skoda Workshop Repair Guides

Skoda Workshop Service and Repair Manuals

Brakes, hydraulics, regulator, servo > < Foot Controls, Brake Pedal
Removing and installing brake pads and brake caliper FN 3
Special tools and workshop equipment required
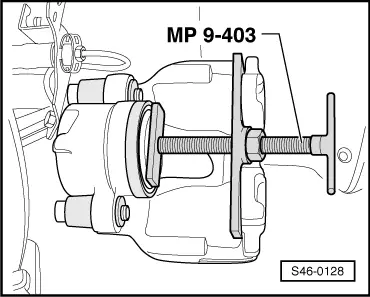
t  Piston jig -MP9-403-
t  Brake filling and bleeding device, e.g. -VAS 5234- or -ROMESS S15-
t  Brake fluid → Chapter
Removing:
  Note
t  When removing mark the brake pads you intend to keep using. Install in the same location, as otherwise this may cause uneven braking!
t  Do not unscrew the brake hose when replacing the brake pad.
   
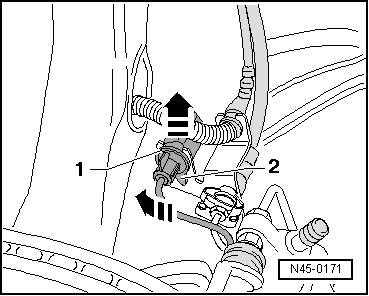
–  Disconnect plug connector -1- for vehicles with a brake pad wear indicator.
–  Lift the fixing lug on the underside of the plug -2- slightly and then turn in the -direction of the arrow- though 90°.
–  Pull the lower part of the plug in the -direction of the arrow- out of the holder.
  N45-0171
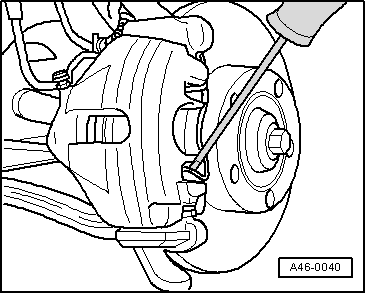
–  Lever up the retaining spring of the brake pad out of the brake caliper housing using a screwdriver and remove.
  A46-0040
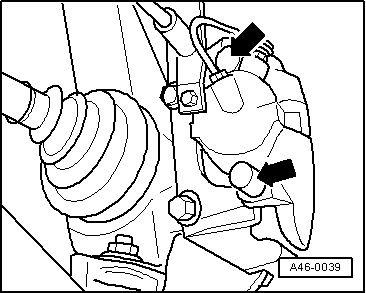
–  Remove caps -arrows-.
  A46-0039
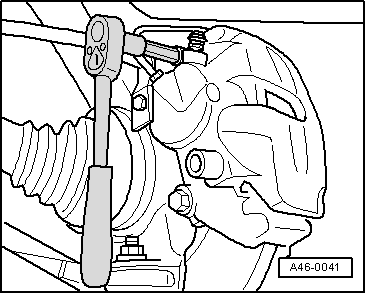
–  Unscrew and remove the two guide bolts from the brake caliper.
–  Remove the brake caliper and secure with wire in such a way that the weight of the brake caliper does not burden or damage the brake hose.
–  Take out the brake pads from the brake caliper or from the brake carrier.
Installing:
  Caution
Brake fluid is toxic and must never be sucked up by mouth!
  Note
t  Drain brake fluid from the brake fluid reservoir using a ventilation bottle before pushing the piston back in.
t  Use the bleeding bottle to drain the fluid.
t  Use alcohol only to clean the brake caliper housing.
–  Clean the brake caliper.
  A46-0041
–  Push piston back with piston jig -MP9-403-.
  Note
t  Do not interchange the inside and outside brake pads. Pay attention to identification.
t  Only the inner brake pad (with spreader spring) has an arrow. The arrow must point in the turning direction of the brake disc when driving forwards. Noise can be generated if it is assembled incorrectly.
t  When inserting the outer brake pad ensure that it does not stick to the brake caliper housing before reaching its correct installed position.
t  Do not damage the surface to be glued.
  S46-0128
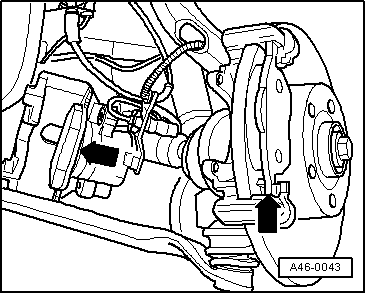
–  Insert the brake pad with retaining spring -arrow- into the brake caliper housing (piston).
–  Remove the protective foil from the supporting plate of the outer brake pad.
–  Place the outer brake pad on the brake carrier -arrow-.
–  Screw the brake caliper with both guide bolts to the brake carrier.
–  Insert the caps of the guide bolts.
–  Insert retaining spring in brake caliper housing.
–  Insert the plug connector for the brake pad wear indicator into the holder on the brake caliper.
The cable for the brake pad wear indicator must be laid between the brake carrier and the brake pipe.
–  Attach the wheel.
  Note
t  After each brake pad replacement forcefully apply the brake pedal repeatedly to ensure the brake pads go into their normal operating position.
t  Check brake fluid level after replacing the brake pads, if necessary top up with brake fluid.
  A46-0043
Tightening torques:
Brake caliper to brake carrier30 Nm
Wheel bolts120 Nm


Brakes, hydraulics, regulator, servo > < Foot Controls, Brake Pedal