
Yeti
| Summary of components |
| The types of joints must be distinguished according to the diameter → Chapter. |
 Note
Note| t | Before removing the joints and the joint boots, thoroughly clean their surrounding. |
| t | When disassembling the joint, remove the old lubricant and any dirt present. |
| t | Clean the joint with great care. |
| t | Dispose of old lubricant and cleaning agent in compliance with the applicable regulations. |
| t | Place removed and cleaned parts on a clean surface and if necessary cover. Do not use fuzzy cloths! |
| t | Carefully cover removed parts if the repair is not completed immediately. |
| t | Only install clean parts: Remove spare parts from their wrapping immediately before installing. Do not use any parts which have been stored unwrapped (e.g. on a shelf or in a tool box etc...). |
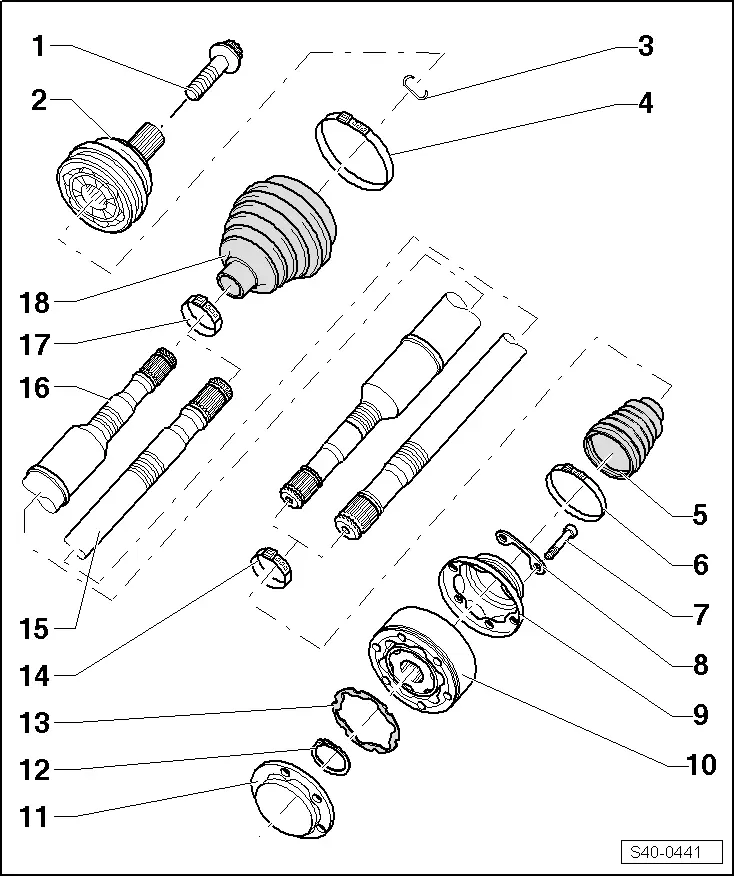
| 1 - | Screw, 70 Nm + 90° |
| q | removing and installing → Chapter |
| q | replace after each removal |
| 2 - | Outer CV joint |
| q | must be replaced completely |
| q | Grease quantity → Chapter |
| q | removing → Chapter |
| q | installing → Chapter |
| q | check → Chapter |
| q | Assignment → Electronic Catalogue of Original Parts |
| 3 - | Circlip |
| q | replace after each removal |
| q | insert in the shaft groove |
| 4 - | Open warm-type clamp |
| q | replace after each removal |
| q | tensioning → Fig. |
| 5 - | Joint boot for inner CV joint |
| q | without ventilation hole |
| q | inspect for tears and chafing points |
| q | Assignment → Electronic Catalogue of Original Parts |
| 6 - | Open warm-type clamp |
| q | replace after each removal |
| q | tensioning → Fig. |
| 7 - | Screw, 70 Nm |
| q | replace after each removal |
| q | first of all pre-tighten all screws crosswise to 10 Nm and subsequently tighten the screws crosswise to final torque |
| q | M10 x 52 |
| 8 - | Shim |
| q | replace after each removal |
| 9 - | Cover |
| q | carefully remove with a drift |
| q | Before the installation on the CV joint cover the sealing surface with -D 454 300 A2-. |
| q | The adherend must be free of grease and oil! |
| 10 - | Inner CV joint |
| q | must be replaced completely |
| q | Grease quantity → Chapter |
| q | pressing off → Fig. |
| q | pressing on → Fig. |
| q | check → Chapter |
| 11 - | Screw cap |
| q | replace after each removal |
| q | drive out of the joint with a drift → Fig. |
| 12 - | Circlip |
| q | removing and installing with circlip pliers |
| 13 - | Gasket |
| q | The adherend must be free of grease and oil |
| q | replace after each removal |
| q | Pull off protective foil and stick in joint |
| q | Assignment → Electronic Catalogue of Original Parts |
| 14 - | Open warm-type clamp |
| q | replace after each removal |
| q | tensioning → Fig. |
| 15 - | Drive shaft |
| 16 - | Drive shaft |
| 17 - | Open warm-type clamp |
| q | replace after each removal |
| q | tensioning → Fig. |
| 18 - | Boot |
| q | inspect for tears and chafing points |
| q | Assignment → Electronic Catalogue of Original Parts |