
Yeti

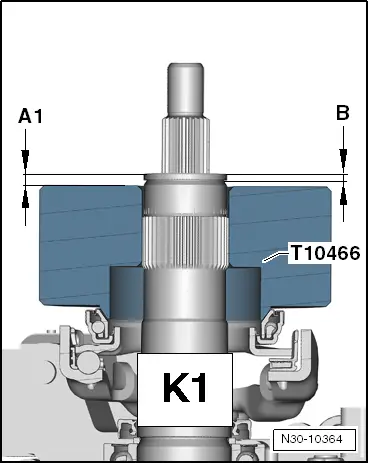
| 1 - | Adjusting washer for „K1“ |
| q | Determine thickness → Chapter |
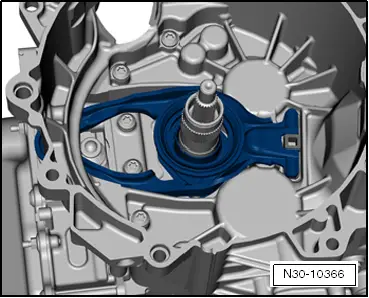
| 2 - | Large engaging lever for „K1“ |
| q | together with large engaging bearing |
| 3 - | Hinge bearing |
| q | for large engaging lever Pos. 2 |
| q | is not replaced |
| 4 - | Small engaging bearing for „K2“ |
| 5 - | Adjusting washer for „K2“ |
| q | Determine thickness → Chapter |
| 6 - | Guide bushing-top part |
| q | for small engaging lever Pos. 7 |
| q | is removed and installed together with the guide bushing-bottom part Pos. 7 |
| 7 - | Small engaging lever for „K2“ |
| q | is removed and installed together with the top and bottom part of the guide bushing |
| 8 - | Ball pin |
| q | for small engaging lever Pos. 7 |
| 9 - | Screw, 8 Nm + torque a further 90° (1/4 turn) |
| q | replace |
| 10 - | Guide bushing-bottom part |
| q | for small engaging lever Pos. 7 |
| q | is removed and installed together with the guide bushing-top part Pos. 6 |
|
 Note
Note
|
|
|
|
Note
|
|
|
|
Note
|
|
|
|
|
|
Note
|
|
Note
|
|
|
|
 WARNING
|
|
|
|
|
|
|
|
|
|
|
|
| Determined thickness of the adjusting washer mm | Available adjusting washers thickness in mm | Part number |
| 1,21...1,60 | 1,50 | 0AM 141 383 |
| 1,61...1,80 | 1,70 | 0AM 141 383 A |
| 1,81...2,00 | 1,90 | 0AM 141 383 B |
| 2,01...2,20 | 2,10 | 0AM 141 383 C |
| 2,21...2,40 | 2,30 | 0AM 141 383 D |
| 2,41...2,60 | 2,50 | 0AM 141 383 E |
| 2,61...2,80 | 2,70 | 0AM 141 383 F |
| 2,81...3,00 | 2,90 | 0AM 141 383 G |
| 3,01...3,20 | 3,10 | 0AM 141 383 H |
| 3,21...3,40 | 3,30 | 0AM 141 383 J |
| 3,41...3,80 | 3,50 | 0AM 141 383 K |
|
|
|
|
|
|
|
|
|
|
|
|
|
|
|
|
|
|
|
|
|
|
| Determined thickness of the washer | Available adjusting washers thickness in mm | |
| from | to | |
| 0,31 | 0,90 | 0,8 |
| 0,91 | 1,10 | 1,0 |
| 1,11 | 1,30 | 1,2 |
| 1,31 | 1,50 | 1,4 |
| 1,51 | 1,70 | 1,6 |
| 1,71 | 1,90 | 1,8 |
| 1,91 | 2,10 | 2,0 |
| 2,11 | 2,30 | 2,2 |
| 2,31 | 2,50 | 2,4 |
| 2,51 | 2,70 | 2,6 |
| 2,71 | 3,30 | 2,8 |
|
|
|