skoda Workshop Repair Guides

Skoda Yeti Workshop Service and Repair Manuals

Cylinder head > < Camshaft timing chain - Summary of components
Removing and installing camshaft timing chain
Special tools and workshop equipment required
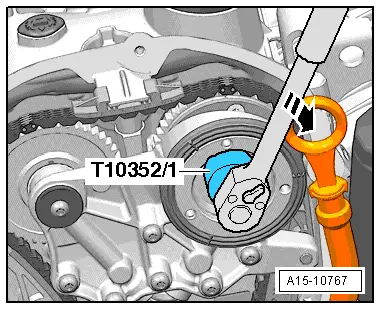
t  Assembly tool -T10352/1-
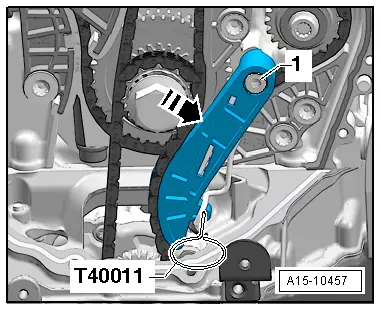
t  Rig pin -T40011-
Removing
–  Remove top cover for timing chain → Chapter.
  Caution
The control valve has a left-hand thread.
   
–  Remove control valve with assembly tool -T10352/1- in -direction of arrow-.
  A15-10767
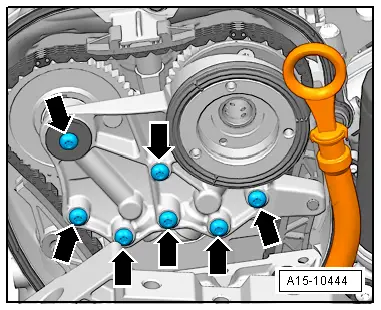
–  Release screws -arrows- and remove bearing frame.
  A15-10444
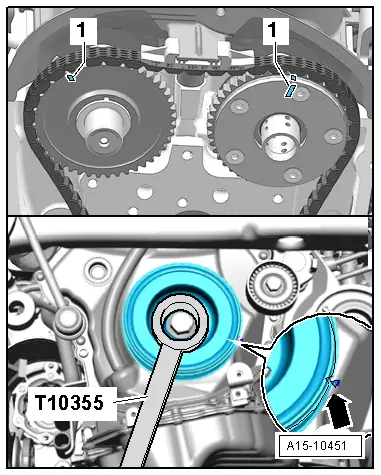
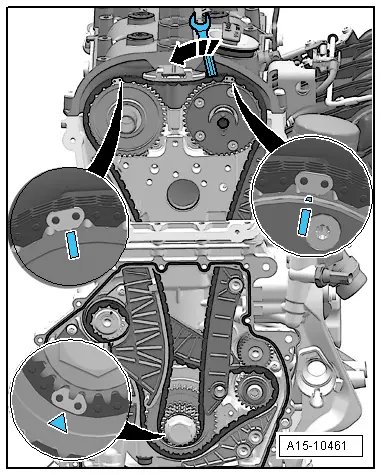
–  Insert vibration damper with counterholder - T10355- into position „TDC“-arrow-.
l  The notch at the vibration damper must be opposite the arrow marking on bottom cover for timing chain.
l  The markings -1- of the camshaft must point upwards.
–  Remove bottom cover for timing chain → Chapter.
  A15-10451
–  Press the chain tensioner of the oil pump in -direction of arrow- and lock with rig pin -T40011-.
–  Remove chain tensioner of oil pump -1-.
–  Remove drive chain for oil pump from chain sprocket at the crankshaft.
  Note
For the following working step a second mechanic is required.
  A15-10457
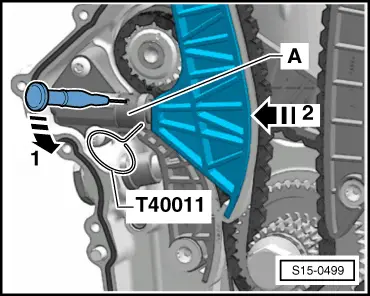
–  Use a suitable cross-head screwdriver (approx. 2 mm) to lift the locking wedge of the chain tensioner in -direction of arrow 1-, press the tensioning rail in -direction of arrow 2- and secure the chain tensioner with rig pin -T40011-.
  Caution
t  The lock washer -A- of the chain tensioner must not be bent or levered off!
t  If the automatic resetting of the chain tensioner does not function, the timing chain can jump over a tooth at a cold start - risk of engine damage!
  S15-0499
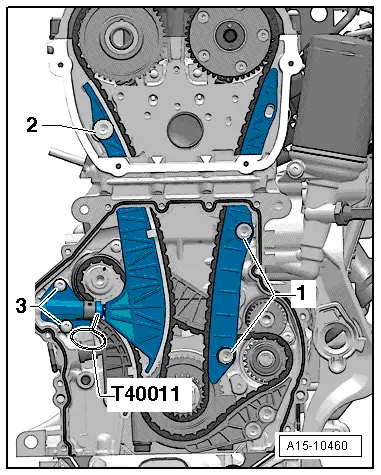
–  Remove tensioning rail -2-.
  Note
The inlet camshaft jumps in the running direction of the engine.
–  Remove sliding rail -1-.
–  Remove timing chain.
Install
  Note
t  The following work sequence must be performed in one work step, to do so a second mechanic is required.
  A15-10460
t  The coloured links of the timing chain must be positioned on the markings of the chain sprockets.
t  Hold the wrench until the sliding rail and the tensioning rail are installed.
–  Place timing chain onto outlet camshaft.
–  Place timing chain onto crankshaft.
–  Turn inlet camshaft with wrench in -direction of arrow- and fit timing chain.
  A15-10461
–  Install sliding rail and tighten screws -1-.
–  Install tensioning rail and tighten screw -2-.
  A15-10460
–  Fit on bearing frame and screw in screws -arrows- by hand.
–  Remove the locking pin -T40011-.
–  Tighten the screws -arrows- for the bearing frame → Chapter.
–  Install control valve (left-hand thread) → Chapter.
Further installation occurs in reverse order. However, pay attention to the following:
t  Tightening torques: → Chapter
–  Install bottom cover for timing chain → Chapter.
–  Install top cover for timing chain → Chapter.
  A15-10444

Cylinder head > < Camshaft timing chain - Summary of components