
ForTwo L3-1.0L (2009)
10
Provide for sufficient pressure by screwing in injector piston (10.3) (picture B).
Observe deformation of rubber nozzle (10.1) of injector (10) to achieve good repair results. The opening is widened (picture B) if sufficient
pressure is present.
The pressure should not be present more than 90 s.
11
Hold injector (10) to prevent unscrewing from tool holder (1) and provide for vacuum by unscrewing injector piston (10.3) up to the thread end
(picture A).
Observe deformation of rubber nozzle (10.1) to achieve good repair results. The opening is smaller (picture A) if sufficient vacuum is present. Do
not remove injector piston (10.3) beyond end of thread to ensure that vacuum is maintained.
The thread end is indicated by a cracking noise when unscrewing. Maintain vacuum at least as long as pressure. The longer the better.
12
Increase contact pressure of injector (10) on windshield by screwing injector (10) into tool holder (1).
Observe damaged points coming from cracks to prevent additional damage.
13
Repeat steps 10 to 12 (8 to 12 times). Increase time of pressure 50 % for each repetition.
The air is completely removed, when air pockets are no longer visible under vacuum after an additional waiting time. Air not completely removed
can be recognized as small black spots. Perfect repair does not have black spots. Otherwise, repeat until air pockets are no longer visible.
14
Check results by holding white background behind.
If the repair results are not satisfactory, repeat steps 10 to 14 by maintaining longer pressure and vacuum (2 to 5 minutes) until air pockets are no
longer visible.
15
Cut off an approx. 2 to 3 cm strip of curing foil (11) with bow-shaped blade (7).
16
Loosen clamping lever (2) and pivot tool holder (1) to side using injector (10).
As long as the filler resin (8) is not yet cured, it is possible to continue work at any time.
17
Slightly wipe out filler resin (8) in damaged point using lint-free cloth.
18
Apply a drop of filler resin (9) at top of damaged point and attach prepared strip of curing foil (11) first at bottom of mark and lay over area of
impact.
Avoid formation of air pockets. Do not press curing foil (11) down; this could endanger the repair result.
If applicable, repeat operation.
19
Remove injector (10) from tool holder (1) and screw in injector piston (10.3) one thread.
20
Store injector (10) in opaque bag to prevent filler resin (8) from curing.
Storing filler resin (8) and injector (10) at 4 °C to 8 °C in a refrigerator prolongs applicability significantly.
21
Position UV curing lamp (6) above area of impact, switch on and allow filler resin (9) to cure for at least 5 minutes.
22
Switch on UV curing lamp (6) and remove.
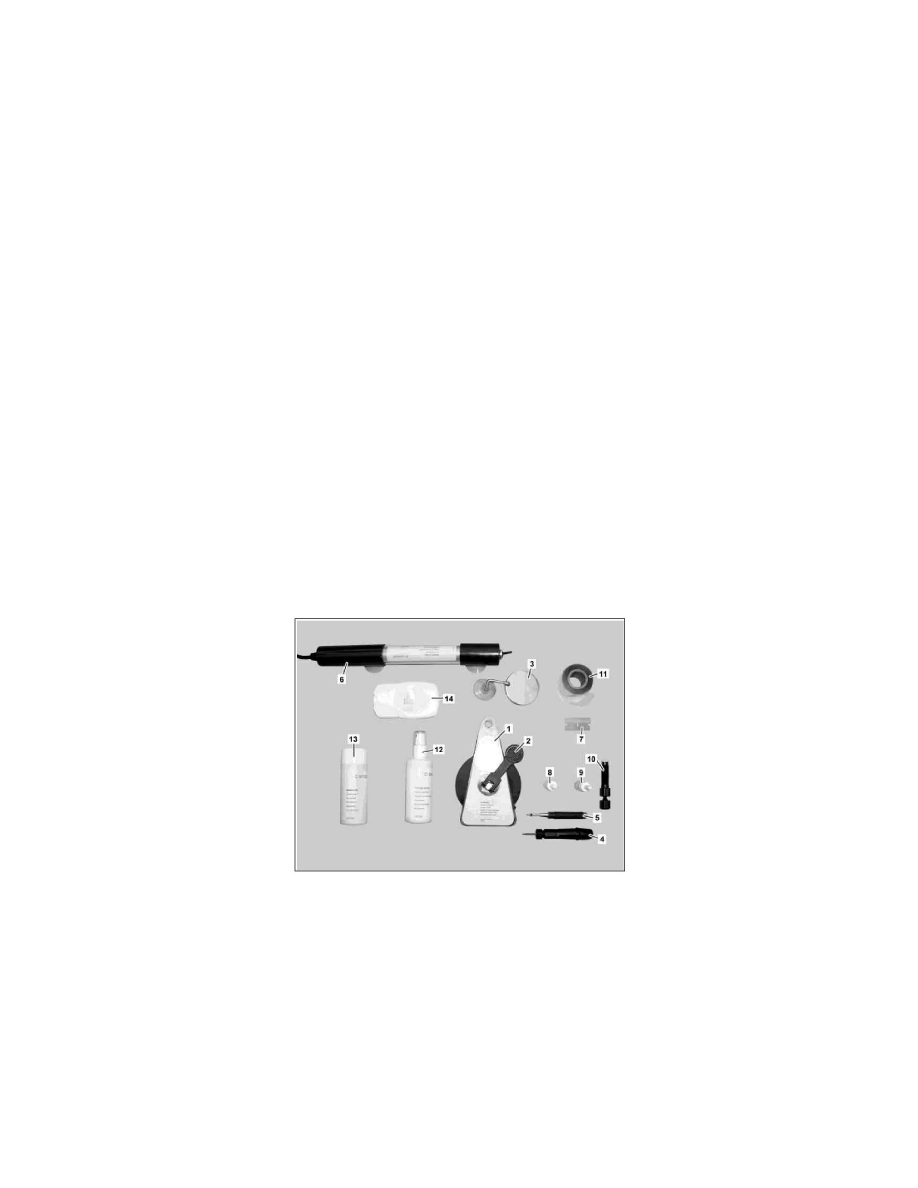
AR67.10-P-1600-03MCC Finish windshield repair
AR67.10-P-1600-03MCC Finish Windshield Repair
1
Tool holder
2
Clamping lever
3
Inspection mirror
4
Milling cutter
5
Stone impact cracker
6
UV curing lamp
7
bow-shaped blade
8
Filler resin
9
Finish resin
10
Injector
11
Curing foil
12
Cleaning agents
13
Adhesion gel
14
Finish polish