
Celica L4-2366cc 22R (1983)
Brake Caliper: Service and Repair
Front
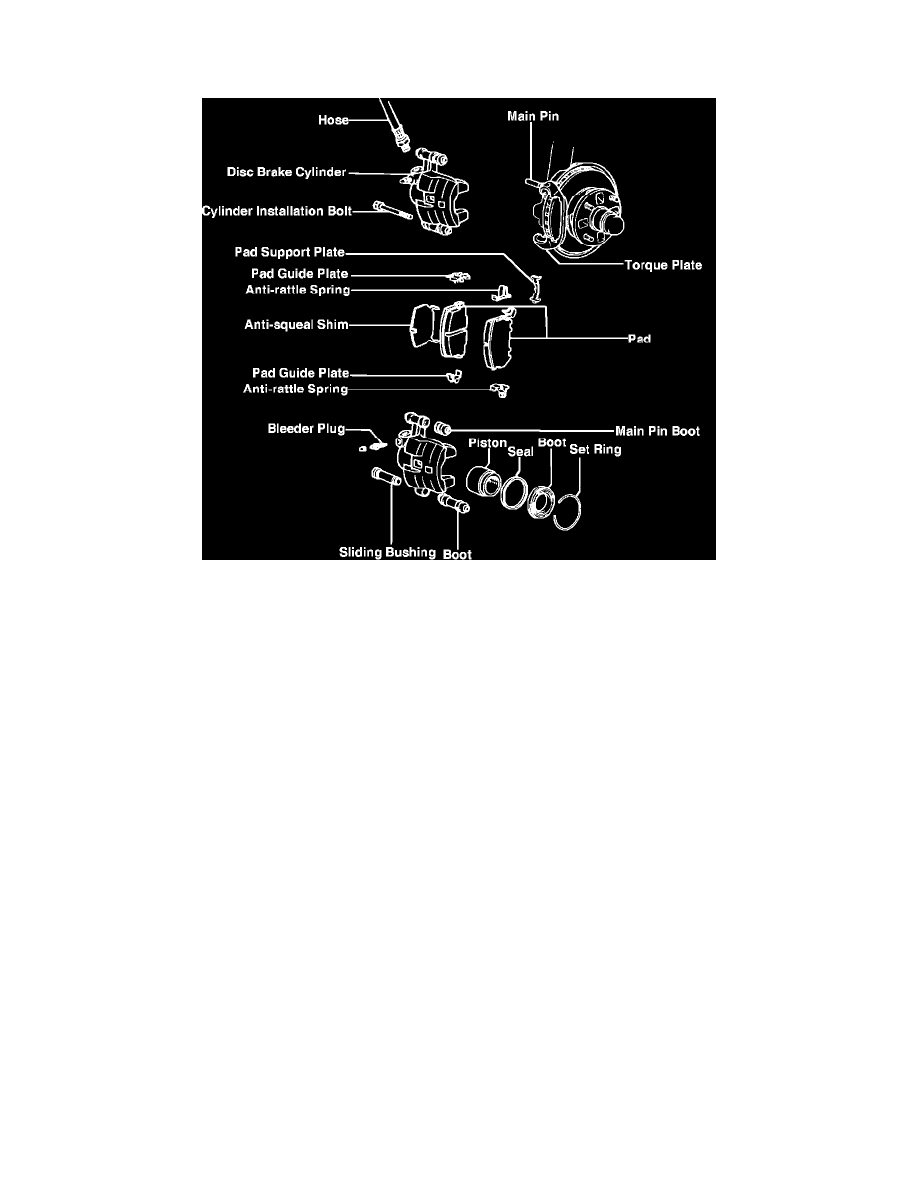
Fig. 10 AD type disc brake assembly. Corolla RWD, Supra & 1984-85 Celica
Pads, Replace
1.
Raise and support front of vehicle, then remove tire and wheel assembly. On some Supra models, temporarily install lug nuts to hold rotor in
place.
2.
On some Supra models, remove brake hose bracket attaching bolts from steering knuckle.
3.
On all models, while holding the sliding bushing, remove cylinder installation bolt, Fig. 10.
4.
On 1982-85 Supra models, rotate caliper upwards on main pin, then install a bolt into torque plate hole to secure caliper. On except 1982-85 Supra
models, rotate caliper upwards and remove. Suspend caliper with wire using caution not to stretch brake hose.
5.
On all models, remove pads and anti-squeal shim.
6.
Remove anti-rattle springs, support and pad guide plates.
7.
Install new anti-rattle springs, support and pad guide plates.
8.
Siphon a small amount of fluid from master cylinder reservoir.
9.
Slowly force piston into caliper bore.
10.
Install new pads and anti-squeal shim. If pads are equipped with wear indicators, install outside pad so indicator is at top side of caliper.
11.
Rotate caliper into place, then install cylinder installation bolt and torque to 12-17 ft. lbs. on 1982-85 Supra models. On except 1982-85 Supra
models torque bolt to 27 ft. lbs.
12.
On except 1982-85 Supra models, install brake hose bracket attaching bolts. Torque attaching bolts to 14 ft. lbs.
13.
On all models, fill master cylinder, then pump brake pedal until a firm pedal is obtained.
Caliper, Replace
1.
Disconnect brake hydraulic hose at frame bracket, then at caliper.
2.
Remove caliper by following steps 1 and 2 of above procedure, then lift caliper up and pull away from torque plate main pin, Fig. 10.
3.
Reverse procedure to install.
Disc, Replace
1.
Remove caliper and torque plate as an assembly. Suspend assembly with wire.
2.
Remove grease cap, cotter pin, lock cap, locknut and washer, then remove disc from vehicle.
3.
To install, assemble disc and bearings on axle. Torque locknut to 22 ft. lbs., then seat bearings by rotating hub several times and back off nut until