
Celica L4-2366cc 22R (1983)
1.
Remove sliding bushing and boot, Fig. 18.
2.
Remove main pin boot using a suitable chisel.
3.
Remove piston using compressed air. When using air pressure to remove caliper piston, place a shop towel over piston to prevent it from
flying out.
4.
Remove caliper boot, set ring and piston seal from caliper.
5.
Reverse procedure to install, noting the following:
a. Apply suitable grease to the main pin boot, sliding pin and boot, piston seal and piston and dust boot.
b. Install main pin boot using a press and suitable socket.
c. Ensure dust boot does not fold under during installation.
Parking Brake Shoes, Replace
1.
Raise and support rear of vehicle, then remove tire and wheel assembly.
2.
Remove rear caliper, refer to "Caliper, Replace".
3.
Remove rotor disc.
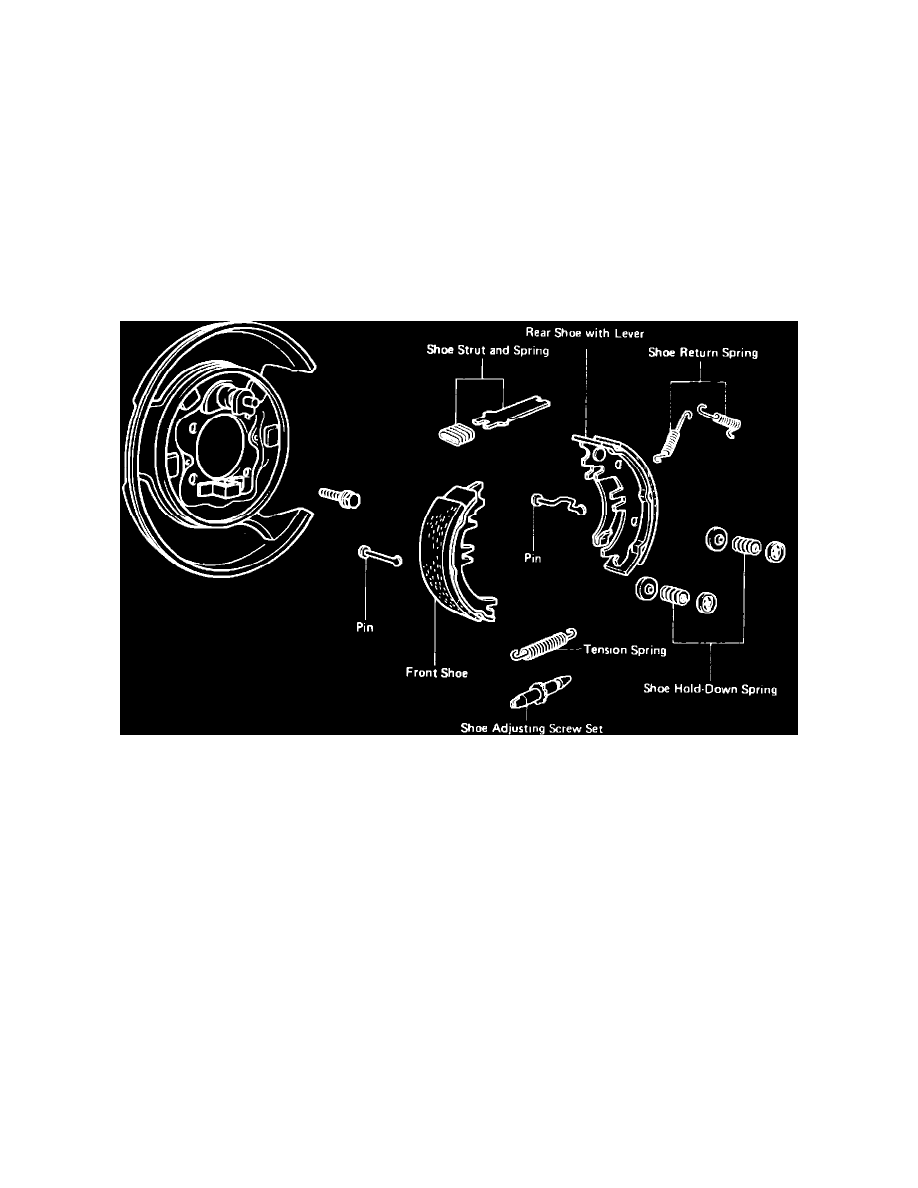
Fig. 17 Rear disc brake parking brake assembly. Supra, Celica & 1984 Cressida (if equipped)
4.
Remove shoe return springs, Fig. 17.
5.
Remove shoe strut and spring.
6.
Slide front shoe from under shoe hold-down spring, then remove shoe adjusting screw, tension spring and remove shoe.
7.
Slide rear from shoe hold-down spring, then disconnect parking brake cable from shoe lever.
8.
Measure brake drum inside diameter. Maximum diameter is 6.61 inches.
9.
Measure brake shoe lining thickness. Minimum thickness is .039 inch. If lining is less than minimum, replace brake shoes.
10.
Measure clearance between rear parking brake shoe and parking brake lever. Clearance should be .0138 inch. If clearance is incorrect, replacement
shims are available to provide proper clearance.
11.
Apply non-melting grease on brake backing plate shoe flats, then on shoe sliding surface.
12.
Lubricate adjusting screw with non-melting lubricant.
13.
Connect parking brake lever to cable.
14.
Slide rear shoe into position under shoe hold-down spring, then install tension spring.
15.
Install adjusting screw on rear shoe and partially install on front shoe.
16.
Slide front shoe into position under shoe hold-down spring. Ensure adjusting screw and tension spring are positioned properly.
17.
Install front shoe return spring, then rear return spring.
18.
Lightly sand brake drum inner surface, then align the service hole on disc with groove on axle shaft and install disc.
19.
Install caliper, then adjust parking brake. Refer to "Parking Brake, Adjust".