
Corolla LE Sedan L4-1762cc 1.8L DOHC MFI (1998)
d. Install the timing chain cover, O-ring and water pump with the 17 bolts and nut. Uniformly tighten the bolts and nut in several passes.
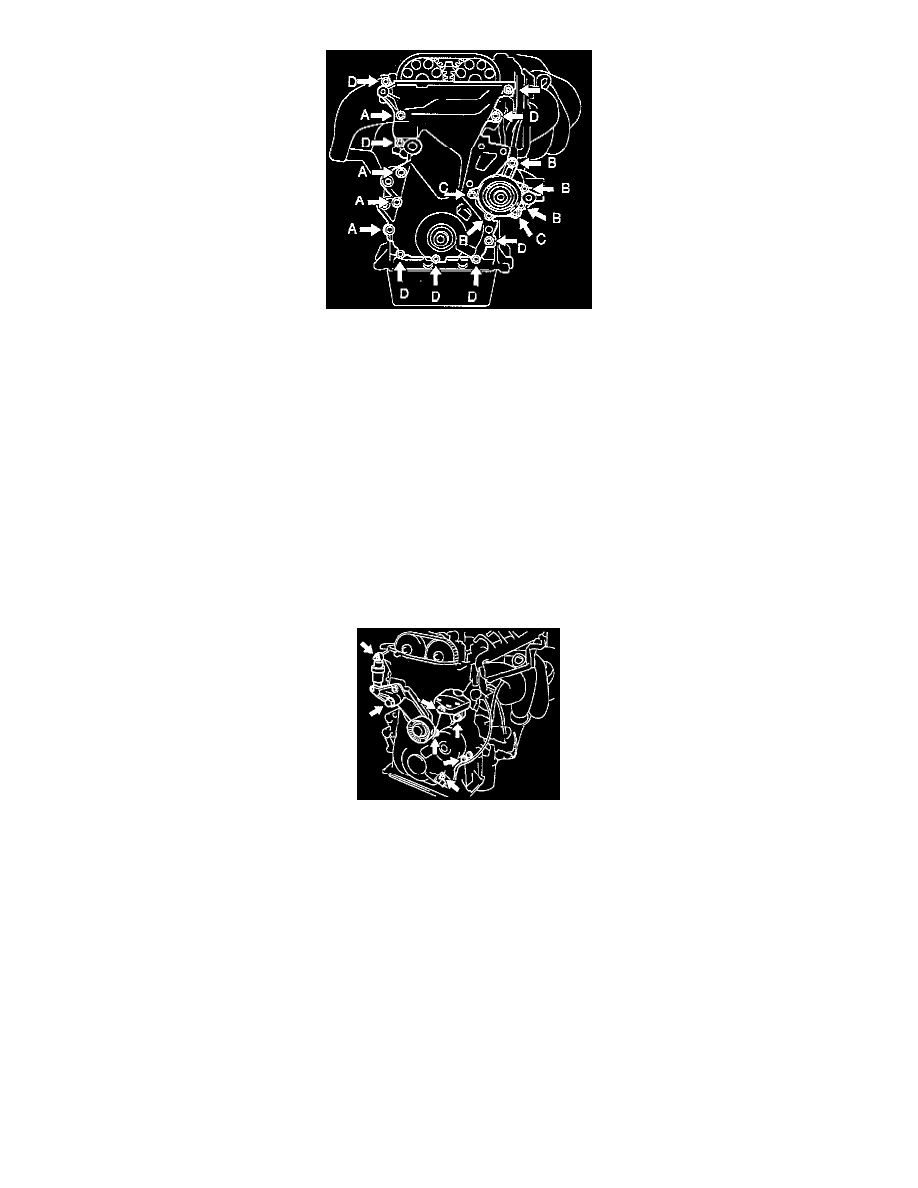
HINT: Each bolt length in indicated in the illustration.
-
A: 45 mm (1.77 inch)
-
B: 35 mm (1.38 inch)
-
C: 30 mm (1.18 inch)
-
D: 25 mm (0.98 inch)
Torque:
10 mm head:
- Bolt C: 9 Nm (80 inch lbs.)
- All others: 11 Nm (8 ft.lb)
12 mm head: 18.5 Nm (14 ft.lb)
NOTICE:
-
Pay attention not to wrap the chain and slipper over the chain cover seal line.
-
After installing the chain cover, you must install the mounting bracket and water pump within 15 minutes.
e. Using a torx wrench socket (E8), install the stud bolt.
Torque: 9.3 Nm (82 inch lbs.)
8. Install RH engine mounting bracket.
a. Apply seal packing to threads of the mounting bolt.
Seal packing: P/N 08826-00080 or equivalent
HINT: Do not apply seal packing to 2 or 3 threads of the bolt end.
b. Install the mounting bracket with the 3 bolts.
Torque: 47 Nm (35 ft.lb)
9. Install drive belt tensioner.
a. Check the appearance before installing the drive belt tensioner.
If in case of having the oil leakage, crack, and etc., replace the drive belt tensioner.
b. Install the drive belt tensioner.
Torque:
-
Bolt: 69 Nm (51 ft.lb)
-
Nut: 29 Nm (21 ft.lb)
c. Hook the tool on the hexagonal portion of the drive belt tensioner bracket and operate drive belt tensioner 3 times with full stroke.