|
Subject:
Leaks in the F18 Manual Transmission
Vehicles:
All Astra - F, Vectra - B and Calibra vehicles
with F 18 manual transmission
Condition:
1. Leaks can occur between the end shield and the
transmission housing on all F 18 manual transmissions without a
green or yellow mark on the edge of the end shield cover (1) or a green
mark at the centre (2).
In isolated cases this can lead to transmission oil
spillage in the left hand area of the front axle.
2. All F 18 transmissions for Vectra - B
delivered by up to approx. September 1996 are equipped with a plastic plug in
the speedo - meter drive opening.
|


|
|
Cause:
Re. 1. Inadequate tightening torque of the 6 fastening
bolts (arrows) for the end shield cover and end shield to transmission
housing.
Re. 2. Only Vectra - B F 18 manual
transmissions have the speedometer opening sealed with a metal plug (closure
cap) in production.
All other F 18 transmissions are equipped
with a speedometer drive in this opening. For these service transmissions,
the speedometer drive opening is closed with a plastic plug.
|

|
|
Remedy:
Re. 1:
Since these leaks can appear under various circumstances,
the individual operations for the affected transmissions will be described
below.
Visual Inspection
Raise vehicle and inspect whether the gasket (arrow)
between the transmission housing and the end shield is still properly seated.
There must not be a gap present.
|

|
|
Loosen the 6 fastening bolts for the end shield on
the transmission housing (arrows) by approx. 30° consecutively and then
retighten - 20 Nm / 15 lbf. ft.
Subsequently tighten each of these fastening bolts a
further 40°.
Once this operation has been completed the end shield must
be marked with a green dot (1).
|

|
|
Visual Inspection
Before performing this operation, take a welding rod
(3 mm / 0.12 in. diameter and approx. 250 mm /
10 in. length) and flatten one of its ends (1), so that it has a
maximum thickness of 0.2 mm / 0.008 in. for a length of
10 mm / 0.4 in.
|

|
|
If a small gap was found between the end shield and the
transmission housing during the 1st step, the depth of the gap must be
checked using the previously prepared tool.
If the flattened end of the tool can be pushed approx.
2 - 3 mm / 0.08 - 0.12 in. into the gap, the gasket
between the end shield and the transmission housing must be replaced as
follows:
|

|
|
Remove the shift cover from the transmission and place to
one side.
Remove the shift cover gasket from the transmission
housing.
Remove the retaining clip for the wheel set brake rocker
arm (1) in the direction of the arrow.
Remove the rocker arm.
Raise the vehicle slightly and remove the front left wheel.
Partially release the wheel housing panelling.
Raise the vehicle further.
|

|
|
Support transmission with hydraulic jack and rubber pad.
Vehicles with diesel engines:
Remove the upper fastening nut for the right engine damping
block.
Vehicles with petrol engines:
Remove the lower fastening nut from the front right engine
damping block.
Remove the cable from the reversing lamps switch.
Remove the reversing lamps switch.
|

|
|
All vehicles:
Unbolt the front left engine damping block bracket from the
transmission (3 bolts).
Remove the nut (arrow) from the front left engine damping
block. Remove the engine damping block bracket with the engine damping block.
Lower the hydraulic jack until all end shield fastening
bolts on the frame side member are accessible.
|

|
|
Remove all end shield fastening bolts.
Important:
The 5 fastening bolts (arrows) for the end shield cover
must not be removed.
|

|
|
Remove the end shield assembly from the transmission -
note magnets are released.
Attention:
Transmission fluid spills out of the gearbox.
|

|
|
Remove existing gasket from the transmission housing or
remove the end shield and, if necessary, clean the sealing surfaces (arrow).
Thinly coat the sealing surfaces of the end shield
with Grease part no. 90 512 280, catalogue no. 19 48 608
(100 ml).
Then position a new Gasket, part no.
90 344 518, catalogue no. 706 565 on the end shield.
|

|
|
Prior to installation of the end shield in the transmission
housing, note the installation position of the magnets.
Install the end shield with the cover in the transmission
housing.
Install the end shield fastening bolts.
Then tighten all bolts to 20 Nm /
15 lbf. ft.
The 6 fastening bolts (arrows) passing through the end
shield cover must be subsequently tightened a further 40°.
|
|
|
Attach the front left engine damping block bracket to the
transmission and tighten - 60 Nm / 44 lbf. ft.
Attach the left engine damping block to the front axle body
and tighten - 45 Nm / 33 lbf. ft.
Install the reversing lamps switch and tighten -
20 Nm / 15 lbf. ft.
Connect the cable for the reversing lamps switch.
Install the wheel housing panelling.
Install the front left wheel and tighten -
110 Nm / 81 lbf. ft.
Vehicles with diesel engines:
Attach the fastening nut to the right engine damping block
and tighten - 45 Nm / 33 lbf. ft.
Vehicles with petrol engines:
Install the torque support and tighten the fastening
nut - 60 Nm / 44 lbf. ft.
|
|
|
Lower vehicle slightly.
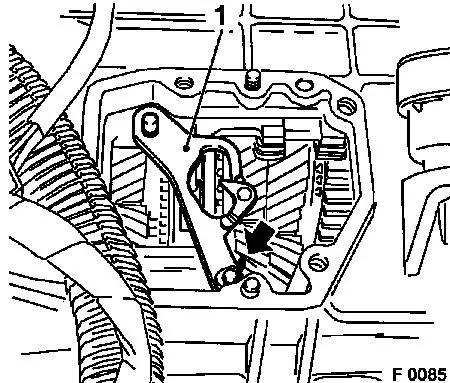
Position the rocker arm for the wheel set brake (1) as
shown in illus. F 0085 and secure using a split pin in the direction
indicated by the arrow.
Important:
Do not drop the split pin into the transmission housing.
|
|
|
Stick a new Gasket for the Shift Cover, part no.
90 470 663, catalogue no. 755 163 to the transmission housing
using grease.
Set transmission in neutral.
Install the shift cover on the transmission housing and
tighten the fastening bolts (arrows) - 15 Nm / 11 lbf. ft.
|

|
|
Check correct fluid level in the transmission; unscrew the
fluid check bolt (1) right, rear.
|

|
|
Unscrew the bleed bolt (1) on the shift cover and
refill with transmission fluid, part no. 90 540 998, catalogue no.
19 40 764, (1 litre) through the bore for the bleed bolt,
until fluid emerges from the checking bore.
Raise vehicle
Install the fluid check bolt and tighten -
4 Nm / 3 lbf. ft. and then tighten a further 45° to 180°.
|

|
|
Subsequently, the transmission must be marked at the centre
of the end shield cover with a green dot (1).
If the visual check indicates that the left side of the
front axle is covered with transmission fluid it is necessary to clean this
side of the front axle and related components and replace components if
required.
|

|
|
Remedy:
Re. 2:
The existing plastic plugs (1) must be replaced by the
closure cap (2) part no. 90 470 781, catalogue no.
724 632 for all F18 manual transmissions supplied by the Service
department for the Vectra - B up to approx.
September 1996 as follows.
|

|

