|
Crankshaft, Remove and Install
 Remove Remove
| 1. |
Detach transmission from engine
| • |
with manual transmission
|
| • |
with automatic transmission 
|
|
| 3. |
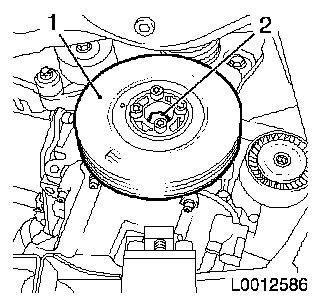
Remove torsional vibration damper (1)
| • |
Unscrew 4x bolts
Note: Counterhold
toothed belt drive gear at bolt (2)
|
|
|
|
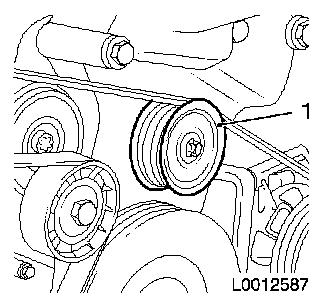
| 4. |
Remove ribbed V-belt guide roller (1)
|
|
|
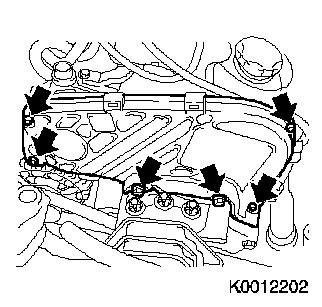
| 5. |
Remove toothed belt cover
| • |
Unscrew 6x bolt (arrows)
|
| • |
4x unclip camshaft sensor wiring harness
|
|
|
|
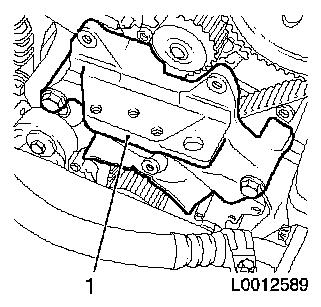
| 6. |
Remove engine damping block adapter (1)
| • |
Unscrew 5x bolts
Note: Note different
bolt lengths
|
|
|
|
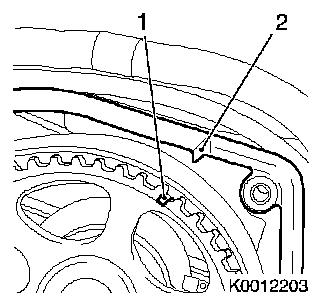
| 7. |
Set cylinder no. 1 to TDC of combustion stroke
Note: The mark on the
camshaft sprocket (1) must align with the mark on the cylinder head
cover (2).
|
|
|
| 8. |
Remove toothed belt (1)
| • |
Slacken the toothed belt tension roller
|
|
|
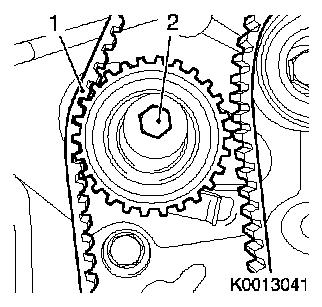
|
| 10. |
Vehicles with manual transmission: remove clutch
|
| 11. |
Remove KM-6263
| • |
Turn rotating spindle back to initial position
|
|
| 13. |
Vehicles with manual transmission: remove flywheel
|
|
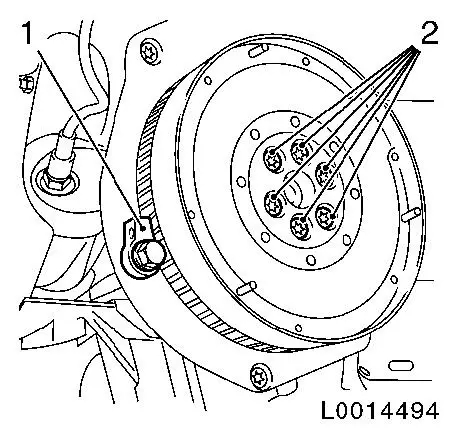
|
| 14. |
Vehicles with automatic transmission: remove drive disc
|
|
|
| 15. |
Place collecting basin underneath.
|
| 16. |
Drain engine oil
| • |
Loosen oil drain bolt
Note: Unscrew the oil
drain bolt slowly until the oil drain hole is open
|
|
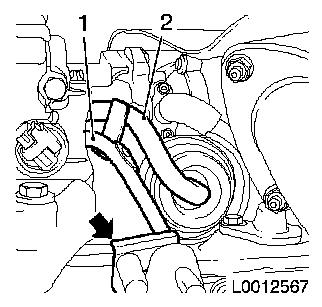
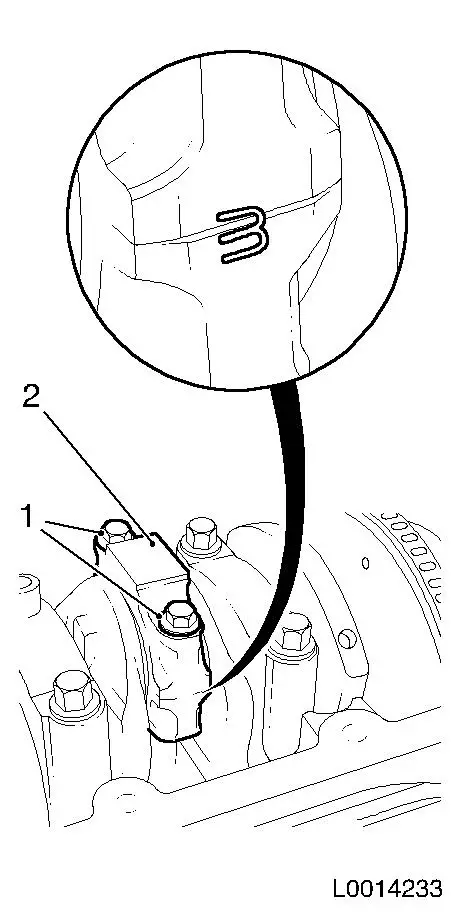
| 17. |
Disconnect residual oil quantity sensor wiring harness plug
(1)
|
| 18. |
Detach engine vent return hose (2)
|
|
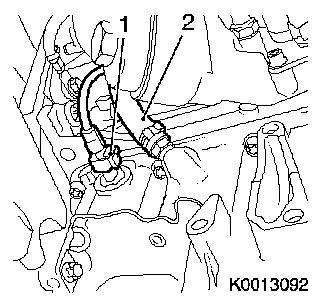
|
| 19. |
Detach vacuum line (2) from oil dipstick guide tube (1)
|
| 20. |
Detach oil dipstick guide tube from oil pan
|
|
|
| 21. |
Remove oil pan
| • |
Unscrew 10x bolts (M8) with EN-46796
|
| • |
Unscrew 4x bolt (M6) with EN-46794
|
|
| 22. |
Attach EN-46730 (1) in conjunction
with KM-956-1 (2) to toothed belt drive
gear
|
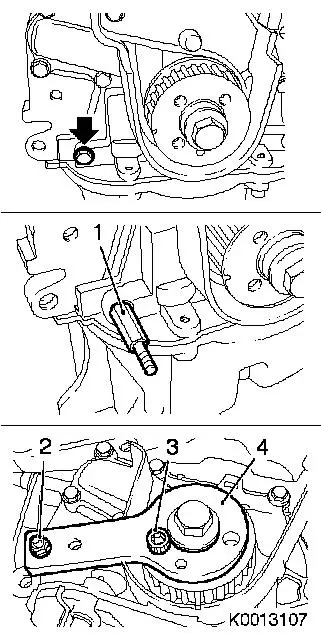
| 23. |
Detach toothed belt drive gear
| • |
Unscrew bolt
Note: Left-handed
thread
|
| • |
Counterhold with EN-47630 in
conjunction with KM-956-1
|
| • |
Remove toothed belt drive gear with EN-47630
|
|
|

|
| 24. |
Remove ribbed V-belt tensioner (1)
| • |
Tension ribbed V-belt tensioner with KM-913-A
|
|
|

|
| 25. |
Remove oil pump
| • |
Unscrew 8x bolt (arrows)
|
| • |
Remove crankshaft seal ring (1)
|
|
|
|
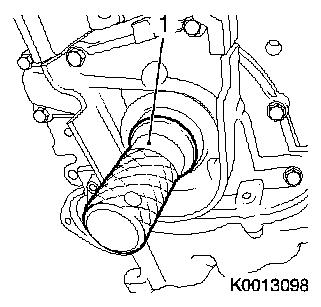
| 26. |
Remove bracket for rear crankshaft seal ring (2)
|
|
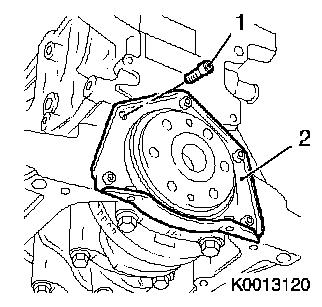
|
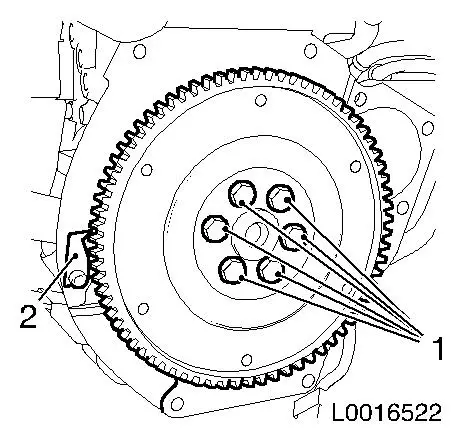
| 27. |
Detach 4x con-rod bearing cap (2) with con-rod bearing
shell
| • |
Unscrew 8x bolts (1)
Note: Note
identification mark on con-rod bearing cap and con-rod. Apply
identification mark if not present
|
|
|
|
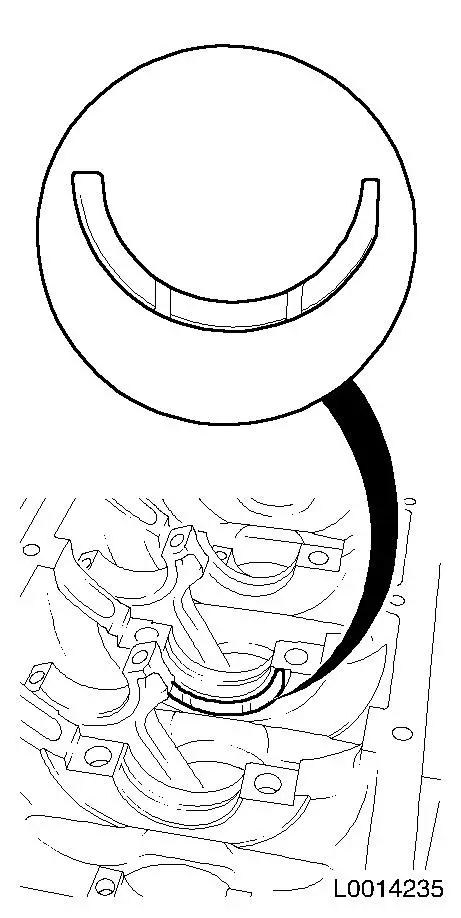
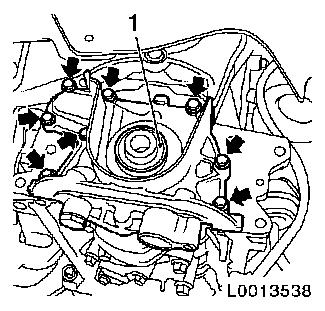
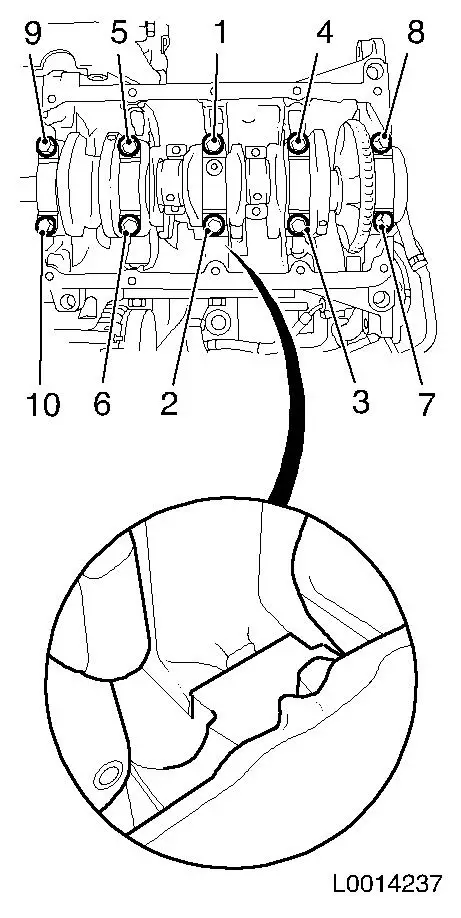
| 28. |
Remove 5x crankshaft bearing cap with crankshaft bearing
shell
| • |
Release 10x bolt in the order shown (1 - 10)
Note: Note marking on
crankshaft bearing cap
|
|
|
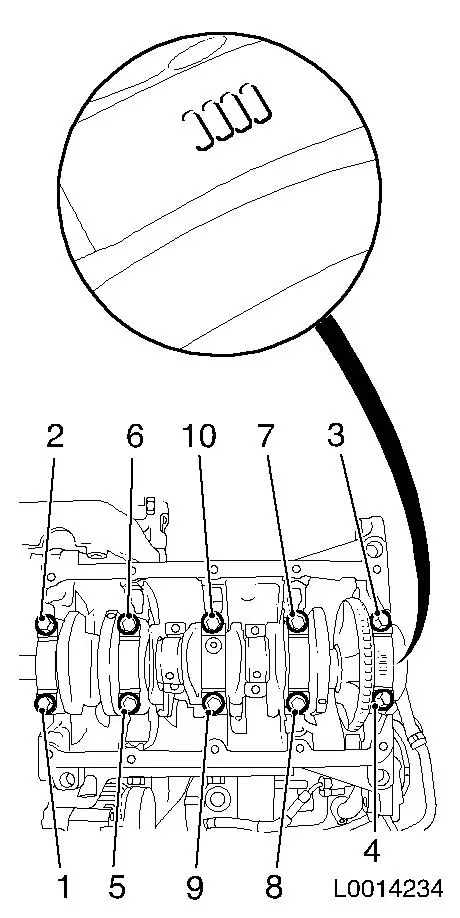
|
| 29. |
Remove crankshaft
Note: Place crankshaft
on wooden blocks
|
| 30. |
Remove 5x crankshaft bearing shell from cylinder block
|
| 32. |
Detach crankshaft pulse pick-up disc (1)
|
|
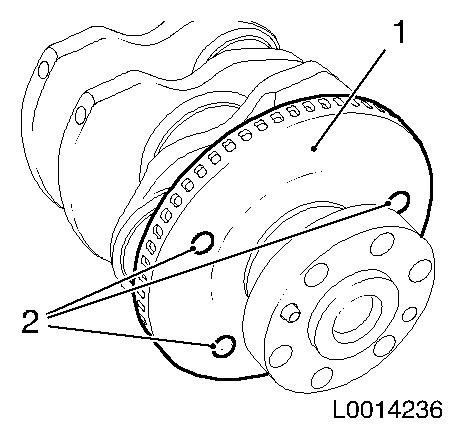
|
 Install
| 34. |
Install crankshaft pulse pick-up disc
| • |
Tighten 3x bolts
Note: Insert bolts with
bolt locking compound (red).
|
|
| 35. |
Replace 8x con-rod bearing shell
|
| 36. |
Replace 10x crankshaft bearing shell
| • |
5x crankshaft bearing cap
|
|
| 37. |
Insert 2x wear ring
| • |
Oil grooves point outwards
|
|
Important: Check installation
position
|
| 38. |
Insert crankshaft
| • |
Coat crankshaft journal with engine oil
Note: Ensure that the
bearing shells and wearing rings are correctly seated
|
|
Important: Note installation
position. Lug points to intake side
|
| 39. |
Install 5x crankshaft bearing cap
| • |
Tighten 10x new bolt in depicted sequence (1 – 10) 25 Nm + 100°
|
|
|
|
| 40. |
Install 4x con-rod bearing cap with con-rod bearing shell
| • |
Tighten 8x new bolt 25 Nm +
60°
Note: Note
identification on con-rod bearing cap and con-rod.
|
|
| 42. |
Install new bracket, rear crankshaft seal ring
| • |
Tighten 5x bolt 9 Nm
Note: Clean thread
before re-using and insert bolt with locking compound (red). The
maximum installation time including torque check is 10 minutes.
|
|
Important: Before fastening,
align oil pump housing with sealing surfaces of the oil pan on the
cylinder block
|
| 44. |
Install oil pump
| • |
Replace crankshaft seal
|
| • |
Tighten 7x bolt (arrows) 9 Nm
Note: Clean thread
before re-using and insert bolt with locking compound (red). The
maximum installation time including torque check is 10 minutes.
|
| • |
Tighten stud bolt (1) from EN-46788
|
| • |
Install oil intake pipe
|
|
|

|
| 45. |
Install oil pump seal ring with EN-46793 (1)
|
|
|
| 46. |
Install ribbed V-belt tensioner
|
| 47. |
Replace toothed belt drive gear
Note: Note locking
| • |
Tighten bolt 340 Nm
Note: Left-handed
thread
|
| • |
Counterhold with EN-47630
|
|
| 48. |
Detach EN-46730 in conjunction with
KM-956-1 from toothed belt drive gear
|
| 49. |
Clean sealing surfaces.
|
| 50. |
Apply sealant
Important: Complete assembly work
within 10 minutes
|
| • |
Apply sealant to oil pan sealing surface
|
|
| 51. |
Install oil pan
| • |
Tighten 10x bolt (M10) 25 Nm
|
| • |
Tighten 4x bolt (M6) 9 Nm
|
|
| 52. |
Attach oil dipstick guide tube to oil pan
|
| 53. |
Attach engine vent return hose
|
| 54. |
Connect residual oil sensor wiring harness plug
|
| 56. |
Vehicles with manual transmission: install flywheel
Note: Note guide
sleeves
| • |
Tighten 6x new bolt 160 Nm
Note: Insert bolt with
locking compound (red). The maximum installation time including
torque check is 10 minutes.
|
|
| 57. |
Vehicles with automatic transmission: install drive disc
| • |
Tighten 6x new bolt 160 Nm
|
|
| 58. |
Attach KM-6263
Important: Fasten KM-6263 but only to engine block, not to oil pan
|
| • |
Tighten 4x bolts
|
| • |
Insert clutch pin KM-6263-30 with
KM-6263-22
|
|
| 61. |
Remove toothed belt tightening roller
|
| 63. |
Install toothed belt tension roller
| • |
Insert tension roller in guide
|
| • |
Screw in bolt
Note: Insert bolt with
locking compound (red). The maximum installation time including
torque check is 10 minutes.
|
|
| 64. |
Set cylinder no. 1 to TDC of combustion stroke
Note: The mark on the
camshaft sprocket must align with the mark on the cylinder head
cover.
|
| 65. |
Install toothed belt
| • |
Observe prescribed direction of rotation
|
Important: Tightened end (1) must
be taut
|
| • |
Position toothed belt
|
|
| 66. |
Tension the toothed belt
| • |
Tension toothed belt tension roller
Note: Push adjusting
lever in direction of arrow with a screwdriver (5) until pointer
(4) of toothed belt tension roller aligns with mark (2).
|
| • |
Tighten bolt, toothed belt tension roller (3) 25 Nm
|
|
|

|
| 67. |
Check crankshaft setting with EN-46788
| • |
Unscrew oil pump bolt (arrow)
|
| • |
Tighten stud bolt (1) EN-46788
|
| • |
Attach positioning disk (4) EN-46788
|
| • |
Remove positioning disk EN-46788
|
|
|
|
| 68. |
Timing, Check
| • |
Turn crankshaft 720° in the
direction of rotation of the engine
|
| • |
Check camshaft position
| – |
The mark on the camshaft sprocket must align with the mark on
the cylinder head cover.
|
|
|
| 69. |
Install engine damping block adapter
Note: Note differing
bolt lengths.
| • |
Tighten 3x bolt (M10) 50 Nm
|
| • |
Tighten 2x bolt (M8) 25 Nm
|
|
| 70. |
Install toothed belt cover
| • |
4x clip in camshaft sensor wiring harness
|
|
| 71. |
Install ribbed V-belt guide roller
|
| 72. |
Install torsional vibration damper
Note: Observe correct
fitting position
| • |
Tighten 4x bolt 25 Nm
Note: Counterhold
toothed belt drive gear at bolt
|
|
| 74. |
Attach transmission to engine
| • |
with manual transmission
|
| • |
with automatic transmission
|
|
| 75. |
Replenish and correct engine oil
|
|