|
Remove and install automatic transmission with
torque converter from engine
 Remove Remove
| 2. |
Detach 2x charge air hose
|
|
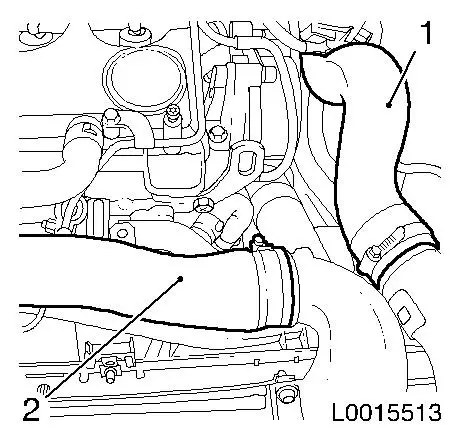
|
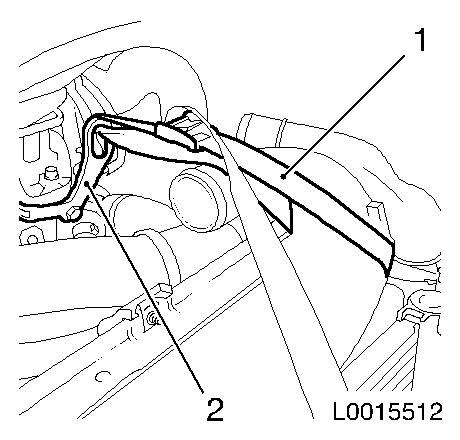
| 3. |
Secure raidator with retaining strap (1) at engine transport
shackle (2)
|
|
|
| 4. |
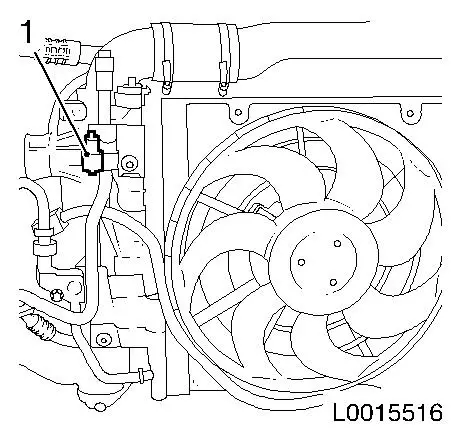
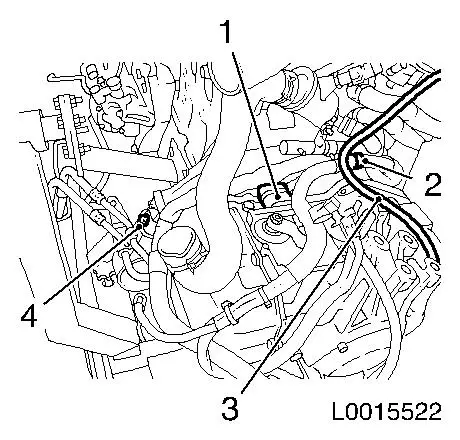
Detach 3x coolant hose from radiator
Note: Place collecting
basin underneath.
| • |
Detach coolant supply hose (3) from radiator
| – |
Unclip from fan housing bracket
|
|
| • |
Detach coolant return hose (4) from radiator
|
| • |
Unclip coolant hose (1) from fan housing
|
| • |
Detach coolant return hose (2) from coolant pipe
|
|
|
|
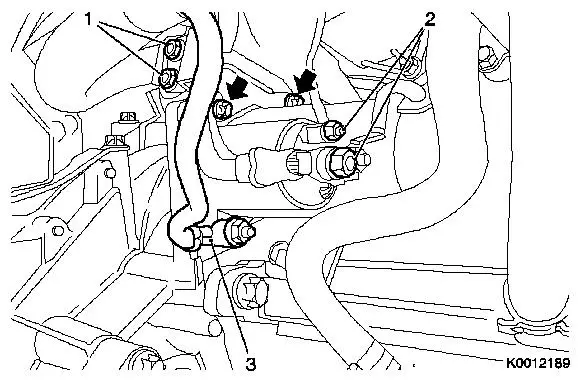
| 5. |
Detach 2x transmission fluid line (3) from oil cooler
Note: Place collecting
basin underneath.
| • |
Unclip 2x protective cap (2)
|
| • |
Unscrew 2x retaining clamp (1)
|
|
|
|
| 6. |
Detach compressor wiring harness
| • |
Disconnect compressor wiring harness plug
|
| • |
Unclip from refrigerant line
|
|
| 7. |
Detach refrigerant line (1) from condenser
|
|
|
| 8. |
Detach engine cooling module
| • |
Unclip 2x vacuum line from radiator
|
| • |
Remove radiator upward from bracket
|
|
| 9. |
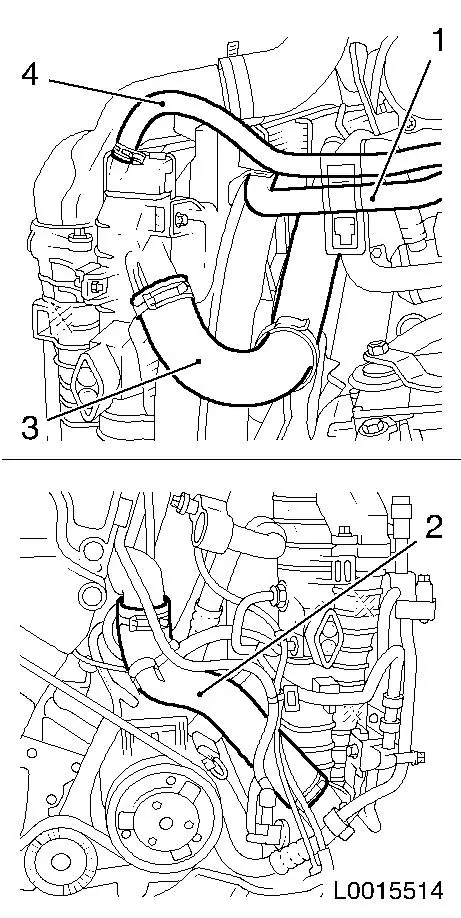
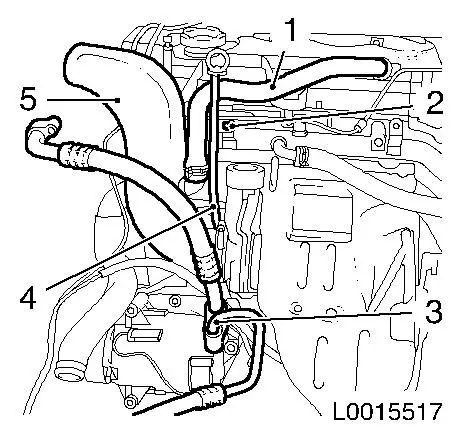
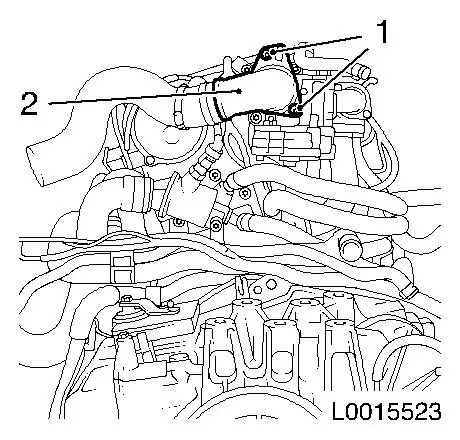
Detach charge air pipe (5) from turbocharger
| • |
Detach hose from cylinder head cover (1)
|
|
| 10. |
Remove oil dipstick guide tube (4)
|
| 11. |
Detach refrigerant line (3) from compressor
|
|
|
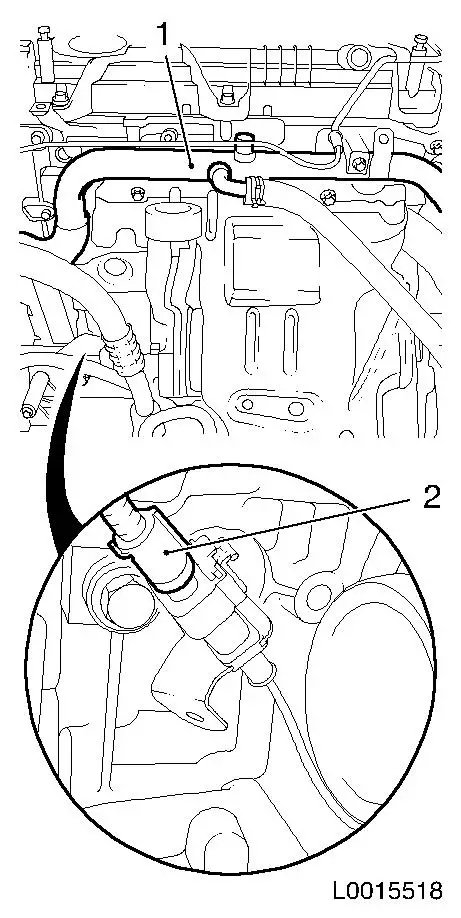
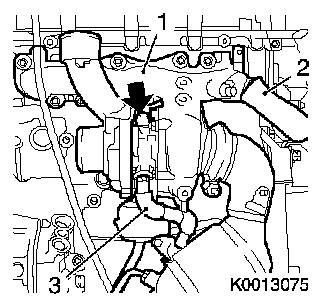
| 12. |
Remove coolant pipe assembly (1)
| • |
Disconnect wiring harness plug of pre-catalytic converter
temperature sensor (2)
|
| • |
Detach hose from EGR cooler
|
| • |
Detach hose from coolant pipe
|
|
|
|
| 13. |
Detach exhaust manifold heat shield (3)
|
|
|
| 14. |
Detach exhaust manifold (1)
| • |
Detach with turbocharger and catalytic converter
|
| • |
Detach EGR metal tube (2)
|
| • |
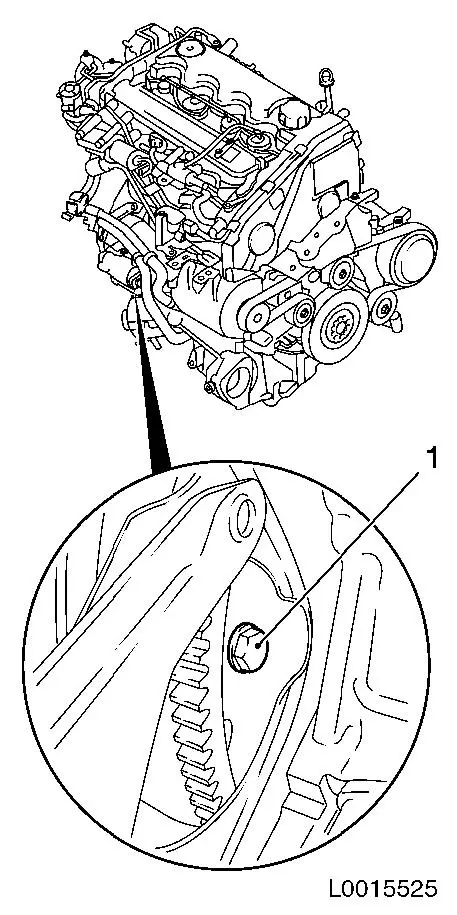
Detach oil feed line from engine block
| – |
Unscrew and remove banjo bolt (arrow)
|
|
| • |
Detach oil return line (3) from engine block
|
| • |
Unclip wiring harness of pre-catalytic converter temperature
sensor
|
| • |
Detach vacuum line from vacuum unit
|
| • |
Release catalytic converter
|
|
|
|
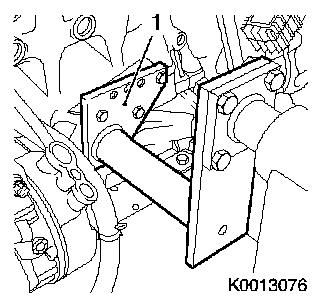
| 15. |
Attach KM-412-36-2 (1)
|
|
|
| 16. |
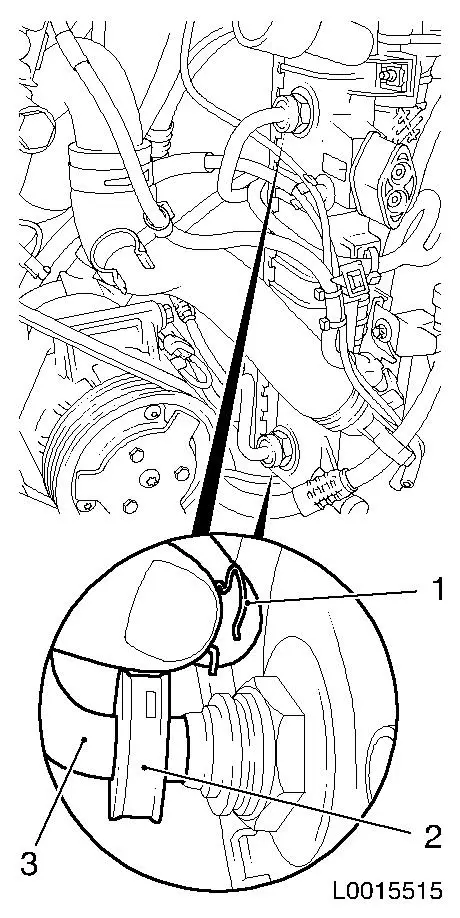
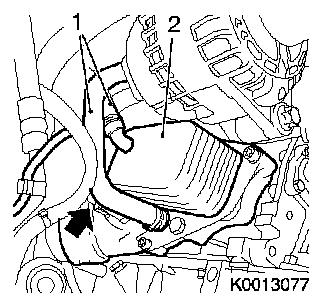
Detach oil filter housing with heat exchanger (2)
| • |
Place collecting basin underneath.
|
| • |
Disconnect wiring harness plug for oil pressure switch
(arrow)
|
| • |
Detach 2x coolant hose (1)
|
|
|
|
|
| 17. |
Remove starter
| • |
Release bracket for wiring harness
|
| • |
Detach 2x wiring harness
|
| • |
Unscrew 2x bolts (arrows)
|
|
|
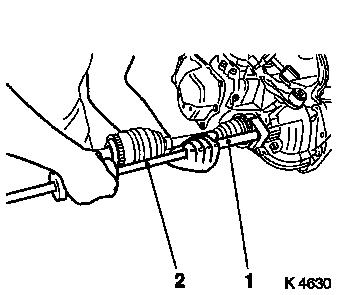
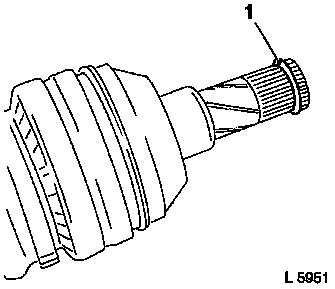
| 18. |
Detach axle shaft on left and right
Note: 2nd mechanic is
required.
| • |
Place collecting basin underneath.
|
| • |
Use KM-313 (2) together with KM-902 (1)
|
|
|
|
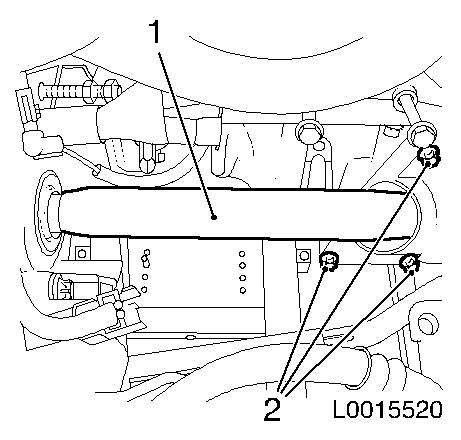
| 19. |
Detach intermediate shaft (1) with its bracket
| • |
Unscrew 3x intermediate shaft bracket bolt (2) from engine
block
|
| • |
Unscrew 3x bolt from end shield
|
|
|
|
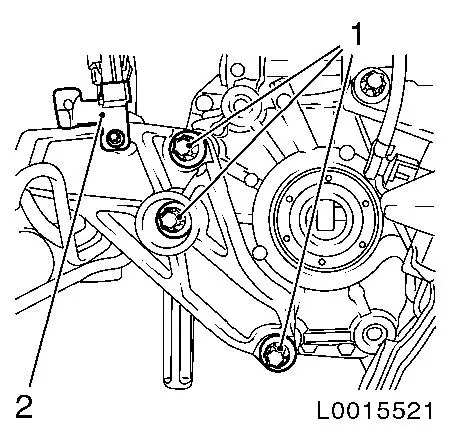
| 20. |
Attach KM-412-36-1 (1)
|
|
|
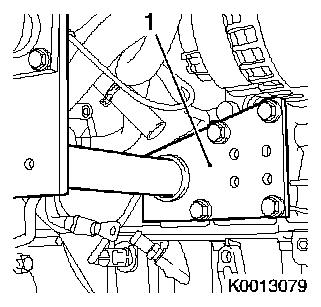
| 21. |
Attach adapter plate KM-883-2
| • |
3x at engine transport shackle
|
| • |
Suspend from workshop crane
|
|
| 22. |
Connect rope to drive unit at KM-883-2
|
| 23. |
Release rear reaction member
| • |
Detach wiring harness bracket from reaction member
|
|
|
|
| 24. |
Release front reaction member
|
|
|
| 25. |
Lift drive unit
Note: 2nd mechanic is
required.
|
| 26. |
Attach drive unit to KM-412-A
Note: 2nd mechanic is
required
|
| 27. |
Detach 3x wiring harness from transmission
| • |
Disconnect wiring harness plug (1) from selector lever
|
| • |
Detach engine management wiring harness bracket (4)
|
| • |
Detach wiring harness bracket (2)
|
| • |
Unclip wiring harness from coolant pipe
|
| • |
Unclip transmission vent hose (3)
|
|
|
|
| 28. |
Detach charge air pipe (2) from throttle valve module
|
|
|
| 29. |
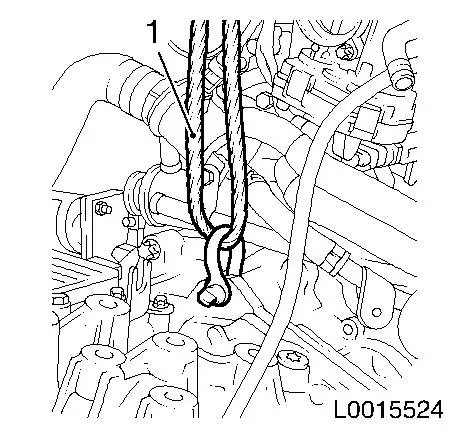
Attach transmission to ropes
|
|
|
| 30. |
Detach torque converter from flywheel
|
|
|
| 32. |
Remove gearbox
Note: 2nd mechanic is
required
|
 Install
| 33. |
Position transmission
Note: 2nd mechanic is
required.
| • |
Screw in bolt
Note: Do not tighten
bolt yet
|
|
| 35. |
Detach transmission from ropes
|
| 36. |
Attach torque converter to flywheel
Note: Through exhaust
port
|
| 37. |
Attach charge air pipe
|
| 38. |
Attach 3x wiring harness to transmission
| • |
Clip wiring harness to coolant pipe
|
| • |
Attach wiring harness bracket
|
| • |
Attach engine management wiring harness bracket
|
| • |
Connector wiring harness plug of selector lever
|
| • |
Clip in transmission vent hose
|
|
| 39. |
Attach drive unit to workshop crane with KM-883-2
|
| 40. |
Detach drive unit from KM-412-A
|
| 41. |
Place drive unit on KM-6001-A
Note: Note contact
points, 2nd mechanic is required.
| • |
Attach rear reaction member
|
| • |
Attach front reaction member
|
|
| 42. |
Secure front reaction member
| • |
Tighten screw connection 55 Nm
|
|
| 43. |
Fasten rear reaction member to transmission
|
| 44. |
Untie ropes from drive unit
| • |
Remove from workshop crane
|
|
| 45. |
Detach adapter plate KM-883-2
| • |
Release transport shackle
|
|
| 47. |
Attach oil filter housing with heat exchanger
| • |
Connect oil pressure switch wiring harness plug
|
|
| 48. |
Install starter
| • |
Tighten stud bolt 25 Nm
|
| • |
Attach 2x wiring harness
|
| • |
Fasten bracket for wiring harness
|
|
| 50. |
Cleaning Work
| • |
Clean sealing surface
| – |
Exhaust manifold, cylinder head
|
|
|
| 51. |
Attach exhaust manifold with turbocharger and catalytic
converter
| • |
Tighten 8x new nuts 25 Nm
|
| • |
Attach oil feed line
| – |
Tighten banjo bolt 15 Nm
|
|
| • |
Clip in wiring harness of pre-catalytic converter temperature
sensor
|
| • |
Attach vacuum line to vacuum unit
|
| • |
Fasten catalytic converter
| – |
Tighten 2x bolts
Note: Clean thread
before re-using and insert bolt with locking compound (red). The
maximum installation time including torque check is 10 minutes.
|
|
|
| 52. |
Attach exhaust manifold heat shield
|
| 53. |
Cleaning Work
| • |
Clean sealing surfaces.
| – |
Coolant pipe, cylinder head
|
|
|
| 54. |
Attach coolant pipe assembly
| • |
Tighten toothed belt cover bolt to coolant flange
Note: Clean thread
before re-using and insert bolt with locking compound (red). The
maximum installation time including torque check is 10 minutes.
|
| • |
Attach hose to EGR cooler
|
| • |
Attach hose to coolant pipe
|
| • |
Connect wiring harness plug of pre-catalytic converter
temperature sensor
|
|
| 55. |
Attach refrigerant line to compressor
|
| 56. |
Attach dipstick guide tube
|
| 57. |
Attach charge air pipe to turbocharger
| • |
Attach hose to cylinder head cover
|
|
| 58. |
Attach intermediate shaft with its bracket
| • |
Tigthen 3x intermediate shaft bracket bolt to engine block
55 Nm
|
| • |
Tighten 3x bolt to end shield 18
Nm
|
|
| 59. |
Replace 2x retaining ring, axle shaft on left and right
|
|
|
Important: Retaining ring must
engage audibly.
|
| 60. |
Attach axle shaft on left and right
|
| 61. |
Attach engine cooling module
| • |
Insert radiator in bracket from above
|
| • |
Secure raidator with retaining strap at engine transport
shackle
|
| • |
Clip in 2x vacuum line at radiator
|
|
| 62. |
Attach refrigerant line to condenser
|
| 63. |
Attach compressor wiring harness
| • |
Fix wiring harness plug
|
| • |
Clip in at refrigerant line
|
|
| 64. |
Attach 2x transmission fluid line to oil cooler
| • |
Install 2x retaining clamp
|
| • |
Clip in 2x protective cap
|
|
| 65. |
Attach 3x coolant hose to radiator
| • |
Attach coolant supply hose to radiator
| – |
Clip into fan housing bracket
|
|
| • |
Attach coolant return hose to radiator
|
| • |
Clip in coolant hose to fan housing
|
| • |
Attach coolant return hose to coolant pipe
|
|
| 66. |
Attach 2x charge air hose
|
| 67. |
Remove retaining strap from radiator
|
| 68. |
Check transmission fluid level and correct if necessary 
|
|
