|
Camshaft Sprocket, Replace
 Remove Remove
| 4. |
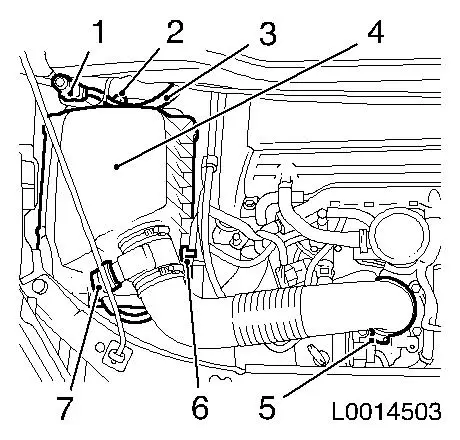
Remove air cleaner housing (4)
| • |
If present: unclip bonnet contact switch (1)
|
| • |
Unclip tank vent line (3)
|
| • |
Release and disconnect wiring harness plug of hot film mass air
flow meter (7)
| – |
Unclip wiring harness (6) from bracket
|
|
|
|
|
| 5. |
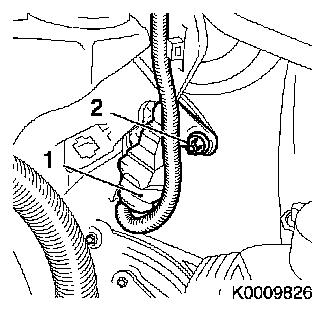
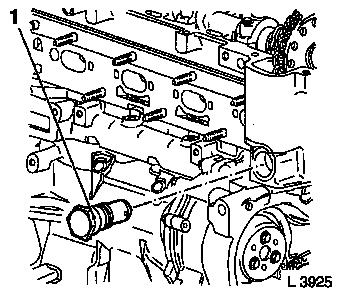
Remove camshaft sensor
| • |
Release and disconnect wiring harness plug (1)
|
|
|
|
| 6. |
Remove cylinder head cover
|
| 7. |
Raise vehicle by its full height
|
| 8. |
Remove lower engine compartment cover (2)
| • |
Remove 2x body-bound rivets (3)
|
|
|

|
| 9. |
Adjust ignition TDC of cylinder 4
Note: Rotate crankshaft
slowly and evenly in direction of engine rotation.
| • |
Place crankshaft on marking
|
|
| 10. |
Lower vehicle by its full height
|
| 11. |
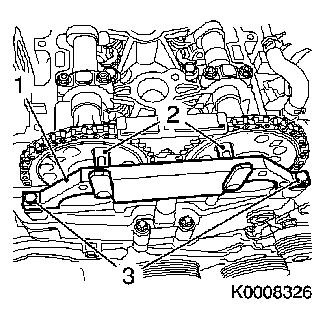
Timing, Check
| • |
Push locating bolt (2) in camshaft sprocket holes provided
Note: If sliding in the
locating bolt is not possible, the timings must be adjusted.
|
|
|
|
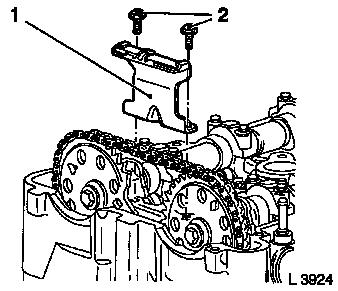
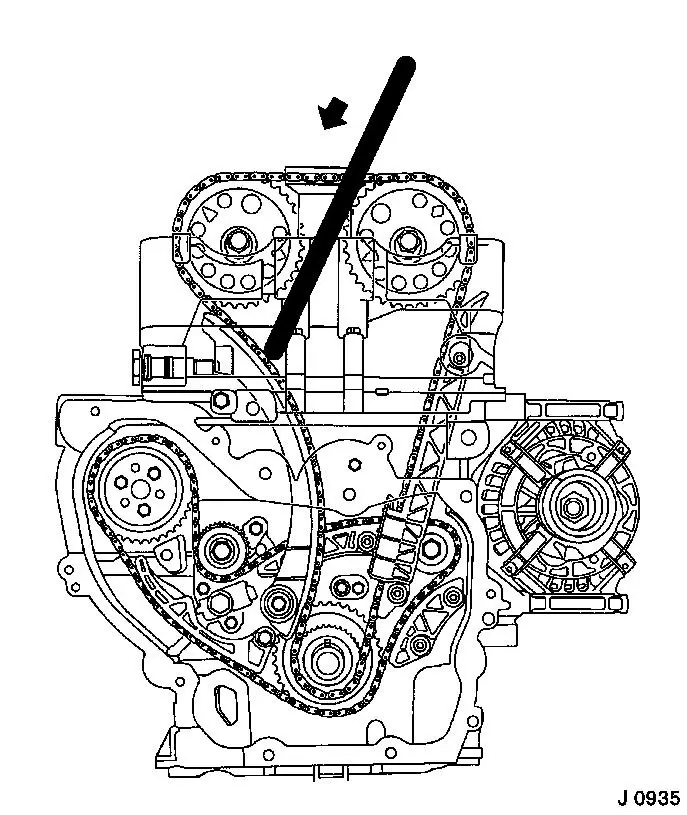
| 12. |
Remove upper sliding rail (1)
|
|
|
| 13. |
Remove chain tensioner of camshaft timing chain (1)
|
|
|
| 14. |
Remove exhaust camshaft sprocket
| • |
Unscrew bolt
Note: Counterhold at
camshaft hexagon.
|
|
 Install
| 15. |
Adjust intake camshaft
Note: Rotate intake
camshaft on hexagonal section until locating bolt of KM-6148 fits in corresponding hole.
|
| 16. |
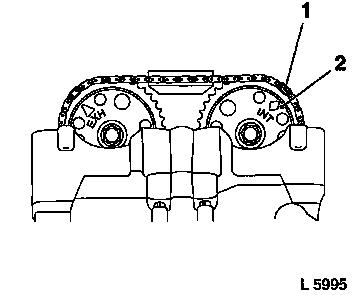
Position camshaft timing chain
Note: The green marking
(1) must be positioned at marking "INT" (2) of the intake camshaft
sprocket.
|
|
|
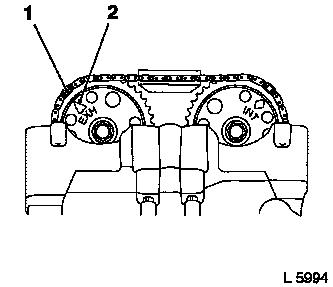
Important: The red marking (1)
must be positioned at marking "EXH" (2) of the exhaust camshaft
sprocket. Rotate exhaust camshaft on hexagonal section until
exhaust camshaft sprocket can be inserted.
|
| 17. |
Attach exhaust camshaft sprocket
|
|
|
| 18. |
Pull back locating bolts
| • |
From intake camshaft sprocket
|
|
| 19. |
Fasten exhaust camshaft sprocket
Note: 2nd mechanic is
required.
| • |
Tighten bolt 85 Nm + 30° +
15°
Note: Counterhold at
camshaft hexagon.
|
|
| 20. |
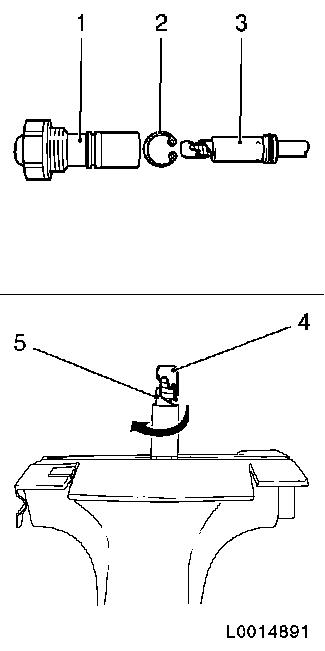
Pre-tension chain tensioner
| • |
Detach retaining ring (2)
|
| • |
Pull piston (3) out of housing (1)
| – |
Tension piston at square in vice
|
| – |
Lock inner piston (4) to last detent (5) by turning
clockwise
|
|
| • |
Insert piston into housing
|
|
|
|
| 21. |
Tension chain tensioner 75 Nm
| • |
Tension chain tensioner
Note: Undo lock by
pressing down the chain in the area of the tension rail for the
camshaft timing chain.
|
|
|
|
| 22. |
Raise vehicle by its full height
|
| 23. |
Adjust ignition TDC of cylinder 4
Note: Turn crankshaft
720° in the direction of rotation of the engine
| • |
Place crankshaft on marking
|
|
| 24. |
Lower vehicle by its full height
|
| 25. |
Timing, Check
| • |
Slide in locating bolts
Note: If the locating
bolts do not fit in the camshaft sprocket holes provided, the
camshaft timing chain must be reseated. The coloured chain links
are no longer valid as TDC reference points.
|
|
| 28. |
Install upper sliding rail
| • |
Tighten 2x bolt 8 Nm
Note: Use screw locking
compound (red)
|
|
| 29. |
Install cylinder head cover 
|
| 30. |
Install camshaft sensor
| • |
Connect and lock wiring harness plug
|
|
| 31. |
Install air cleaner housing
| • |
Attach air cleaner housing to wheelhouse
|
| • |
Attach air intake hose to throttle valve module
|
| • |
Attach engine vent hose to timing case
|
| • |
Connect and lock wiring harness plug to hot film mass air flow
meter
|
| • |
If present: clip in bonnet contact switch
|
|
| 33. |
Raise vehicle by its full height
|
| 34. |
Attach lower engine compartment cover
| • |
Install 2x body-bound rivets
|
|
| 35. |
Lower vehicle by its full height
|
| 37. |
Program volatile memories
|
|
