|
Remove and install automatic transmission with
torque converter from engine
Note: Engine with
automatic transmission removed
 Remove Remove
| 1. |
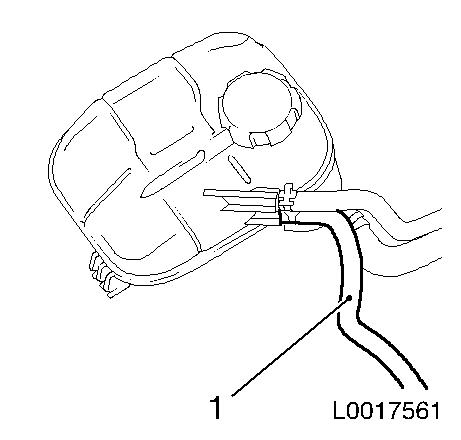
Detach coolant return hose, throttle valve pre-heating (1) from
coolant expansion tank
|
|
|
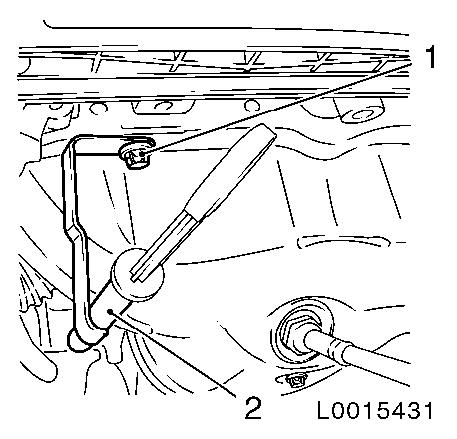
| 2. |
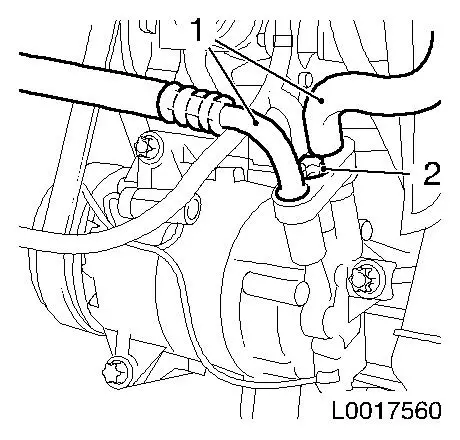
Detach upper radiator hose (1) from thermostat (2)
|
|
|
| 3. |
Detach lower radiator hose from coolant pump
|
| 4. |
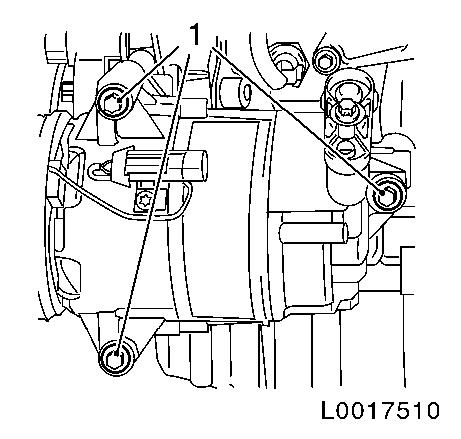
Detach refrigerant lines (1) from compressor
|
|
|
| 5. |
Disconnect 3x wiring harness plugs
| • |
Manometric switch, condenser (2)
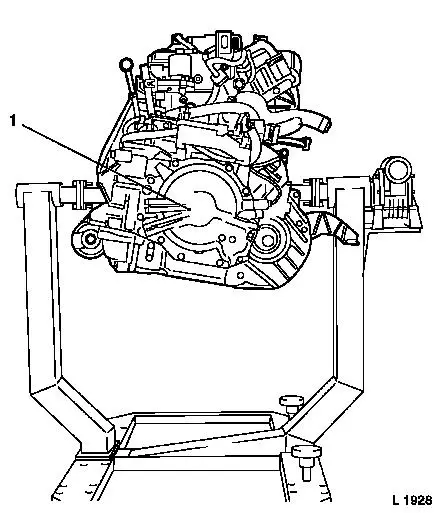
|
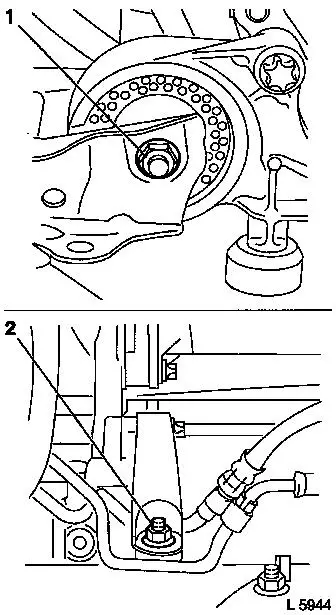
| • |
Temperature sensor, radiator (3)
|
|
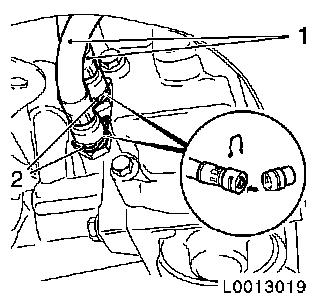
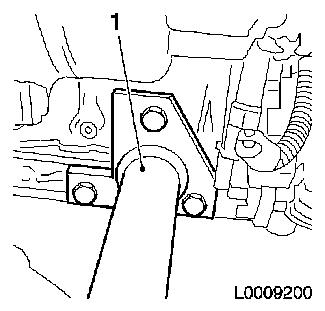
|
|
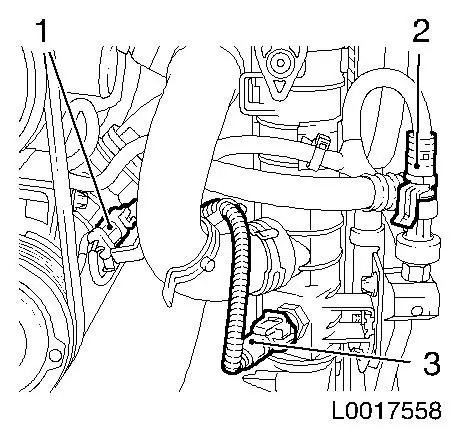
| 6. |
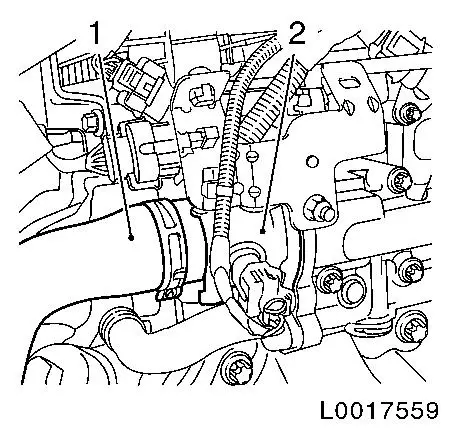
Detach 2x transmission fluid line (1) from automatic
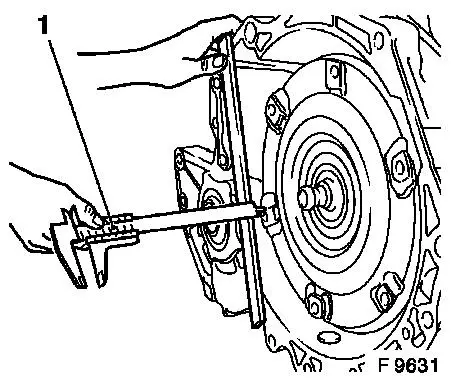
transmission
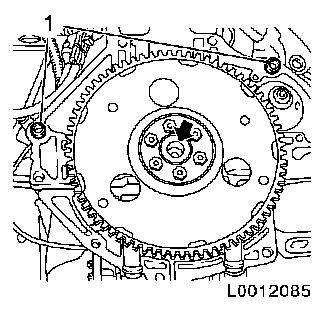
| • |
Lever off 2x retaining clamp (2) from quick coupling
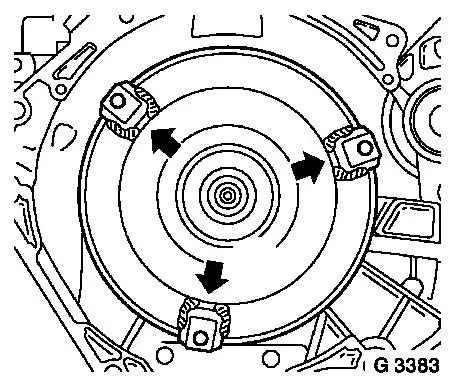
|
|
|
|
|
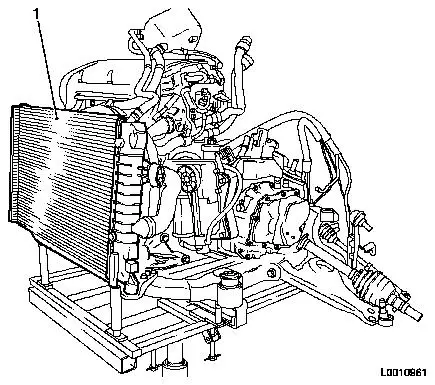
| 7. |
Detach cooling module (1)
| • |
Remove from lower radiator brackets
|
|
|
| 8. |
Place collecting basin underneath.
|
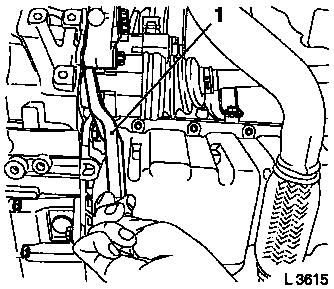
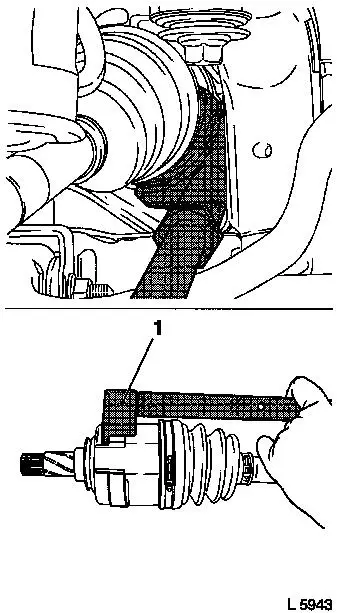
| 9. |
Remove right-hand axle body
| • |
Remove axle body with KM-460-B (1)
from differential gear
|
| • |
Seal opening in differential with sealing plug
|
|
|
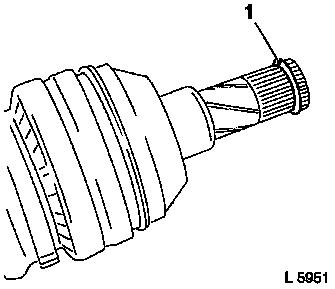
|
| 10. |
Remove left-hand axle body
| • |
Remove axle body with KM-313 and
KM-6003-1 (1) from differential gear
|
| • |
Seal opening in differential with sealing plug
|
|
|
|
| 11. |
Remove oil dipstick guide tube (2)
| • |
Remove oil dipstick guide tube upward
|
|
|
|
| 12. |
Detach wiring harness plug of catalytic converter control
oxygen sensor
| • |
Disconnect wiring harness connector.
|
|
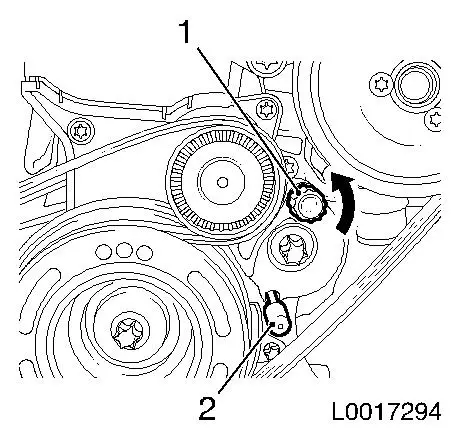
| 13. |
Remove ribbed V-belt
| • |
Apply tension to ribbed V-belt tensioner in the direction of
the arrow at the projection (1) and lock with KM-6349 (2)
|
|
|
|
| 14. |
Detach exhaust manifold heat shield
|
|
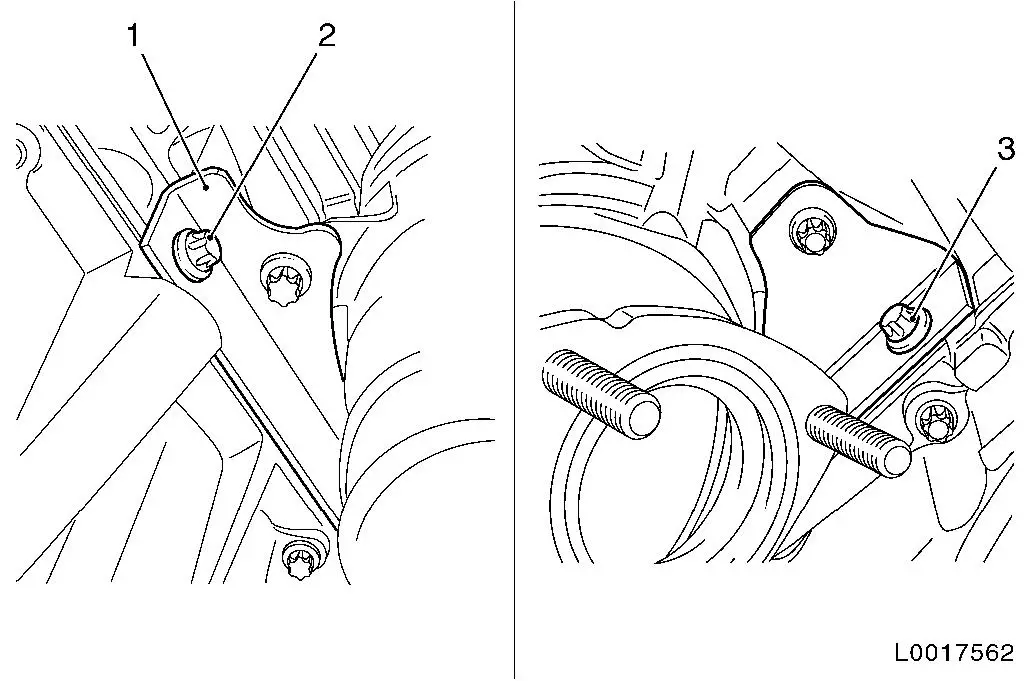
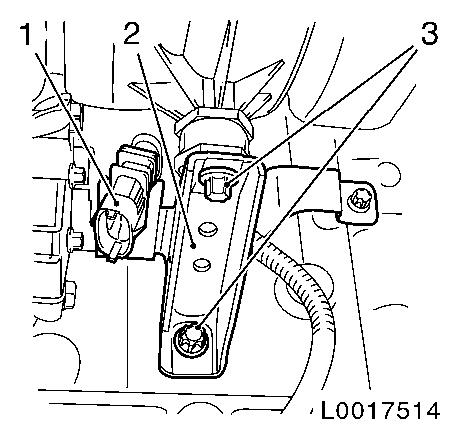
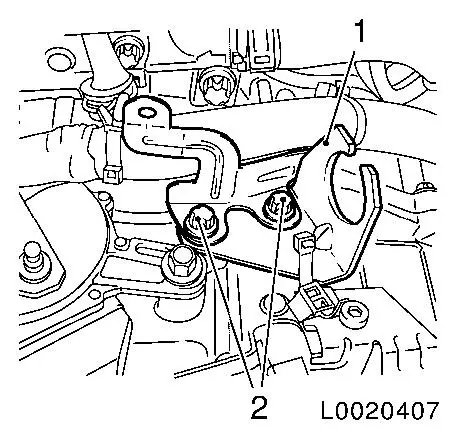
| 15. |
Detach bracket for catalytic converter (1) from cylinder
block
| • |
Unscrew 2x bolts (2) and (3)
|
|
|
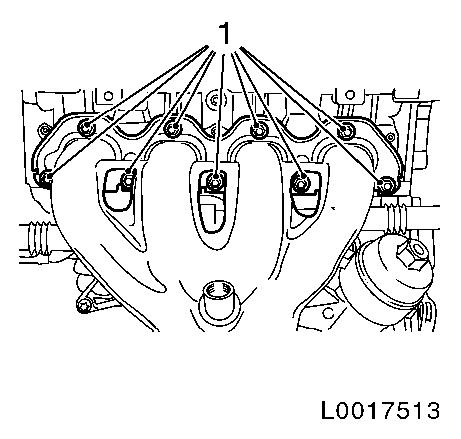
| 16. |
Remove exhaust manifold
|
|
|
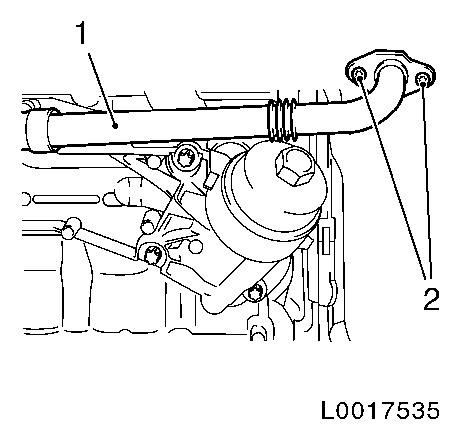
| 18. |
Remove coolant pipe (1) between thermostat housing and oil
filter housing
| • |
Draw out of oil filter housing
|
|
|
|
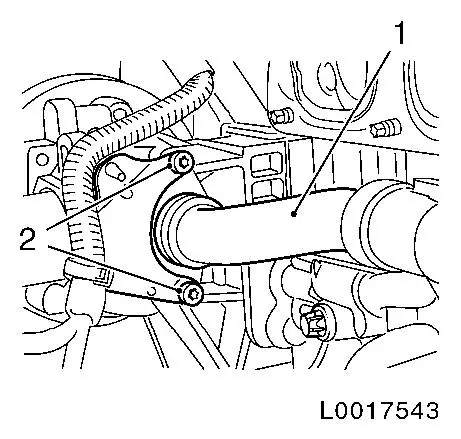
| 19. |
Detach coolant pipe (1) from coolant pump
| • |
Push coolant pipe into oil filter housing
|
|
|
|
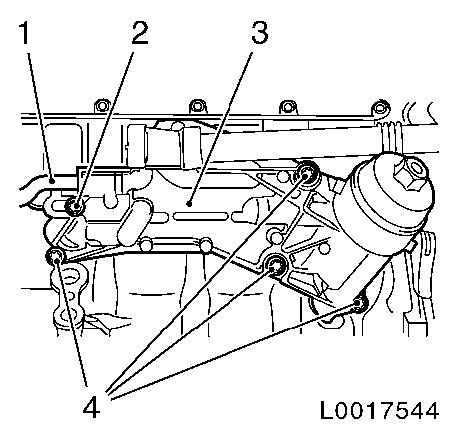
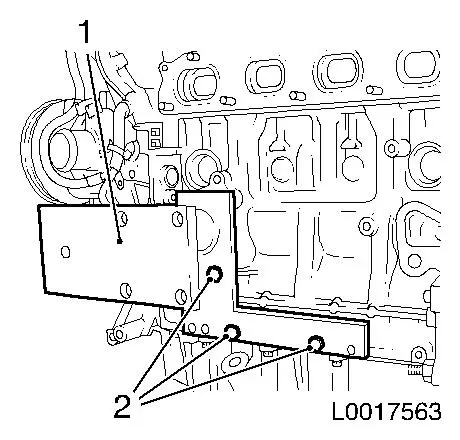
| 20. |
Remove oil filter housing (3)
| • |
Release coolant pipe (1) and push into oil filter housing
|
|
|
|
| 21. |
Detach intake manifold support (2)
| • |
Disconnect wiring harness plug of catalytic converter control
oxygen sensor
|
| • |
Unclip wiring harness plug (1) from bracket
|
|
|
|
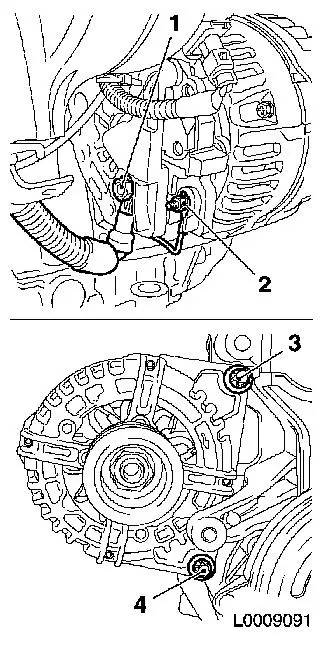
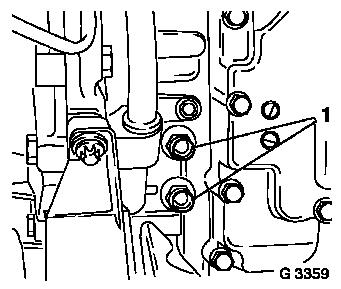
| 22. |
Disconnect alternator from power supply
| • |
Disconnect alternator from power supply
| – |
Unscrew 2x nuts (1) and (2)
|
|
|
| 23. |
Remove alternator
| • |
Unscrew 2x bolts (3) and (4)
|
|
|
|
| 24. |
Detach earth cable (1) from starter
|
| 25. |
Detach 2x positive cable (2) starter
|
|

|
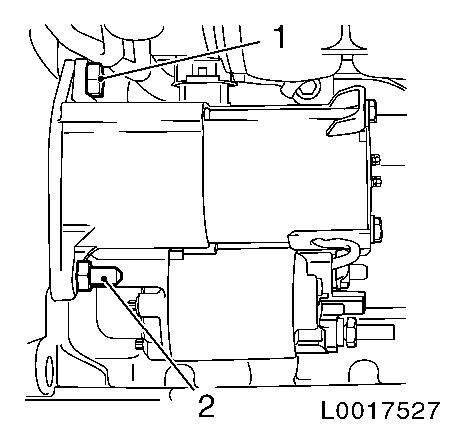
| 26. |
Detach starter
| • |
Unclip wiring harness plug for oxygen sensor of catalytic
converter control from bracket
|
| • |
Unscrew 2x bolts (1) and (2)
|
|
|
|
| 27. |
Attach KM-412-31-1 (1)
|
|
|
| 28. |
Attach KM-412-31-2 (1)
|
|
|
| 29. |
Hitch engine up to workshop crane.
| • |
Attach holding ropes to engine transport shackles
|
|
| 30. |
Remove front engine damping block
| • |
Detach screwed connection (1)
|
|
| 31. |
Remove rear engine damping block
| • |
Detach screwed connection (2)
|
|
|
|
| 32. |
Lift motor away from front axle body
|
| 33. |
Install engine on engine overhaul stand KM-412-A
Note: 2 mechanics
required
| • |
Remove holding ropes from engine transport shackles
|
|
| 34. |
Detach gearshift cable bracket (1) from transmission
|
|
|
| 35. |
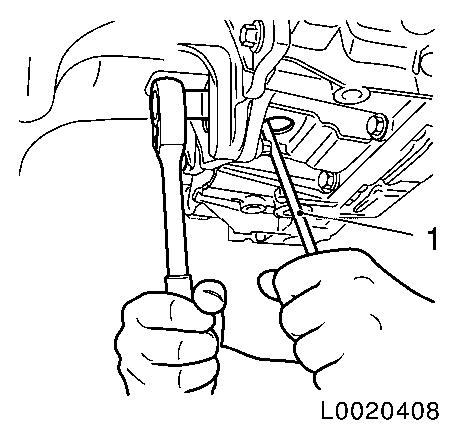
Remove torque converter from drive disc
| • |
Turn engine towards torsional vibration damper until the
relevant screw is accessible
|
| • |
Unscrew 3 bolts
Note: Lock torque
converter with appropriate counterstay (1)
|
|
|
|
|
| 36. |
Detach transmission (1) from engine
| • |
Unscrew 7x bolts
Note: One bolt remains
as a retaining device
|
|
|
Important: Torque converter must
remain in the transmission
|
| 37. |
Remove gearbox
| • |
Hitch gearbox up to workshop crane
|
| • |
Unscrew bolt
Note: Ensure that
attached parts and wiring harnesses are undamaged
|
|
 Install
| 38. |
Measure resistance, torque converter in the transmission
| • |
Measure with measuring device (1)
| – |
Distance: approx. 12 mm
|
|
|
|
|
| 39. |
Coat centring seat (arrow) for torque converter in the
crankshaft with grease
|
| 40. |
Check correct seating of 2x guide bush (1) in engine flange
|
|
|
| 41. |
Cut thread (arrows) in the torque converter
|
|
|
| 42. |
Install gearbox
| • |
Hitch gearbox up to workshop crane
|
| • |
Attach transmission to engine
|
|
| 43. |
Attach transmission to engine
| • |
Attach transmission to cylinder block
|
| • |
Attach transmission to oil pan
|
|
| 44. |
Attach torque converter to drive disc
| • |
Tighten 3x bolts
Note: Insert bolts with
locking compound
Insert bolts in two stages
|
|
| 45. |
Hitch engine up to workshop crane.
| • |
Attach holding ropes to engine transport shackles
|
|
| 46. |
Detach engine from engine overhaul stand KM-412-A
Note: 2 mechanics
required
|
| 47. |
Attach rear engine damping block, front axle body
| • |
Tighten screwed joint 55 Nm
|
|
| 48. |
Attach front engine damping block to front axle body
| • |
Tighten screwed joint 55 Nm
|
|
| 49. |
Detach KM-412-31-1 and KM-412-31-2 from cylinder block
|
| 51. |
Fit starter
| • |
Clip in wiring harness plug for oxygen sensor of catalytic
converter control to bracket
|
|
| 52. |
Attach starter wiring harness
| • |
Install earth cable
| – |
Tighten nut, clip in 2x
|
|
|
| 53. |
Connect alternator wiring harness
|
| 54. |
Attach intake manifold bracket
| • |
Clip wiring harness plug into bracket
|
| • |
Connect wiring harness plug for catalytic converter control
oxygen sensor
|
|
| 55. |
Clean sealing surface
|
| 56. |
Replace 4x coolant pipe seal ring
| • |
Remove 2x coolant pipe from oil filter housing
|
| • |
Insert 2x coolant pipe in oil filter housing
|
|
| 57. |
Attach oil filter housing
| • |
O-rings with silicone grease
|
|
| 58. |
Attach coolant pipe to coolant module
| • |
Draw coolant pipe out of oil filter housing
|
| • |
Attach coolant pipe to oil filter housing
|
|
| 59. |
Attach coolant pipe to coolant module
| • |
Draw coolant pipe out of oil pump housing
|
|
| 60. |
Detach coolant pipe, oil filter housing to thermostat
housing
| • |
Push into oil filter housing
|
| • |
Attach to thermostat housing
|
|
| 62. |
Clean sealing surface
|
| 63. |
Attach exhaust manifold with catalytic converter
| • |
Tighten 9x new nut 20 Nm
|
| • |
Attach bracket to cylinder block
|
|
| 65. |
Attach wiring harness plug of catalytic converter control
oxygen sensor
| • |
Fix wiring harness plug
|
| • |
Clip in
Note: Be careful of
wiring harness bracket
|
|
| 66. |
Attach dipstick guide tube
| • |
Insert guide tube into oil pan
|
|
| 67. |
Install left-hand axle body
| • |
Attach new circlip (1) to axle body
|
| • |
Lubricate teeth and bearing points with engine oil
|
| • |
Push axle body into gearbox until circlip engages
|
|
|
|
| 68. |
Fit right-hand axle body
| • |
Attach new circlip to axle body
|
| • |
Lubricate teeth and bearing points with engine oil
|
| • |
Push axle body into gearbox until circlip engages
|
|
| 69. |
Place cooling module in position
|
| 70. |
Attach oil cooling lines to transmission
Note: Observe correct
assignment.
|
|
|
| 71. |
Connect 3x wiring harness plugs
| • |
Temperature sensor, radiator
|
| • |
Manometric switch, condenser
|
|
| 72. |
Attach refrigerant line to compressor
|
| 73. |
Attach lower radiator hose to radiator
|
| 74. |
Attach upper radiator hose to thermostat
|
| 75. |
Attach coolant return hose, throttle valve pre-heating to
coolant expansion tank
|
| 76. |
Check and correct transmission fluid level 
|
|