
Corsa B
Field Remedy: 1401
Remedy:
I:   Preparation of an A-pillar check link carrier and an A-pillar inner
     reinforcement plate.
II:  Replacement of the A-pillar check link carrier.
III: Repair of the crack in the A-pillar.
Note:
For each A-pillar check link carrier repair side is required:
2 A-pillar check link carrier 90 195 522 90 94 969 4 Fixing screws 11 093 871 20 35 600 4 Fixing nuts 11 011 418 20 64 155
     The A-pillar reinforcement plate must be made from the A-pillar carrier
     of the respective other side.
Working procedure: I: Preparation of an A-pillar inner reinforcement plate Important:
     When preparing the A-pillar check link carrier and the A-pillar inner
     reinforcement plate, the dimensions must be meticulously kept and the
     bores must be made exactly; otherwise, problems may arise during the
     installation of the check link to the A-pillar check link carrier.
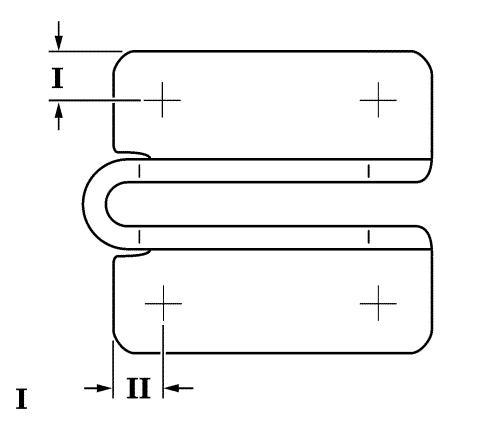
 1. Scribe the A-pillar check link carrier (dimension "I" 7 mm, dimension
    "II" 8 mm) and punch it (picture I).
2. Predrill the A-pillar check link carrier 4 times (diameter 3 mm).
3. Rebore the A-pillar check link carrier 4 times (diameter 6,5 mm).
4. Debur the bores.
5. Align the A-pillar check link carrier and the A-pillar inner
reinforcement plate to each other (the A-pillar check link carrier
serves as drill template).
6. Mount the A-pillar check link carrier and an A-pillar inner
reinforcement plate into the vice of the stationary drilling machine.
7. Drill the A-pillar inner reinforcement plate through the A-pillar
check link plate (diameter 6.5 mm).
8. Debur the bores.
9. Grind the zones around the bores of the A-pillar inner reinforcement
plate naked.
10. Remove the surface-coating in the welding area of the fixing nuts with
emery cloth or a file.
11. Mount the A-pillar check link carrier and the A-pillar inner
reinforcement plate with fixing screws and fixing nuts (included in
the repair kit), join these by screwing hand-tight (locate the fixing
nuts on the side of the A-pillar inner reinforcement plate).
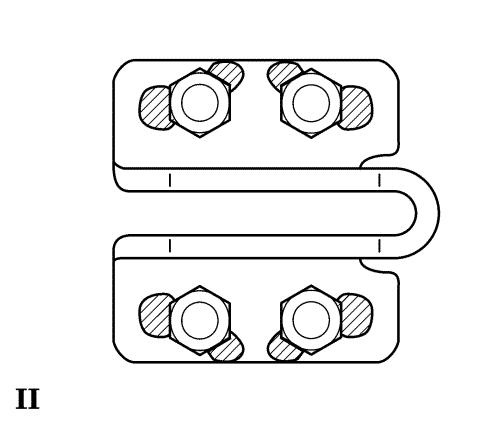
12. Fix the fixing nuts with two welding points each to the A-pillar inner
reinforcement plate (picture II).
13. Remove the fixing screws. II: Replacement of the A-pillar check link carrier Note:
     Be aware of the mounting position of the A-pillar check link carrier:
     The closed bend shows in outward direction.
     Be aware of the mounting position of the A-pillar inner reinforcement
     plate:
     The closed bend shows in inward direction.
1. Remove front door
     - see working procedure "Front Door, Remove and Install", group "A",
     Service Instruction Corsa-B.
 2. Only driver side: Remove the storage compartment under the instrument
    panel
     – see working procedure "Storage Compartment under Instrument Panel",
     Remove and Install, group "C", Service Instruction Corsa-B.
3. Only passenger side: Remove glove box
     - see working procedure "Glove Compartment, Removal and Install", group
     "C", Service Instruction Corsa-B.
4. Remove the front door sealing in the A-pillar area.
5. Remove the front door wiring harness sealing from the A-pillar.
6. Scribe the position of the A-pillar check link carrier on the
A-pillar.
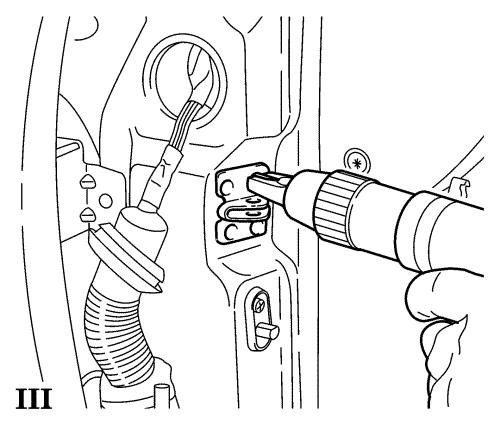
7. Drill out the 4 welding points of the A-pillar check link carrier with
a welding point drill (picture III).
8. Remove the A-pillar check link carrier.
9. If necessary, adjust or repair the A-pillar (A-pillar repair see
working procedure "III").
10. Grind the A-pillar naked in the area of the A-pillar check link carrier
using an angle grinder.
11. Install the front door.
12. Install a new A-pillar check link carrier to the check link.
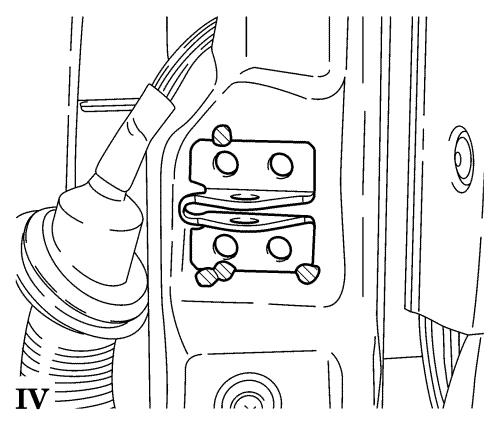
13. Determine the position of the A-pillar check link carrier and fix the
carrier with three welding points to the A-pillar (prior to this, grind
the welding areas of the A-pillar check link carrier naked)
(picture IV).
14. Remove front door.
15. Drill 4 bores into the A-pillar through the A-pillar check link carrier
(diameter 6.5 mm).
16. Grind the welding points off the A-pillar check link carrier.
17. Remove the A-pillar check link carrier.
18. Debur the bores.
19. Paint the A-pillar, the A-pillar check link carrier and the A-pillar
inner reinforcement plate.
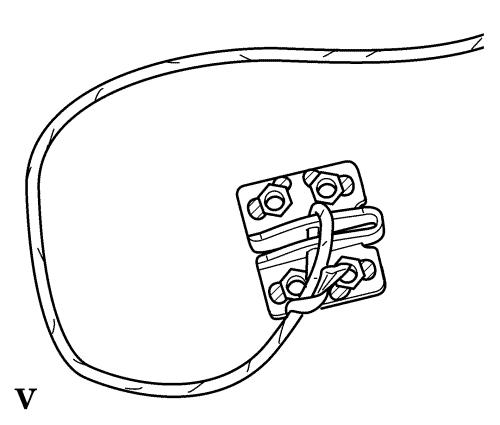
20. Fix retaining band to the A-pillar inner reinforcement plate (in order
to avoid possible rattling noise, do not use welding wire or cables)
(picture V).
21. Insert the A-pillar inner reinforcement plate, through the opening of
    the front door wiring harness, into the A-pillar.
22. Install the A-pillar check link carrier to the A-pillar using new
    fixing screws – tightening torque 10 Nm (use locking compound).
23. Cut off as much of the retaining band as possible.
24. Apply cavity protection to the inner A-pillar.
25. Install the inner and outer front door wiring harness sealing to
    the A-pillar.
Note:
Observe the mounting position – the arrow must point upwards.
26. Install the front door sealing.
27. Install the front door
     - see working procedure "Front Door, Remove and Install", group "A",
     Service Instruction Corsa-B.
28. Only driver side: Install the storage compartment under the instrument
    panel
     – see working procedure "Storage Compartment under Instrument Panel",
     Remove and Install, group "C", Service Instruction Corsa-B.
29. Only passenger side: Install glove box
     - see working procedure "Glove Compartment, Removal and Install", group
     "C", Service Instruction Corsa-B.
III: Repair of the crack in the A-pillar 1. Bore through the ends of the crack (diameter 2.5 mm). 2. Weld the crack and the bores. 3. Grind the repaired area. Parts: Part-No.: Catalog-No.: 2 A-pillar check link carrier 90 195 522 90 94 969 4 Fixing screws 11 093 871 20 35 600 4 Fixing nuts 11 011 418 20 64 155 Labour Times: TC: Hours:
T 8 140 10    Repair of A-pillar       90                4.3
              check link carrier
T 8 140 11    Paint and finish         90                2.2
              works
The costs for this repair will be covered for vehicles not older than 3 years and a mileage lower than 100.000 km.
The regular warranty procedure should be used for claiming Set-up-time.
|
||||||||||||||||||||