Crankshaft, Remove and Install
 Remove, Disconnect Remove, Disconnect Remove engine - see operation "Engine with Transmission, Remove and Install". Fit engine with Adapters KM-412-3 onto Engine Overhaul Stand KM-412. Place collecting pan underneath and drain engine oil. Remove oil pan and oil pump with oil intake pipe - see corresponding operations. | 
|
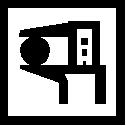
Lock flywheel via starter ring gear with KM-652 and remove (see illus.). When reusing flywheel mark position before removal. Mark the position of the con-rod and crankshaft bearing caps before removal. Release con-rod and crankshaft bearing caps evenly on both sides and remove.
 Important! Important! Observe safety measures concerning con-rods and to con-rod bearing caps! | 
|
 Measure Measure Remove crankshaft from cylinder block (see illus.). Clean crankshaft, crankshaft bearings as well as con-rod bearings and check for wear or damage. If bearing shells are worn, determine bearing journal diameter - see operations "Con-rod Bearing, Check (Bearing Clearance) - Con-rod Removed" as well as "Crankshaft, Check (Bearing Clearance) - Crankshaft Removed" and install new bearing shells. For selection table see "Technical Data". | 
|
 Install, Connect Install, Connect Insert crankshaft bearing shells and crankshaft in cylinder block. Before inserting the front and rear crankshaft bearing cap, their inner faces (arrows) must be coated with surface sealant (green) and a bead of adhesive sealing compound (black) with an approx. 6 mm diameter must be applied into their grooves. | 
|
Install, Connect New bolts must be used to attach crankshaft bearing caps and position of front crankshaft bearing cap must be aligned with front surface. Tighten all crankshaft bearing caps evenly.
 Torque - Angle Method Torque - Angle Method Crankshaft bearing cap to cylinder block - 50 Nm / 37 lbf. ft. + 45 ° + 15 ° 1)
. | 
|
Important! After installing the front and rear crankshaft bearing cap, adhesive sealing compound (black) must be pressed into the grooves again from above until it emerges at the joints. | 
|
1) In case of angle specifications, tighten bolts with corresponding torques. Then turn further by the specified angle Use new bolts.
Install, Connect Replace seal ring of rear crankshaft - for this, coat seal lip of new shaft seal ring with silicone grease (white) and attach to Protective Sleeve KM-658-2 with the closed side. To avoid damaging the sealing lip, slightly turn seal ring when attaching to the protective sleeve. Push protective sleeve with attached shaft seal ring onto crankshaft journal and press on flush. | 
|
Position Installer Sleeve KM-658-1 on Protective Sleeve KM-658-2 and drive in shaft seal ring until it sits flush in housing. Oil all con-rod bearing shells and install - note installation position. Tighten con-rod bearing caps evenly (see illus.).
Torque - Angle Method Con-rod bearing cap to con-rod - 25 Nm / 18 lbf. ft. + 30 ° 1)
. | 
|
1) In case of angle specifications, tighten bolts with corresponding torques. Then turn further by the specified angle Use new bolts.
Install, Connect Install oil pump, oil intake pipe, oil pan and oil drain plug with new seals - see corresponding operations. Coat joints of sealing surfaces on cylinder block with adhesive sealing compound (black) (arrows, see illus. I). Position flywheel on crankshaft and align. Lock flywheel above starter ring gear with KM-652 (starter side, illus. II) and bolt on with new bolts - 35 Nm / 26 lbf. ft. + 30 ° + 15 ° . Top up engine oil to "MAX" mark on oil dipstick. Install engine - see operation "Engine with Transmission, Remove and Install".
Torque - Angle Method
|
Oil pump to cylinder block |
- 10 Nm / 7 lbf. ft. |
|
Oil intake pipe to oil pump |
- 8 Nm / 6 lbf. ft. 1) |
|
Oil intake pipe (bracket) to cylinder block |
- 8 Nm / 6 lbf. ft. |
|
Oil pan to cylinder block and oil pump |
- 10 Nm / 7 lbf. ft. 1) 2) |
|
Aluminium oil pan to transmission housing M8 |
- 20 Nm / 15 lbf. ft. |
|
Aluminium oil pan to transmission housing M 10 |
- 40 Nm / 29.5 lbf. ft. |
|
Oil drain bolt to sheet metal oil pan |
- 55 Nm / 41 lbf. ft. |
|
Oil drain bolt (hex bolt) to aluminium oil pan |
- 45 Nm / 33 lbf. ft. |
|
Oil drain bolt (inner Torx bolt) to aluminium oil pan |
- 14 Nm / 10 lbf. ft.
|
1) Re-cut thread before re-use and insert fastening bolts with screw locking compound (red). 2) Installation time including the torque check is max. 10 min. | 
|
|
