Subject:
Replacement of jammed locking nuts for mounting the front and
rear axle components and seating to the body.
Vehicles
Astra-F, Vectra-B, Omega-B
Condition:
Thread of the locking nuts damaged.
Remedy:
Replace defective locking nuts with new components. For
Service operations, bolts which are factory fitted with locking compound, must
be fitted with Loctite 242. The assembly (contact adhesive with metal
substrate) must be completed within 5 minutes of application. Protect bare
areas of drilled holes against corrosion. Drilled holes in the vehicle
underbody area (inner and outer) must be sealed water - and air-tight with
closure caps.
|
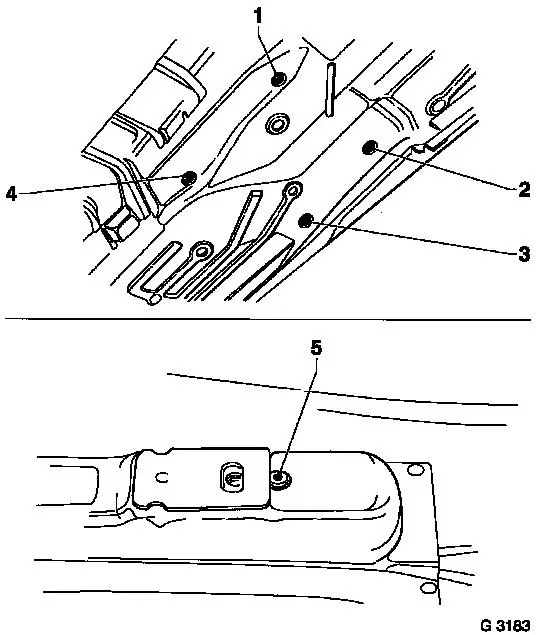
Survey of Locking Nuts for Astra-F and Omega-B (Chassis
/ Underbody)
Chassis to Underbody
Astra-F
1 Front axle mounting to
radiator cross member
Omega-B
1 Front
axle to radiator cross member
2 and 3 Front
axle to side member
4 and 5 Rear
axle to side of floor panel
6 Rear
axle to side member
7 Rear
axle to side of floor cross member
8 Rear
axle to underbody main brackets
|

|
|
Survey of Locking Nuts for Vectra-B (Chassis /
Underbody, Seat Mounting)
Vectra-B
Chassis
1 and 2 Front axle to side member
3 Front axle to support, front of floor
4 Front axle to front of underbody
5 Rear axle to car jack support
6 Rear axle to car jack support
7 Rear axle to side member
Front Seat to Floor
1 Front seat to vehicle floor
|

|
|
Replace Locking Nuts (Accessible Locations with
Installation Apertures)
Vectra-B
Concerns item 2
Front axle body to underbody.
Access through existing aperture in side member.
Withdraw welding nut through aperture using welding rod.
In addition, split plastic rings using screwdriver or a
small chisel for POS. 5, 6 and 8.
Install new locking nuts "without plastic rings".
Tighten bolt.
|
|
The following locking nuts can be replaced using the same
procedure:
Vehicle: Positions (see page 4):
Vectra-B 1 and 4
Vectra-B 5 and 6
Vehicle: Positions (see page 3):
Omega-B 1, 2
Omega-B 4, 5 and 6 (without
plastic rings)
Omega-B Estate 8
|
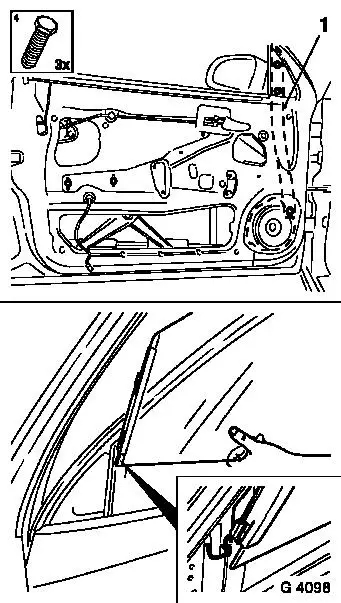
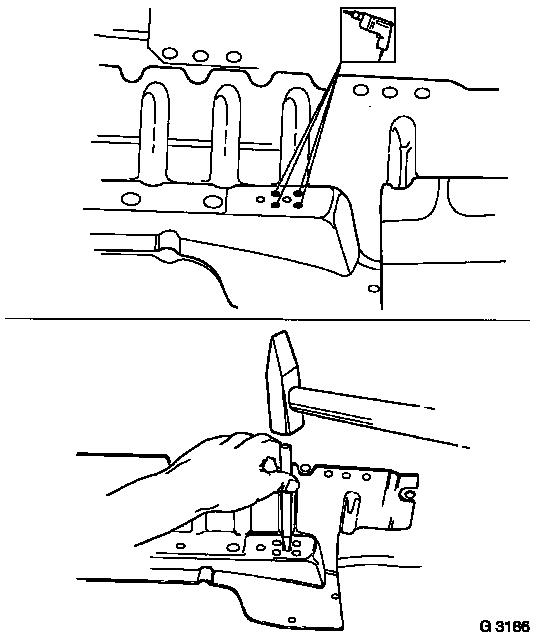
Replace Locking Nuts (Locations without Direct Access)
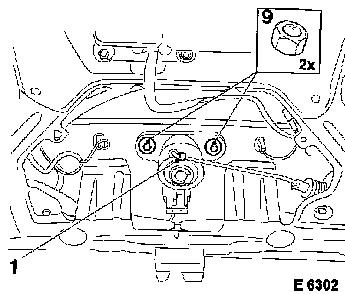
Astra-F
Concerns position 1, front axle body to radiator cross
member.
Remove front panelling.
Expand drilled hole (3) in the closure plate to Æ 15 mm / 0.6 in.
Remove drilling swarf.
Important: Raise right side of radiator,
remove the rubber radiator mountings.
Split the locking nut using a screwdriver or a thin chisel.
Withdraw the locking nut from the aperture using a twisted
welding rod.
Install new locking nut "without plastic ring”.
Tighten bolt.
Install front panel.
|
|
|
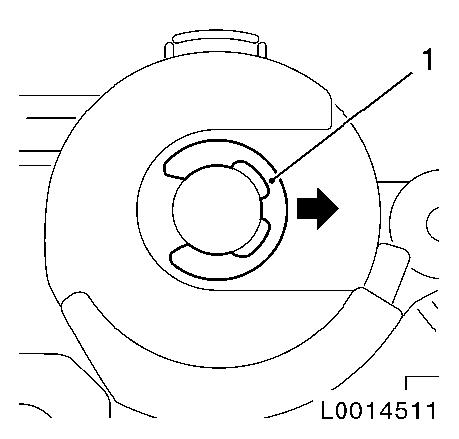
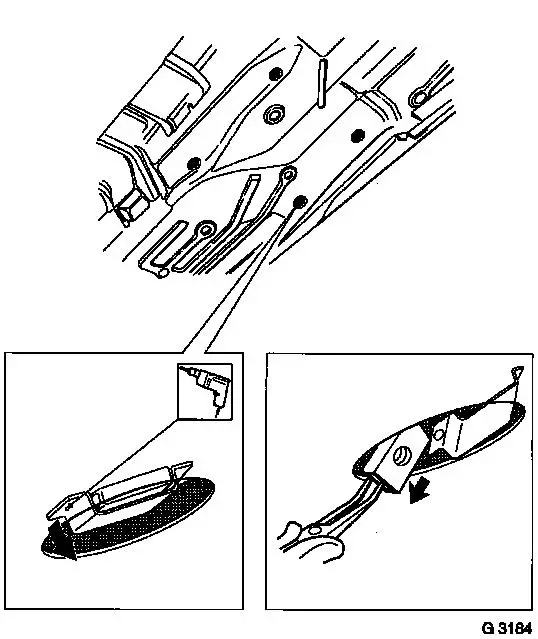
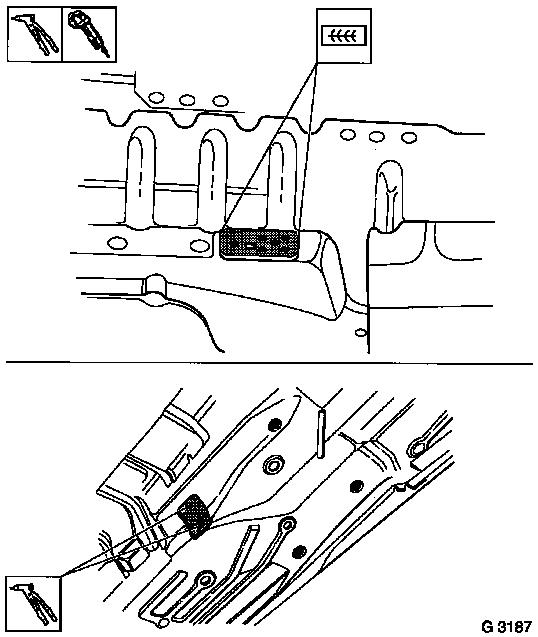
Replace Locking Nuts (Locations without Direct Access)
Omega-B
Concerns position 2 (see page 3)
Front axle body to underbody.
Slide medium-sized screwdriver from below between locking
nut and side member.
Lever locking nut backwards out of the cage. Pick up nut
using twisted welding rod and withdraw through rectangular aperture in
member.
Slide new locking nut into cage "without plastic
ring" using welding rod.
Tighten bolt.
The following locking nuts can be replaced using the same
procedure:
Vehicle: Positions (see page 3):
Omega-B 3 (remove plastic ring)
|
|
|
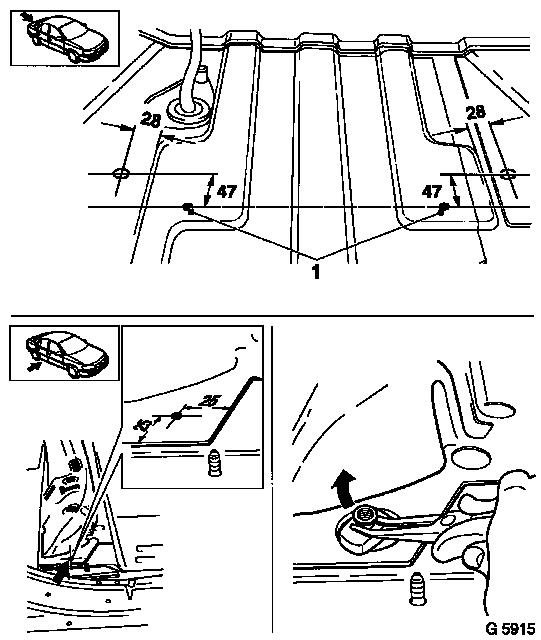
Replace Locking Nuts (Locations without Access)
Vectra-B
Concerns position 3 (see page 4)
Front axle body to underbody.
Access through drilled holes which must be made in the
floor panel from the vehicle interior.
Use existing centrepunch marks on the floor panel.
Drill Æ 34 mm /
1.3 in. hole, deburr edge and remove drilling swarf, apply corrosion
protection.
Split plastic rings using screwdriver or small chisel.
Remove nut with welding rod or offset long-nose pliers (page 9).
Insert new locking nut "without plastic ring".
Tighten bolt.
Seal drilled hole using cap.
|
|
|
Replace Locking Nuts (Locations without Access)
Vectra-B
Concerns position 7 (see page 4)
Rear axle body to underbody.
Access through drilled holes which must be made in the
floor panel from the vehicle interior.
Use existing centrepunch marks.
Drill Æ
34 mm / 1.3 in. hole, deburr edge and remove swarf, apply
corrosion protection.
Split plastic ring using screwdriver or small chisel.
Remove nut using welding rod or offset long-nose pliers.
Fit new locking nut "without plastic rings”.
Tighten bolt.
Seal drilled hole with cap.
|
|
|
Replace Locking Nuts (Locations without Access)
Omega-B
Concerns position 8 (saloon) and 7 (see page 3)
Rear axle body to underbody.
Position of cage with nut to main underbody brackets and in
side of floor cross member.
Access through drilled holes which must be made in the
floor panel from the vehicle interior (see dimensional specifications).
Drill Æ
34 mm / 1.3 in. hole, deburr edge and remove swarf, apply
corrosion protection.
Split plastic ring using screwdriver or small chisel.
Remove nut using welding rod or offset long-nose pliers.
Fit new locking nut "without plastic rings".
Tighten bolt.
Seal drilled hole with cap.
|
|
|
Replace Locking Nuts for Seat Mounting
Vectra-B
Concerns position 1, rear of front seat to vehicle floor.
Access through drilled holes which must be made in the
vehicle underbody from outside.
Use centrepunch marks on vehicle underbody.
Example, locking nut on transmission tunnel side of
position 2:
Drill Æ
34 mm / 1.3 in. hole, deburr edges and remove swarf, apply
corrosion protection.
Bend open retention tabs of the cage with a screwdriver.
Slide nut out of cage and remove using screwdriver.
Install new locking nut in cage with long-nose pliers or
screwdriver.
Tighten bolt and seal drilled hole with cap.
|
|
|
Replace Locking Nuts for Seat Mounting
Vectra-B
Example: Position 1 driver's seat door-side mounting.
Drill holes in vehicle underbody, see operation on page 10.
Secure cage with bolt. Drill out cage spot welds in vehicle
from inside.
Remove bolt. Remove cage through hole with long-nose
pliers.
Mark and centrepunch spot welding positions from old
component for the new cage. Use a Æ
5.4 mm / 0.21 in. drill.
Drill and deburr floor panel as required. Remove swarf,
apply corrosion protection.
Insert cage through hole in vehicle underbody. Tighten bolt
and use it to position cage. Fasten cage with aluminium pop rivets
(Æ
5.2 mm / 0.2 in.) with flat head ( Æ 10 mm / 0.4 in.).
Unscrew bolt, install seat frame.
|
|
|
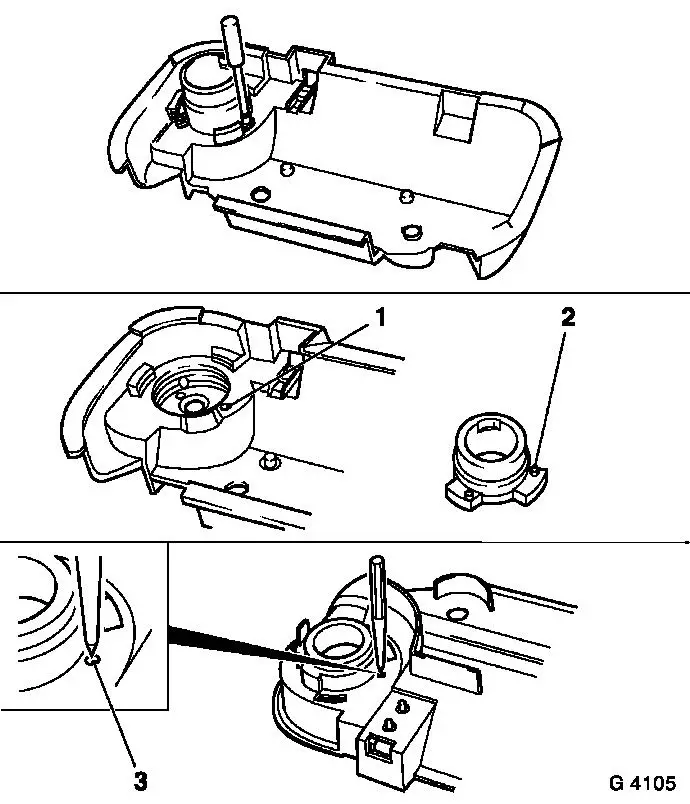
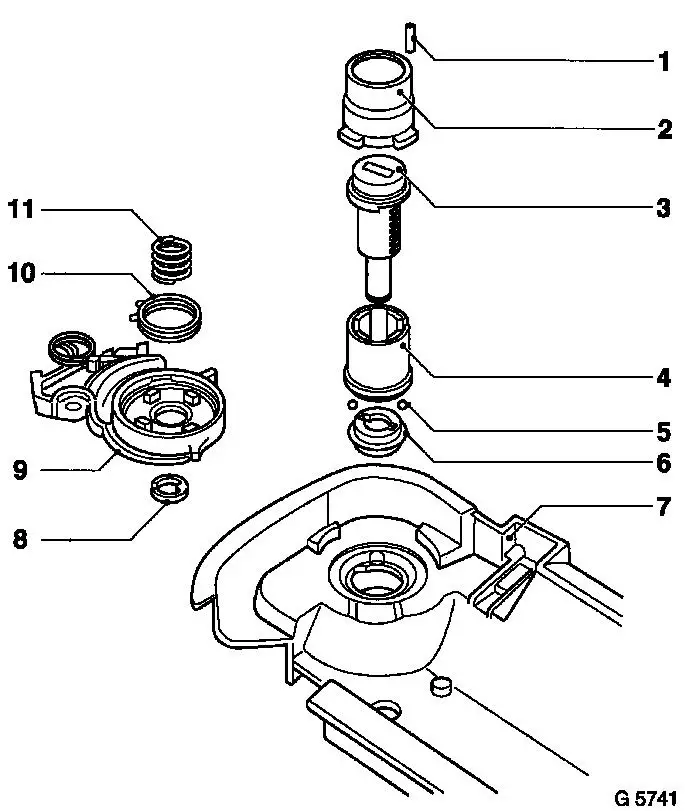
Replace Outer Rail Locking Nut for Front Seat Mounting
Omega-B
Remove front seat.
Access through holes which must be made in the vehicle
underbody from outside.
Use centrepunch marks (2+3) on vehicle underbody.
Drill Æ
34 mm / 1.3 in. hole, deburr edge and remove swarf, apply
corrosion protection.
Drill spot welds in front of the spacer plate.
Centrepunch spot weld (5)
Drill using Æ
8 mm / 0.3 in. drill.
Open cage.
Bend cage open downwards using drift punch.
|
|
|
Replace Outer Rail Locking Nut for Front Seat Mounting
Omega-B
Replace locking nut from below.
Open cage wide enough to permit removal of the nut with
long-nose pliers.
Remove nut, insert new nut and lock with bolt from above.
Perform safety measures to prevent sparks and fire hazards
when welding.
Close cage and weld drilled-out spot welds from above while
counterholding from below with thin straightening lever.
Grind spot welds flush.
Seal spot weld and drilled hole with corrosion protection.
Seal drilled hole with cap.
|
|
|
Replace Rear Inner Threaded Plate for Front Seat
Mounting, Omega-B
Remove front seat.
Access through drilled holes which must be made in the
vehicle underbody from outside.
Use centrepunch mark (1)
on the vehicle underbody.
Operation as on page 13
(Remove heat shield panelling).
Drill Æ
34 mm / 1.3 in. hole, deburr edge and remove swarf, apply
corrosion protection.
Remove spacer plate.
Apply centrepunch (A).
Drill out spot weld with Æ
8 mm / 0.3 in. drill.
Lever out spacer plate with chisel.
|
|
|
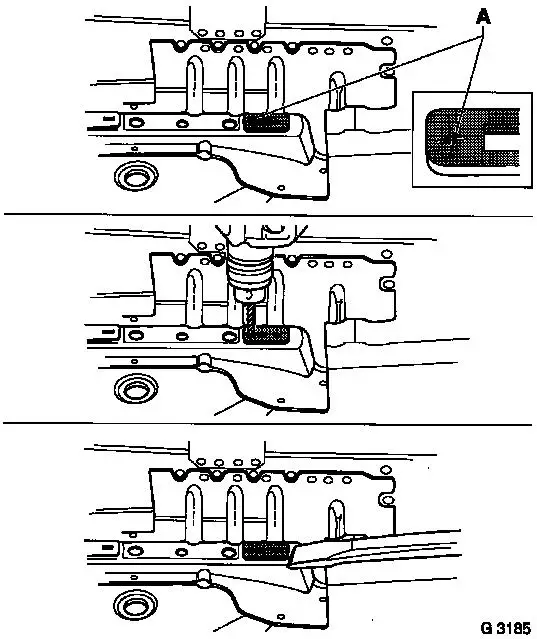
Replace Rear Inner Threaded Plate for Front Seat
Mounting, Omega-B
Replace threaded plate (seat belt version):
Drill out 4 spot welds from above with Æ 8 mm / 0.3 in. drill.
Insert conical drift punch in threaded hole and knock off
threaded plate.
Remove plate from below with long-nose pliers.
Align mounting surface for spacer plate.
Check dimensions of unit with a ruler.
Perform safety measures against sparks and fire hazards
when welding.
Insert new threaded plate, tighten bolt to lock unit and
weld threaded plate from above, counterholding with thin straightening lever.
|
|
|
Replace Rear Inner Threaded Plate for Front Seat
Mounting, Omega-B
Attach spacer plate.
Perform safety measures against sparks and fire hazards
when welding.
Remove locking bolt and weld spacer plate to previous
fastening point. The rectangular hole in the spacer plate must be located
directly over the rectangular hole in the reinforcement.
Grind welding seam flush.
Seal welding seam and drilled hole with corrosion
protection.
Cement galvanised plate (50 x 50 x 1 mm / 2 x 2 x
0.04 in.) over drilled hole (Adhesive 90 295 281 / 15 04 803) and fasten
using aluminium pop rivets (Æ
5.2 mm / 0.2 in.) with flat heads (Æ 10 mm / 0.4 in.), then apply underbody
protective coating.
Install front seat.
|
|
|
Replace Front Welding Nut for Inner Front Seat Mounting
Omega - B
Remove front seat.
Access through drilled holes which must be made in the
vehicle underbody from outside.
Use operation on page 13 for centrepunch (4) on the vehicle
underbody.
Remove spacer plate.
Mark with centrepunch.
Drill out spot weld with Æ
8 mm / 0.3 in. drill.
Lever out spacer plate with chisel.
Replace welding nut and attach spacer plate.
Operation as for rear threaded plate on front seat mounting
(see page 17).
|

|
Recommended Tightening Torques
|
|
Nm
|
|
Astra-F
|
|
|
1 Front axle mounting on radiator cross
member
|
110
|
|
Vectra-B
|
|
|
1 and 2 Front axle to side member
3 Front axle to front floor support
4 Front axle to front of underbody
5 Rear axle to car jack support
6 Rear axle to car jack support
7 Rear axle to side member
1 Front seat to vehicle floor
|
100
1)
100
1)
100
1)
90
1)
90
1)
90
1)
20
|
|
Omega-B
|
|
|
1 Front axle to radiator cross member
2 Front axle to side member
3 Front axle to side member
4 and 5 Rear axle to side of floor panel
6 Rear axle to side member
7 Rear axle to cross member
Side of floor panel
8 Rear axle to underbody main brackets
1 Front seat to vehicle floor
|
65
1)
150
1)
130
1)
65
65
125
65
20
|
Must be tightened in 2 stages
1) 45°+15°
2) 30°+15°
3) 60°+15°
Parts
Designation Part no. Catalogue no. Vehicle
Locking nut (M12 x 1.5) 90 468 617 03 02 926 Astra-F
Locking nut (M12 x 1.5) 90 468 617 03 02 926 Vectra-B
Locking nut (M12 x 1.5) 90 468 617 03 02 926 Omega-B
Locking nut (M14 x 1.5) 90 497 169 03 02 871 Omega-B
Locking nut (M10 x 1.25) 90 497 190 04 02 881 Omega-B
Outer seat rail
Spacer plate 90 229 596 01 80 959 Omega-B
Nut 90 376 985 01 80
962 Omega-B
Cage 90 230 913 01 80
961 Omega-B
Inner seat rail
Spacer plate 90 229 595 51 80 558 Omega-B
Nut 09 291 942 01 80
958 Omega-B
Threaded plate 90 563 353 01 80 963 Omega-B
Cap (34 mm) 90 120 285 01 78
038
Bolt (M12 x 27) 11 091 631 20 00
608 Astra-F 1
Bolt (M12 x 31) 90 468 527 03 02 922 Omega-B 1
Bolt (M14 x 71) 11 094 602 20 02
602 Omega-B 2
Bolt (M14 x 30) 11 095 561 20 02
603 Omega-B 3
Bolt (M10 x 34) 11 096 331 20 00
437 Omega-B 4-6
Bolt (M14 x 117) 11 092 045 20 00
708 Omega-B 7
Bolt (M10 x 41) 90 498 577 04 02
488 Omega-B 8
Bolt (M12 x 70) 11 095 961 20 00
733 Vectra-B 1-3
Bolt (M12 x 30) 11 097 811 20 00
732 Vectra-B 4
Bolt (M12 x 41) 90 497 723 04 02
487 Vectra-B 5+6
Bolt (M12 x 127) 11 097 561 20 00
667 Vectra-B 7
Bolt (M8 x 30) 90 482 552 01 65 682 Up
to MY 97 Front seat to floor
Bolt (M8 x 30) 90 584 606 51 65 916 As
of MY 97 Front seat to floor
Time Allowance:
|
Operation No.
|
|
Operation
|
Time Allowance
|
|
|
|
Front seat with Backseat - Remove and Reinstall
|
|
|
|
|
|
TC : 01, 40, 54, 71, 73, 76, 97
|
|
|
|
|
C 5500 00
|
Right side
|
Time allowances
|
|
|
|
C 5510 00
|
Left side
|
remain unchanged
|
|
|
|
|
In addition:
|
|
|
|
|
003
|
Replace one locking nut / threaded plate for inner seat mounting
|
1.0 hr
|
Omega-B
|
|
|
|
|
NA
|
Astra-F,
|
|
|
|
|
|
Vectra-B
|
|
|
004
|
Replace one locking nut / threaded plate for outer seat mounting
|
NA
|
|
|
|
|
|
|
|
|
|
E 1176 00
|
Remove and install front axle body
|
Time allowance
|
|
|
|
|
TC : 02, 04, 11, 33
|
remains unchanged
|
|
|
|
|
In addition:
|
|
|
|
|
007
|
Replace one locking nut in side or cross member
|
.2 hr
|
Astra-F,
|
|
|
|
(installation aperture present)
|
|
Vectra-B,
|
|
|
|
|
|
Omega-B
|
|
|
008
|
Replace one locking nut in side or cross member
|
NA
|
|
|
|
|
+: make installation aperture
|
|
|
|
|
|
|
|
|
|
|
F 6501 00
|
Rear Axle - Remove and Reinstall Completely
|
Time allowance
|
|
|
|
|
TC : 01, 06, 12, 30, 31, 40, 62
|
remains unchanged
|
|
|
|
|
In addition:
|
|
|
|
|
014
|
Replace one locking nut in side or cross member
|
.2 hr
|
Astra-F,
|
|
|
|
(installation aperture present)
|
Vectra-B,
|
|
|
|
|
|
Omega-B
|
|
|
|
015
|
Replace one locking nut in side or cross member
|
.5 hr
|
Omega-B
|
|
|
|
+: make installation aperture
|
NA
|
Astra-F,
|
|
|
|
|
Vectra-B
|
|
|
|
|
Time allowances will be published in the coming revised editions.
|
