Subject:
Removal
and Installation of Directly Adhered Glass Screens in Service
Vehicles:
All
except Frontera, Monterey, Campo
General:
The
adhesive technology in production has been developed with the use of the most
modern adhesive and glass installation systems.
At
the same time, the number of glass screens with PU trim strips in the
Vectra/Cavalier, Calibra and Tigra has been increased.
In
the Service sphere, the oscillating cutter, the protective hose and the insert
awl for the wire cutter set have been introduced into the delivery range.
This Technical Information
Bulletin offers a recap of the most important points for guaranteeing
non-destructive removal of glass screens. This Technical Information Bulletin
does not replace the information in the Service Instructions which must also be
observed.
|
Operations - Quick Overview
Areas
of Application
Service
Literature
Service
Instructions,
Technical
Information Bulletins
Materials,
Products, Tools
Positioning
(Cutting Wires)
Wire
Lengths/Application/Cutting
Application
of Protective Hose
Application
of Thermoknife
Application
of Oscillating Cutter
PU
Activator
Application
of Adhesive
Bond
Parts
Tensioning
Belts
Waiting
Periods
Environmental
Protection/Disposal
|

|
|
Operations - Details
Areas of Application
All
directly adhered glass screens (example: Corsa-B, Tigra)
Windscreen
(1)
Rear
screen / tailgate screen (2)
Side
windows (3)
Does
not apply for bolted or rail-mounted screens
|
|
|
Service-Literatur
Service Literature
1 Existing
Technical Information Bulletins
2 Brochures
(e.g. New Technical Features for new product features)
3 Service
Instructions
Vehicle-specific
operations and instructions
|
|
|
Materials, Products, Tools
From
the "Special Service Tools" catalogue:
Wire
Cutter Set MKM-589-B (with protective hose and insert awl)
Thermoknife
Set MKM-590-B
Tensioning
Belts MKM-591
Window
Screen Suction Lifter MKM-641
Oscillating
Cutter1)
MKM-846-1E
(electric) or
MKM-846-1P
(pneumatic)
Knife
Set, Tailgate Screen, Tigra2)
MKM-846-50
Knife
Set, Windscreen, Tigra2)
MKM-846-60
Scraper
Set2) MKM-846-70
Assembly
Tool Set, Tigra MKM-848
1) Always specify when ordering
E = electric P = pneumatic
2) Suitable for MKM-846-1E and MKM-846-1P
|
|
|
|
|
Allocation
of permissible special service tools to individual screens and vehicle types
|
Type
|
Windscreen
|
Rear screen
|
Tailgate screen
|
Side screens
|
|
Kadett-D/
Astra-D
|
-
|
-
|
Wire
|
-
|
|
Ascona-C
|
-
|
-
|
Wire/osc. cutter*)
|
-
|
|
Kadett-E/
Astra/ Belmont
|
Wire/thermoknife/ osc. cutter*)
|
Wire1)/thermoknife1)/ osc. cutter*)1)
|
Wire1)/thermoknife1)/ osc. cutter*)1)
|
Wire1)/thermoknife1)/ osc. cutter*)1)
|
|
Astra-F
|
Wire/thermoknife/ osc. cutter*)
|
Wire2)/thermoknife2)/ osc. cutter*)2)
|
Wire/thermoknife/ osc. cutter*)
|
-
|
|
Corsa-B
|
thermoknife/ osc. cutter*)
|
-
|
Wire/thermoknife/ osc. cutter*)
|
Wire3)/thermoknife3)
|
|
Vectra/
Cavalier
|
Wire/thermoknife/ osc. cutter*)
|
Wire/thermoknife/ osc. cutter*)
|
Wire4)/thermoknife/
osc. cutter*)
|
-
|
|
Calibra
|
thermoknife/ osc. cutter*)
|
-
|
Wire4)/osc.
cutter*)
|
-
|
|
Omega/
Carlton
|
thermoknife/ osc. cutter*)
|
Wire/thermoknife/ osc. cutter*)
|
Wire/thermoknife/ osc. cutter*)
|
-
|
|
Senator-B
|
thermoknife/ osc. cutter*)
|
Wire/thermoknife/ osc. cutter*)
|
Wire/thermoknife/ osc. cutter*)
|
-
|
|
Omega-B
|
thermoknife/ osc. cutter*)
|
Wire/thermoknife/ osc. cutter*)
|
thermoknife/ osc. cutter*)
|
-
|
|
Tigra
|
osc. cutter*)
|
-
|
osc. cutter*)
|
-
|
*) Oscillating cutter (electric or pneumatic)
1) Does not apply for Models 37, 38, 47, 48
(rubber-mounted glass screens)
2) Does not apply for Model 53-B
(rubber-mounted glass screens)
3) Does not apply for Models 71 (bolted
swing-out window), 78, 79 (bolted window)
4) Use only with protective hose (Wire Cutter
Set MKM - 589 - B)
Adhesives
(Parts and Accessories Delivery Range)
1-component
Screen Adhesive - 310 ml
2-component
Screen Adhesive Set - 310 ml
Processing
with mixer rod.
2-component
Screen Adhesive Set - 2 x 225 ml
Processing
with electric pistol Betagun 2000 and forced mixture.
Note:
The
adhesives are based on polyurethane (PU).
1-component
screen adhesives cure physically on application of oxygen and air
humidity.
2-component
screen adhesives are fast-reacting chemical systems. Curing occurs without
the influence of air humidity.
Always
check the date of expiry before using adhesives.
|
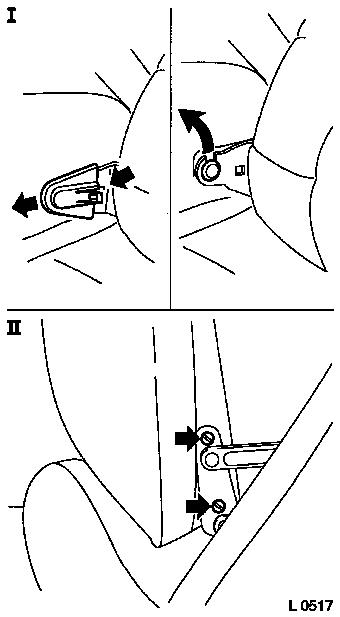
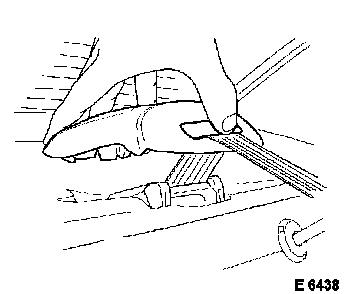
Positioning (Cutting Wire)
General
Two
technicians are required (to avoid damage)
Wear
protective gloves and goggles.
Do
not use cutting agents and/or lubricants.
Cutting
agents and/or lubricants always lead to a loss of adhesion when the screen is
installed.
Remove
attaching parts as specified in Service Instructions.
|
|
|
Screens without PU Trim Strips
All
screens approved for wire (table, see page 7), except tailgate screen for
Vectra/Cavalier and Calibra
Use
square wire (MKM - 589 - 1)
Wear
protective goggles
Wear
safety gloves
Maximum
wire length 600 mm/24 in.
Guide
cutting wire through adhesive bed from inside outwards Use protective
hose to avoid damage
|

|
|
Screens with PU Trim Strips
Vectra/Cavalier
and Calibra
Tailgate
screen
Construct
ad hoc tool for drill bit:
welding
rod Ø 3 mm/0.12 in., 90 mm/3.5 in. long, grind to a point
Slide
ad hoc tool under trim strip from outside at point shown (A), tilt drill by
90° (parallel to glass surface)
Drill
wire application hole from outside inwards (B)
Use
protective hose from MKM-589-B.
Pull
cutting wire through drilled hole to inside
Wire
length 600 mm/24 in.
|
|
|
Wire Lengths/Application/Cutting
General
Position: Wire length:
windscreen,
rear 600 mm/24 in.
screen
and tailgate
screen,
side
Windscreen, 1200
to
rear
screen and 1400 mm/
tailgate
screen, 48 to 55 in.
upper and lower
Side
windows 600 mm/24 in.
Always
use protective hose (MKM-589-4)
Screens without PU Trim Strips
All
screens approved for wire (see table page 7), except tailgate screen for
Calibra and Vectra/Cavalier
Pull
cutting wire flat to the edge of the glass on the outside and keep under
tension.
Cut
on inside.
Avoid
damage to the moulded headlining and upholstery in the interior.
Guide
handle on inside close to the screen.
Cut
to the corner of the screen, then change wire.
Apply
corrosion protection if necessary.
|

|
|
Screens with PU Trim Strips
Calibra
Tailgate
screen with PU trim strip.
Use
protective hose (MKM-589-4)
Cut
at side:
Route
cutting wire on outside under lip of trim strip (A) and guide along
adhesive bead.
Keep
cutting wire under tension on outside.
Always cut on the inside
(B).
Cut
to the corner of the screen, then change wire.
|

|
|
Cutting
at top and bottom:
Maximum
wire length 1400 mm/ 55 in.
Apply
cutting wire and protective hose at corner of screen (A) and apply under lip
of trim strip using insert awl (B).
Keep
cutting wire under tension on outside.
|
|
|
Cut
on inside.
Keep
cutting wire horizontal under tension on outside. Cut to corner of screen,
then change wire.
Apply
corrosion protection if necessary.
|
|
|
Screens with PU Trims Strips (Additional Adhesive Trim Strip Ends)
Vectra/Cavalier
Tailgate
screen with PU trim strip.
Cut
at sides:
Operation
see page 12.
Cut
at bottom:
Operation
see page 13.
Cut
at top:
Heat
up trim strip ends with foil adhesive (hot air dryer) and detach from body.
Route
cutting wire under ends of trim strip.
Wire
application and cutting see page 13.
Apply
corrosion protection if necessary.
Adhere
trim strip ends with sealing compound, alternatively with glue
|
|
|
Application of Protective Hose
To
prevent paint damage and damage to the PU trim strips, use Protective Hose
MKM-589-4.
Guide
protective hose over cutting wire.
Guide
free end of cutting wire through adhesive bed
Route
protective hose with insert awl under lip of trim strip.
Cut
as described in previous section
Note:
Protective
hose will be likewise cut through and must not be reused.
|
|
|
Application of Thermoknife
All
screens approved for thermoknife (table page 7).
Ensure
adequate ventilation of workplace.
Use
prescribed cutting knife (Service Instructions).
Note
cutting direction, as specified in operating instructions.
Recut
remains of adhesive bead to thickness of approx. 1 mm/0.04 in.
Apply
corrosion protection if necessary.
|
|
|
Application of Oscillating Cutter
All
screens approved for oscillating cutter (electric or pneumatic) (table page
7).
Note
instructions.
Before
starting, sharpen knife using commercially available whetting stone at low
speed.
Use
prescribed knife.
Observe
Service Instructions
Example,
Tigra tailgate screen (Knife Set MKM-846-50):
Area
1 Knife MKM-846-4
Area
2 Knife MKM-846-2
Area
3 Knife MKM-846-4
Area
4 Knife MKM-846-3
For
recutting, use Scraper Set MKM-846-70.
|
|
|
PU Activator
Only on new screens with PU
trim strips.
Sand
adhesive surface of PU trim strip with dry sandpaper grain P 80 - P 100.
Blow
off adhesive surface with compressed air.
Apply
PU activator on adhesive surface.
Allow
to dry for 10 minutes.
Apply
adhesive to activated surfaces.
Note: For Tigra tailgate
screen, do not apply PU activator to black screen print (A).
The
PU activator can cause residue to mix with the glass primer (possible
disruption of adhesion).
Use
only glass primer on screen print.
Important: Note
instructions enclosed with adhesive set.
Only
PU activator guarantees optimal adhesion of the screen adhesive.
|
|
|
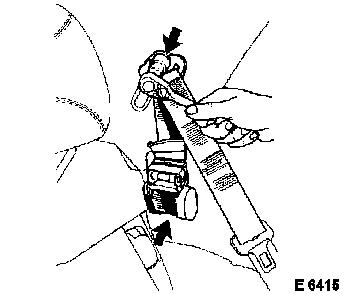
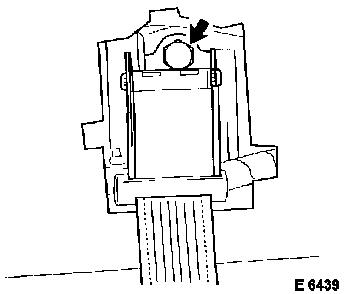
Adhesion
Place
screen on holder (1)
Alternatively,
use flat commercially available holding frame for working with Betagun
(easier application)
Prepare
screen.
Apply
adhesive using precut triangular nozzle from adhesive set (2).
Apply
adhesive only to screen
Bond Parts
Insert
screen (3).
Align
as specified in Service Instructions.
Apply
only light pressure (hand or tensioning belt).
To
prevent excessive tension and the risk of glass breakage, maintain a minimum
distance of 4 mm/0.16 in. (4).
|
|
|
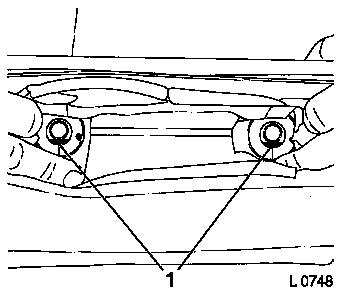
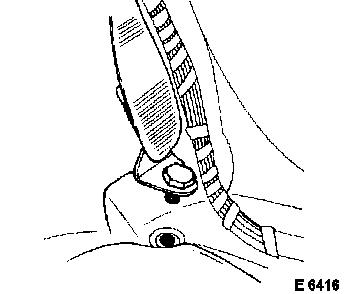
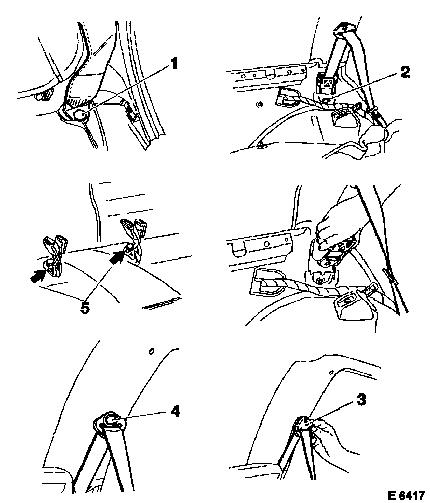
Tensioning Belts
All
screen types have intrinsic pretension. Therefore, tensioning belts must only
be applied with light pressure, even for vertical screens.
Important: Risk of glass breakage
(tension) after the adhesive has hardened if the screen frame is too close to
the body flange.
Minimum
distance from glass to body should be 4 mm/0.16 in.
Select
correct position of rubber pad:
1
= Correct
2
= Incorrect
Remove
tensioning belts after approx. 1 hour, to ensure that the remaining hardening
process is free of tension.
Important: Install
tailgate screen for Tigra with Screen Installation Set MKM-848:
MKM-848-1 Upper
Spacer
MKM-848-2 Fixing
Piece, Side
MKM-848-3 Rear
Spacer
Do
not use tensioning belts.
|
|
|
Waiting Periods
Vehicles
with and without driver's airbag:
If
1-component screen adhesive is used:
Put
vehicle into operation at the earliest after 2 hours.
The
adhesive is hardened after 36 hours.
Hardening
is caused by air humidity (physical curing).
If
2-component adhesive set is used:
Vehicle
is unconditionally ready for operation after 1 hour.
Hardening
is caused by a chemical reaction.
Vehicles with driver's and co-driver's airbags:
If 1-component or 2-component adhesives are used:
Allow vehicle to stand overnight.
|
|
|
|
|
Environmental
Protection/Disposal
1-component
adhesive: Normal refuse
2-component
adhesive set: Press out remains from cartridge. Dispose of in normal refuse.
Dispose
of black primer, cleaner and PU activator in special refuse.
Note: Observe instructions enclosed in adhesive set.
Parts
1-component
Screen Adhesive - 310 ml Part no. 90 166 373,
Cat. no. 15 04 802
Physical
curing with air humidity,
36
hours.
2-component
Screen Adhesive Set - 310 ml Part no. 90 443 098 Cat.
no. 15 04 807
Processing
with mixer rod Part no. 90
397 005 Cat. no. 15 04 805
Chemical
curing, 1 hour or overnight.
2-component
Screen Adhesive Set - 2 x 225 ml Part no. 90 398 386 Cat.
no. 15 04 806
Processing
with electric handgun
Betagun
2000 and forced mixing (Euroline).
Chemical
curing, 1 hour or overnight.
Locking
Compound Part no.
90 167 347 Cat. no. 15 10 177
For
adhesion of trim strip ends
Glue Part
no. 90 297 969 Cat. no. 15 00 005
For
adhesion of trim strip ends
Safety
Regulations
Note:
Perform
all work described in the operations in observance of valid national legislation,
accident prevention regulations, regulations from trade guilds or similar
organisations.
The
legislation regarding road traffic safety of motor vehicles applies.
Observe
the relevant legal requirements regarding environmental safety and health
protection.
Note
the instructions on the packaging and enclosed package slips.
Time
Allowance
The
time allowances can be found in the relevant valid Labour Time Guide catalogues.
