|
Ballast Xenon Dipped Beam, Remove and Install
Caution
|
High voltage! Do not touch the components of the xenon dipped
beam when the dipped beam is switched on. Ignition and light switch
OFF. Remove fuses F22 and F31 in interior fuse box.
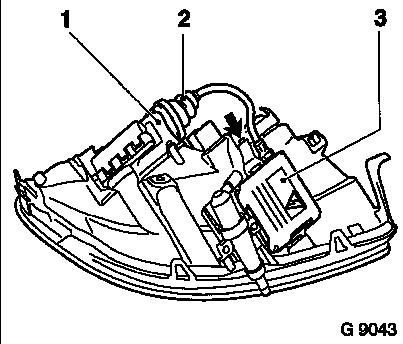
 Remove Remove
Headlamp – see operation "Headlamp with Xenon Dipped Beam,
Remove and Install (up to MY 2000)" or "Headlamp with Xenon Dipped
Beam, Remove and Install (as of MY 2000)". Unscrew three Torx bolts
for lamp cover cap (1) and slide cover cap with high-voltage cable
grommet (2) away from lamp socket. Release high-voltage plug by
turning to the left and disconnect. Only for right headlamp:
Release servo motor for headlamp range control by a 1/4 turn and
detach. Ballast bracket – unscrew 1 bolt (arrow) and remove
ballast (3) together with high-voltage plug and cable grommet.
Illustration shows left headlamp, right analogous.
|
|
 Install
Ballast to headlamp. High voltage plug, bulb protective cap,
headlamp.
Check headlamp adjustment, correct if necessary – see
operation "Headlamp, Check and Correct".
|
