
Vectra B
Field Remedy: 1291
Remedy:There are 3 possibilties: I: Installation of two reinforcement plates, only in case of
cracks and WITHOUT strong deformation of the door body.
II:   Omega-B: Welding the check link - front door mounting bracket and
      installation of two reinforcement plates in case of cracks
      and strong deformation of the door body.
III:  Vectra-B: Welding the check link - front door mounting bracket
      WITHOUT installation of two reinforcement plates in case of cracks
      and strong deformation
Working Procedure: Possibility I (Omega-B and Vectra-B): 1. Disconnect battery. 2. Remove inner panelling - front door - see working procedure ”Inner panelling – front door, Remove
and Install”, unit ”C”, of the corresponding Service Instruction.
3. Remove loudspeaker - see working procedure ”Loudspeaker - Front door, Remove and
Install”, unit ”R”, of the corresponding Service Instruction.
4. Separate wiring harness connector of front door.
5. Remove check link - front door.
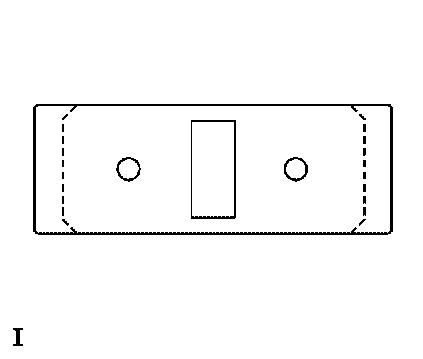
6. Shorten and bevel the outer reinforcement plate on both sides by
7.5 mm (Fig. I).
 7. Paint the reinforcement plates in the color of the car.
 8. Set original inner reinforcement plate onto the check link - front
    door and insert into front door.
 9. Install the modified outer reinforcement plate to the check link -
    front door with new fixing screws – use locking compound.
10. Install wiring harness connector of front door.
11. Install loudspeakers
     - see working procedure ”Loudspeaker - Front door, Remove and
     Install”, unit ”R”, of the corresponding Service Instructionne.
12. Install inner panelling – front door - see working procedure ”Inner panelling – front door, Remove
and Install”, unit ”C”, of the corresponding Service Instruction.
13. Connect battery.
14. Program volatile memories.
Possibility II (Omega-B): 1. Remove inner panelling - front door - see working procedure ”Inner panelling – front door, Remove
and Install”, unit ”C”, Service Instruction Omega-B.
2. Remove loudspeaker - see working procedure ”Loudspeaker - Front door, Remove and
Install”, unit ”R”, Service Instruction Omega-B.
3. Remove outside mirror - see working procedure ”Replace Outside Mirror”, unit ”R”,
Service Instruction Omega-B.
4. Open sash window. 5. Partially loosen front door window guide seal. 6. Remove guide rail of front door window. 7. Close sash window. 8. Disconnect battery. 9. Remove front door - see working procedure ”Front or rear door, Remove and
Install”, unit ”A”, Service Instruction Omega-B.
10. Set door to installation carrier.
11. Disconnect front door wiring harness up to loudspeaker area.
12. Remove check link - front door.
13. Remove front door gum seal in the front area.
14. Punch the welding points of the mounting bracket of the check
link - front door (8 per door).
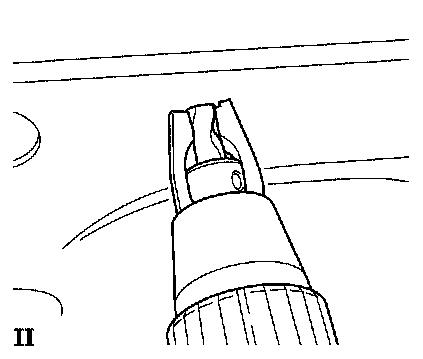
15. Drill through the welding points with a welding point drill
(pic. II).
16. Remove drill chips completely.
17. Remove the check link - front door mounting bracket with a
chisel and a drift punch from the front door.
18. Take off the check link - front door mounting bracket through
the loudspeaker aperture.
19. Perform cleaning work.
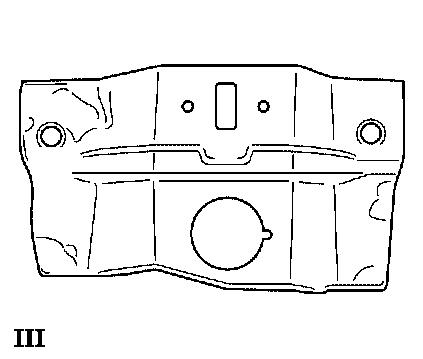
20. Insert new check link - front door mounting bracket through the
loudspeaker aperture (pic. III).
21. Fix the check link - front door mounting bracket with two drift
punches.
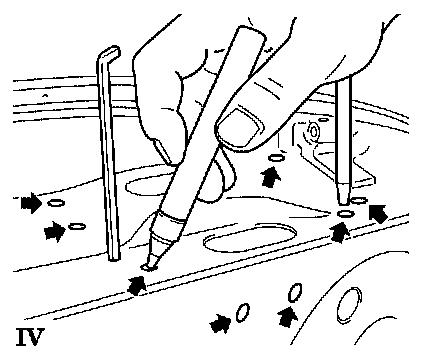
22. Mark the welding points by drill holes in the new check link -
front door mounting bracket (pic. IV).
23. Take off the check link - front door mounting bracket.
24. Grind the welding areas of the check link - front door mounting
bracket with an angle grinder.
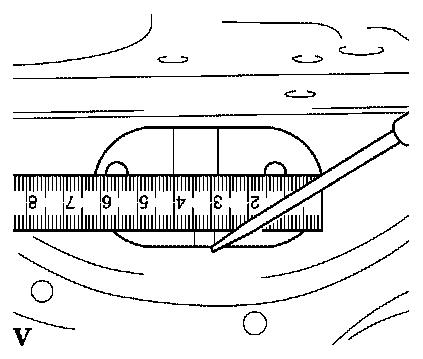
25. Insert the check link - front door mounting bracket and center
it (pic. V). Center the oval door aperture to the exterior sheet.
Mark rectangular check link - front door aperture to the check
link - front door mounting bracket, centered 6 mm.
26. Fix the check link - front door mounting bracket (2 fixing
screws M5).
27. Protect water-repellent foil and inside of door from sparks.
28. Weld the check link - front door on mounting bracket.
29. Remove fixing screws M5.
30. Grind welding points with angle grinder.
31. Perform cleaning work.
32. Apply zinc spray paint to welding area.
33. Shorten the original outer reinforcement plate on both sides
(see pic. I).
34. Paint the door with reinforcement plates.
35. Set modified inner reinforcement plate onto the check link -
front door and insert into front door.
36. Install the outer reinforcement plate to the check link - front
door with old fixing screws – use locking compound.
37. Apply cavity protection in the repair area.
38. Lay and fix front door wiring harness.
39. Install door and attaching parts as mentioned above, in
reversed order.
40. Install outside mirror
     - see working procedure ”Replace Outside Mirror”, unit ”R”,
     Service Instruction Omega-B.
41. Install loudspeaker - see working procedure ”Loudspeaker - Front door, Remove and
Install”, unit ”R”, Service Instruction Omega-B.
42. Install inner panelling - front door - see working procedure ”Inner panelling – front door, Remove
and Install”, unit ”C”, Service Instruction Omega-B.
43. Connect battery.
44. Program volatile memories.
Possibility III (Vectra-B): 1. Remove inner panelling – front door - see working procedure ”Inner panelling – front door, Remove
and Install”, unit ”C”, Service Instruction Vectra-B.
2. Remove loudspeaker - see working procedure ”Loudspeaker - Front door, Remove
and Install”, unit ”R”, Service Instruction Vectra-B.
3. Remove exterior rear view mirror - see working procedure ”Outside rear
view mirror, Remove and Replace”, unit ”R”, Service Instruction
Vectra-B.
 4. Open sash window.
 5. Partially loosen front door window guide seal.
 6. Close sash window.
 7. Disconnect battery.
 8. Remove front door
- see working procedure ”Front or rear door, Remove and
Install”, unit ”A”, Service Instruction Vectra-B.
9. Set door to installation carrier.
10. Disconnect front door wiring harness up to loudspeaker area.
11. Remove check link - front door.
12. Straighten the deformation of the check link - front door
mounting bracket.
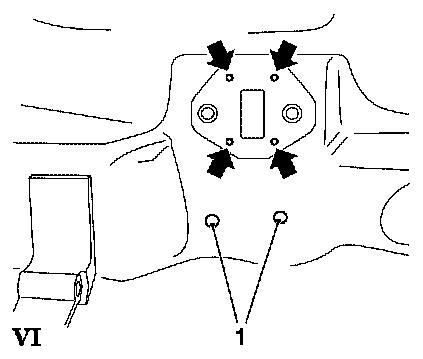
13. Punch the welding points of the mounting bracket of the check
link - front door (pic. VI, 1).
14. Punch new fixing points in the area of the check link - front
door mounting bracket (pic. VI, arrows).
15. Drill through the welding points and the fixing points with
a 5 mm drill.
16. Debur drill holes.
17. Remove drill chips completely.
18. Clean the inner check link - front doorop mounting bracket and
remove cavity protection.
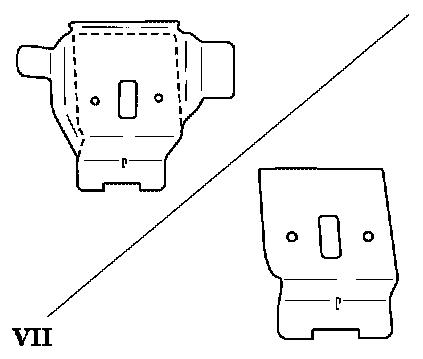
19. Adapt new check link - front door mounting bracket (pic. VII).
20. Insert new check link - front door mounting bracket from the
    inside into the front door and fix it with 2 fixing screws and
    fixing nuts M5.
21. Mark the welding points by drill holes in the new check link -
    front door mounting bracket.
22. Remove the check link - front door mounting bracket (2 fixing
    screws and fixing nuts M5).
23. Grind the welding areas of the check link - front door mounting
    bracket with an angle grinder.
24. Insert the check link - front door mounting bracket and fix it
    with 2 fixing screws and fixing nuts M5.
25. Grind the front door in the area below the inner panelling for
    ground contact for welding purposes.
26. Protect water-repellent foil and inside of door from sparks.
27. Weld the check link - front door on mounting bracket.
28. Remove fixing screws and fixing nuts M5.
29. Grind welding points with angle grinder.
30. Perform cleaning work.
31. Apply zinc spray paint to welding area.
32. Paint the door with reinforcement plates.
33. Install check link - front door (outside use washers with diameter 20mm).
Note: Heed weldingpoints - washers may not support. 34. Apply cavity protection in the repair area. 35. Lay and fix front door wiring harness. 36. Install the front door - see working procedure ”Front or rear door, Remove and
Install”, unit ”A”, Service Instruction Vectra-B.
37. Connect battery.
38. Open sash window.
39. Install front door window guide seal.
40. Close sash window.
41. Disconnect battery.
42. Install exterior rear view mirror
- see working procedure ”Outside rear view mirror, Remove
and Install”, unit ”R”, Service Instruction Vectra-B.
43. Install loudspeakers - see working procedure ”Loudspeaker - Front door, Remove
and Install”, unit ”R”, Service Instruction Vectra-B.
44. Install inner panelling – front door - see working procedure ”Inner panelling – front door, Remove
and Install”, unit ”C”, Service Instruction Vectra-B.
45. Connect battery.
46. Program volatile memories.
Parts: Part-No.: Catalog-No.: Possibility I: Omega-B: 2 reinforcement plates 09 195 961 90 97 309 2 Fastening screws 13 104 167 20 03 001 Vectra-B: 2 reinforcement plates 09 195 961 90 97 309 2 Fastening screws 13 104 167 20 03 001 Possibility II: Omega-B: 1 front door stop mounting bracket, 90 458 147 90 97 293 left side 1 front door stop mounting bracket, 90 458 148 90 97 294 right side 2 reinforcement plates 09 195 961 90 97 309 2 Fastening screws 13 104 167 20 03 001 Possibility III: Vectra-B: 1 front door stop mounting bracket, 90 507 501 90 01 077 left side 1 front door stop mounting bracket, 90 507 502 90 01 076 right side Labour Times: TC: Hours: T 8 129 10 Repair with 92 0.7 (Omega-B)
reinforcement 1.0 (Vectra-B)
plates without
sidebag
T 8 129 11    Repair with                92           0.8 (Omega-B)
              reinforcement                           1.2 (Vectra-B)
              plates with
              sidebag
T 8 129 12    Repair with                92           3.3 (Omega-B)
              bracket front                           3.3 (Vectra-B)
              check link
              without sidebag
T 8 129 13    Repair with                92           3.5 (Omega-B)
              bracket front                           3.5 (Vectra-B)
              check link
              with sidebag
T 8 129 14    Painting and               92           1.4 (Omega-B)
              finishing work                          1.4 (Vectra-B)
The costs for this repair will be covered for vehicles not older than
3 years and a mileage lower than 100.000 km.
The regular warranty procedure should be used for claiming Set-up-time.
|
||||||||||||||||||||