Alternator Alternator, Remove and Install Notice: G 0009 shows X 20 DTL. For repairs to the alternator: see corresponding operations in Service Instructions "OHC Petrol Engine".
 Remove, Disconnect Remove, Disconnect Remove ribbed V-belts - see operation "Ribbed V-belts, Remove and Install". Remove upper part of air cleaner housing with air intake hose and hot film mass air flow meter - see illustration "Air Cleaner Housing, Air Duct". Remove engine cover and charged air tube (1). Detach conduction bridges (2) or rear wiring trough from glow plugs together with wiring connections. Remove fastening bolts (3) and central heat shield. Remove fastening bolts (4) and left and right heat shield. | 
|
Remove, Disconnect Remove wiring trough from cylinder block (3 fastening bolts) and carefully push away downwards. Remove heat shield and wiring connections from alternator. Disconnect coolant hose (1) from alternator bracket (coolant flange)- collect escaping coolant. Remove upper fastening bolt (2) and lower fastening bolt (3) - remove alternator upwards. | 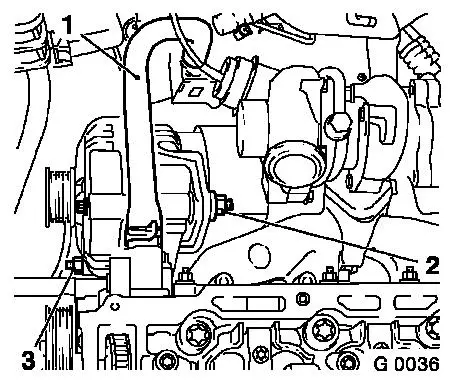
|
 Install, Connect Install, Connect Attach alternator to timing case, cylinder block and alternator bracket - tightening torque 35 Nm / 26 lbf. ft. Attach coolant hose to alternator bracket. Attach cable connections and heat shield to alternator. Fasten wiring trough to cylinder block (3 fastening bolts). Install heat shields. Attach conduction bridges or rear wiring trough to glow plugs together with wiring connections.
Notice: Before assembling components of the intake system (hoses, connections, etc.), they must be cleaned of any possible contamination (grease, oil, etc.). When tightening the hose clamps, be sure to observe exactly the tightening torque of 3.5 Nm / 2.6 lbf. ft.
 Important! Important! It is only ensured that the intake system is free of leaks, thus ensuring operational safety of the engine, if the hose clamps are tightened correctly to the prescribed tightening torque.
Install, Connect Install charge air pipe with new seal ring. Install engine cover on cylinder head cover. Install upper part of air cleaner housing with air intake hose and hot film mass air flow meter - see illustration "Air Cleaner Housing, Air Duct". Install ribbed V-belt - see operation "Ribbed V-belt, Remove and Install". Top up cooling system - see operations "Cooling System, Top up and Bleed" and "Cooling System, Check for Leaks".
|
