volkswagen Workshop Repair Guides

Volkswagen Golf Workshop Service & Auto Repair Manuals

Checking oil pressure switch and oil pressure > < Checking and adjusting valve clearance
4 cyl. carburetor engine, mechanics (1.5, 1.6 and 1.8 litre engine)
Removing and installing parts of lubrication system
 
V17-0529

Note:

  • ◆ All parts shown here can be removed and installed with engine in situ.
  • ◆ Always renew gaskets and oil seals.
  • ◆ If large amounts of metal burr as well as abrasion are found while repairing the engine and this is caused by seizure (e.g. damaged crankshaft and conrod bearings), the oil cooler must be renewed in addition to cleaning the oil ducts thoroughly in order to avoid follow-up damage.
  • ◆ The oil level must not be higher than the MAX. mark (danger of damaging the catalyst).
 
V17-0529

Engine oil specification

Use engine oils as per VW Standard 500 00 or 501 01. Exceptional circumstances only: multi-grade/single grade oils as per API-SF or SG.

Oil capacity1)

with
filter

without
replacement

ä 07.85

3.5 l

3.0 l

08.85 ä

4.0 l

3.5 l

1)     Current values => "Exhaust gas and idling speed test binder"

Checking oil pressure: checking oil pressure switch and oil pressure
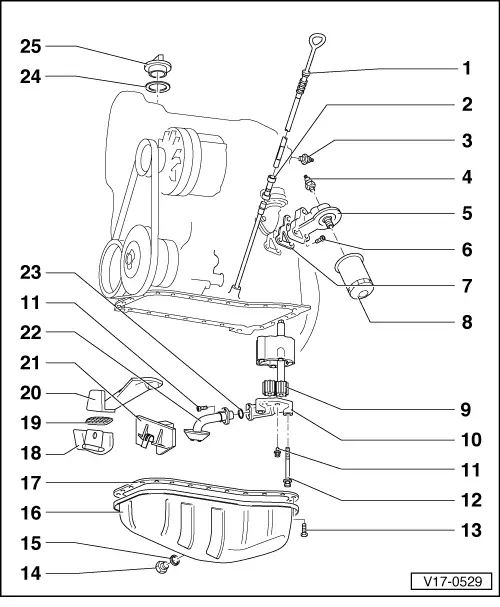
  • Oil dipstick
    • ◆ Quantity difference min/max
      Round dipstick = 1 l
      Flat dipstick = 0.75 l
  • Dipstick guide
    • ◆ 08.89 ä
    • ◆ Remove to draw off oil
 
V17-0529
  • 0.3 bar oil pressure switch (F22), 25 Nm
    • ◆ Switch with tapered thread: 12 Nm, install without oil seal, fit with sealant D3
    • ◆ Series oil seal cannot be removed. In the event of leakage, pinch open seal and renew
    • ◆ Checking => page 17-8
  • 1.8 bar oil pressure switch (F1), 25 Nm
    • ◆ Checking: checking oil pressure switch and oil pressure => page 17-9
    • ◆ Series oil seal cannot be removed. In the event of a leak, pinch open seal and renew
  • Oil filter bracket
  • 25 Nm
  • Gasket
    • ◆ Renew
 
V17-0529
  • Oil filter
    • ◆ Loosen with strap wrench
    • ◆ Tighten by hand
    • ◆ Refer to installation instructions on the oil filter
  • Gears
    • ◆ Checking backlash and axial clearance => Fig. 1 and 2
    • ◆ Gear width:

ä

12.84

26 mm

01.85

ä

30 mm

(hydraulic bucket tappets only)

  • Oil pump cover with pressure relief valve
    • ◆ 08.82 ä
  • 10 Nm
  • 20 Nm
 
V17-0529
  • Bolt
    • ◆ Socket head 8 Nm
    • ◆ Hexagon head 20 Nm, loosen/tighten on flywheel end using 3185
  • Oil drain plug, 30 Nm
  • Oil seal
    • ◆ Renew
  • Oil sump
    • ◆ Note version
  • Oil sump gasket
    • ◆ Renew
    • ◆ Do not bond on
    • ◆ Watch correct position
  • Splash plate
    • ◆ 07.82 ä
    • ◆ If very dirty, remove splash plate and strainer by bending open metal edges and clean
  • Strainer
    • ◆ ä07.82
    • ◆ Clean
 
V17-0529
  • Oil pump cover
    • ◆ With pressure relief valve
    • ◆ ä07.82
  • Splash plate
    • ◆ 08.82 ä
  • Intake pipe
    • ◆ 08.82 ä
  • O-ring
    • ◆ Renew if damaged
  • Gasket
    • ◆ Renew if damaged
  • Cap
 
V17-0005

→ Fig.1     Checking backlash of oil pump

New:

0.05 mm

Wear limit:

0.20 mm

 
V17-0006

→ Fig.2     Checking axial clearance of oil pump

Wear limit:

0.15 mm

Checking oil pressure switch and oil pressure > < Checking and adjusting valve clearance