volkswagen Workshop Repair Guides

Volkswagen Workshop Service and Repair Manuals

Draining and refilling with coolant > < Checking oil pressure switch and oil pressure (engine code: EG)
4 Cyl injection engine (2 valve), Mechanics
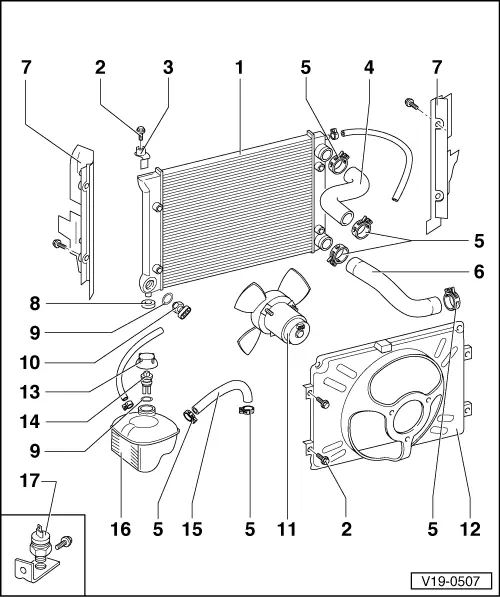
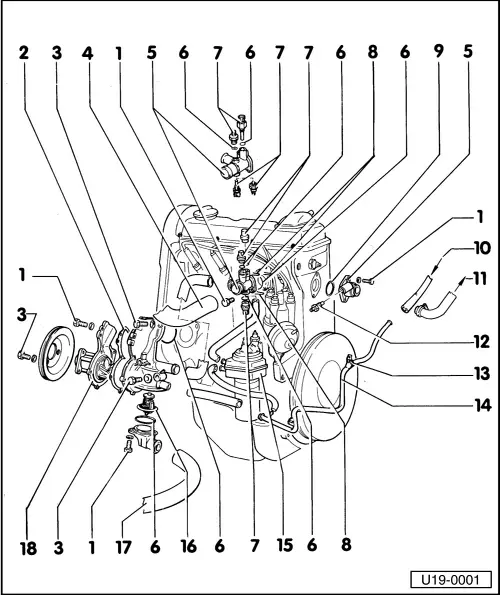
Removing and installing cooling system components
 
V19-0507
  • ◆ Perform cooling system leak testing with V.A.G 1274 and 1274/1A.
  • ◆ Draining and refilling with coolant .
  • ◆ Coolant mixture ratios .

Notes:

  • ◆ Coolant hoses are secured either with spring clips with or screw-type clips. The spring clips can be replaced by screw clips when repairs are performed.
  • ◆ For the installation of the spring clips conventional pliers such as Hazet- 798-5 are recommended.
 
V19-0507
  • ◆ Renews seals and washers.
  • ◆ When the radiator/heat exchanger is renewed, the coolant must be renewed.
  • Radiator
    • ◆ Removal:
    • ‒ Remove air ducts
    • ‒ Detach brackets and coolant hoses
    • ‒ Remove radiator complete with fan and fan cowling
  • 10 Nm
  • Bracket
  • Upper coolant hose
 
V19-0507
  • Spring-type hose clip
  • Lower coolant base
  • Air duct
  • Rubber washer
  • Seal
  • Thermo-switch for electric fan, 35 Nm

Switch

Switching temperature

On

Off

2 pin ▸7/78

90...95 °C

85...90 °C

2 pin 8/78▸

92 ...97 °C

84...91 °C

3 pin
+ = supply
1 = 1st stage
2 = 2nd stage


92...97 °C
99...105 °C


84...91 °C
91...98 °C

 
V19-0507
  • Radiator fan
  • Fan cowling
  • Radiator cap
    • ◆ Check with V.A.G 1274 and 1274/1A
    • ◆ Test pressure 1.2...1.5 bar
  • Switch for coolant shortage indicator
  • To coolant pipe
  • Expansion tank
  • Thermo-switch
    • ◆ Engine Code 2H only
    • ◆ For fan run-on to cool injectors
    • ◆ Checking
 
U19-0001

Notes:

  • ◆ Renew gaskets and seals.
  • ◆ All of the components shown in the illustration can be removed and installed with the engine in.
  • ◆ Fit spring-type clips with conventional pliers, e.g., Hazet - 798-5.
  • 10 Nm
  • Gasket
  • 20 Nm
  • Upper coolant hose
  • Connection
  • Sealing ring
  • Thermo-switch/Temperature sender
    • ◆ Allocation, Engine Codes DX, EG, JH, JJ, KT:

=> Repair Group 25

    • ◆ Allocation, Engine Code 2H:

=> Repair Group 24

 
U19-0001
  • Retaining clip
  • Sealing ring or gasket
  • From heat exchanger
  • To heat exchanger
  • Temperature control switch/Sender
    • ◆ Engine Codes DX, EG 8/78▸, JJ, KT
      Temperature control switch, 7Nm
    • ‒ Connections at temperature control switch => page 19-9 , fig.1
    • ◆ Engine Code EG▸7/78 Temperature sender
  • Connection
    • ◆ Only on vehicles with expansion tank
    • ◆ To expansion tank
  • Coolant pipe
 
U19-0001
  • Oil cooler
    • ◆ 8/84 ▸Engine Codes DX, JH, KT, 2H
    • ◆ ▸7/84 => page 17-8
  • Thermostat
    • ◆ Checking: heat thermostat in water
    • ◆ Engine Code: EG ▸7/78
      Begins opening at approx.: 80 °C
      Fully open at approx.: 105 °C
    • ◆ Engine Code: EG 8/78 ▸
      Begins opening at approx.: 87 °C
      Fully open at approx.: 102 °C
    • ◆ Engine Codes:
      DX, JH, JJ, KT, 2H
      Begins opening at approx.: 85 °C
      Fully open at approx.: 105 °C
    • ◆ Minimum stroke = 7 mm
 
U19-0001
  • Lower coolant hose
  • Water pump
    • ◆ Check shaft for easy movement
    • ◆ Renew water pump complete in case of damage or leaks
 
V90-0262

→ Fig.1     Connections on temperature control switch

  •      1 -     Wire yellow/red:
    • Engine overheating - red warning lamp comes on above approx. 120 °C.
  •      2 -     Wire blue/yellow:
    • Engine cold - up to approx. 60 °C yellow warning lamp is on.

Draining and refilling with coolant > < Checking oil pressure switch and oil pressure (engine code: EG)