
Golf Mk2
| Removing and installing steering column with column tube, vehicles up to 06.84 |
 Note
Note| t | Renew self-locking nuts and bolts. |
| t | Welding and straightening work on steering components is not permitted. |
| t | Disengageable steering column is no longer available. On renewing, install telescopic steering column, lower bearing (part No. 191 419 517 C) and spring (part No. 165 419 343) → Chapter. |
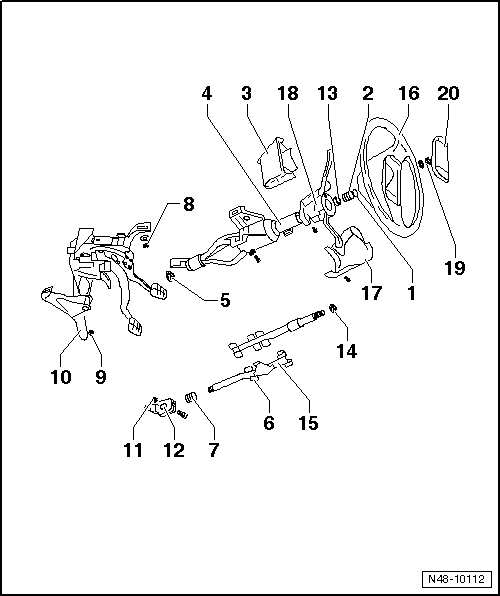
| 1 - | Clamping washer |
| q | Renew. |
| q | Push on with tube -VW 418 A- until spring is fully compressed. At same time, press both halves of steering column together with pliers. |
| 2 - | Spring |
| 3 - | Upper trim |
| 4 - | Column tube |
| q | Modification: As of 08.86, with two telescopic tubes inside one another → Fig.. |
| 5 - | Lower steering column bearing |
| q | Ø 20 mm |
| 6 - | Rubber cap |
| 7 - | Spring |
| q | Ø 20.5 mm |
| 8 - | Hexagon nut, 20 Nm |
| 9 - | Hexagon nut, 20 Nm |
| 10 - | Mounting bracket for column tube |
| 11 - | Hexagon nut with bolt, 30 Nm |
| 12 - | Shaft with universal joint for steering column |
| 13 - | Contact ring |
| q | Push on to stop. |
| 14 - | Support ring |
| q | Push onto upper steering column. |
| 15 - | Steering column |
| q | Can be removed without removing column tube. |
| q | Position rubber caps before installing, insert individually into column tube. |
| q | Press both halves of steering column together with pliers. |
| q | As of 08.88 with splined adapter sleeve, pulling this sleeve off and on → Fig. and → Fig.. |
| 16 - | Steering wheel |
| q | Position with steering in central position. |
| q | Trigger ring tab points to left. |
| 17 - | Lower trim |
| 18 - | Steering column switch with steering lock housing |
| q | Distance between steering wheel/steering column switch is not adjustable. |
| q | Push onto column tube to stop. |
| 19 - | Hexagon nut, 40 Nm |
| 20 - | Cover cap |