volkswagen Workshop Repair Guides

Volkswagen Workshop Service and Repair Manuals

Removing and installing oil sump > < Renewing valve stem seals
4-Cyl. injection engine, Mechanics (1.4 and 1.6 l engine)
Removing and installing parts of the lubrication system

Note:

The oil level must not be above the max. mark - danger of damaging catalyst!

Checking oil pressure

Oil system capacity1):

  • ◆ Without oil filter: 3.0 ltr.
  • ◆ With oil filter 056 115 561G (approx. 120 mm long): 3.5 ltr.
  • ◆ With oil filter 030 115 561E (approx. 80 mm long): 3.4 ltr.

     1)     Up-to-date figures:

=> Exhaust emissions test binder

Engine oil specifications:

Use engine oil to VW standard 500 00 or 501 01. Only in exceptional cases: Multi-grade oils corresponding to API-SF or SG.

 
N17-0013

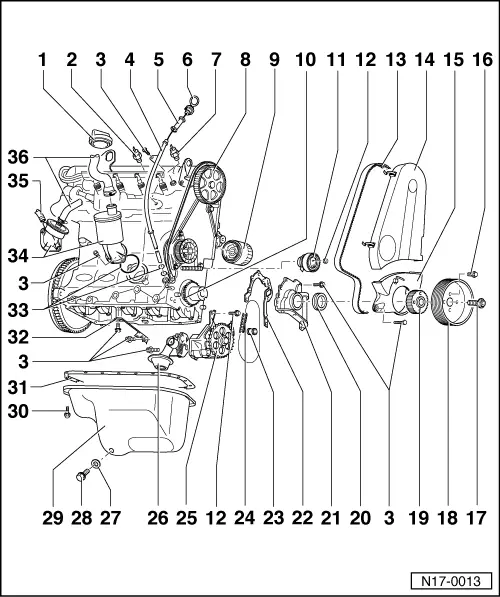
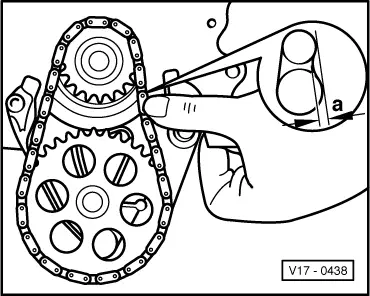
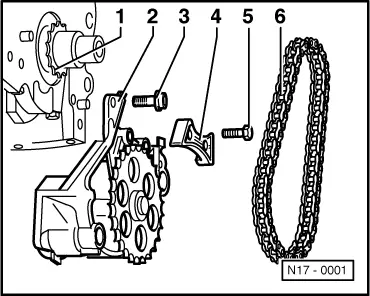
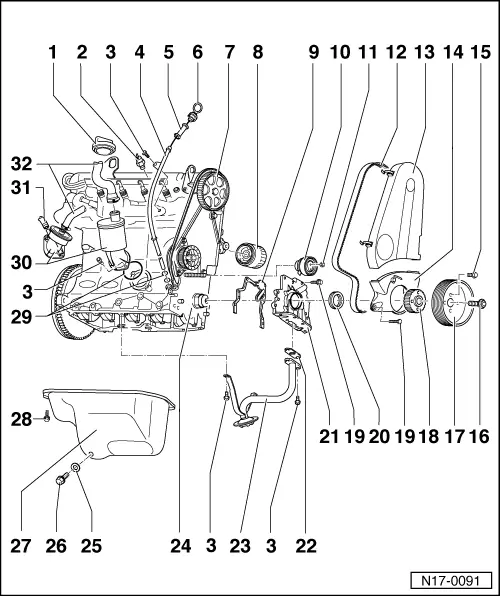
Vehicles with oil pump driven by chain
Vehicles with Duo-centric oil pump => Page 17-11

  • Cap
    • ◆ Renew seal if damaged
  • 0.3 or 0.25 bar oil pressure switch (F22), 25 Nm
    • ◆ 0.3 bar switch: brown
    • ◆ 0.25 bar switch: blue
    • ◆ Wiring: blue/black
    • ◆ Checking => Page 17-24
    • ◆ If sealing ring is leaking nip open and replace.
  • 10 Nm
  • Guide tube
  • Guide
    • ◆ Pull off to extract oil
 
N17-0013
  • Dipstick
    • ◆ The oil level must not be above the max. mark!
    • ◆ Area above shaded zone up to max. mark: Do not top up with engine oil!
    • ◆ Oil level in shaded zone: Engine oil can be topped up
    • ◆ Area min. mark up to shaded zone: Top-up with max. 0.5 ltr. of engine oil!
  • 1.4 or 0.9 bar oil pressure switch (F1), 25 Nm
    • ◆ 1.4 bar switch: black
    • ◆ 0.9 bar switch: grey
    • ◆ Wiring: yellow
    • ◆ Checking => Page 17-24
    • ◆ If sealing ring is leaking nip open and replace.
  • Camshaft sprocket
 
N17-0013
  • Oil filter
    • ◆ Loosen with strap wrench
    • ◆ Tighten by hand
    • ◆ Observe installation instructions on oil filter
  • Chain sprocket
  • Tensioner
    • ◆ Engine code AEA, AEE, AEX, APQ only
    • ◆ Tensioning toothed belts
      => Page 13-20
  • 20 Nm
  • Toothed belt
    • ◆ Mark D.O.R. before removing
    • ◆ Check for wear
    • ◆ Do not kink
    • ◆ Removing, installing and tensioning
      => Page 13-20
  • Toothed belt guard - upper part
 
N17-0013
  • Toothed belt guard - lower part
  • 20 Nm
  • Hexagon bolt: 90 Nm + 1/3 turn
    (120 °) further
    Multi-point screw: 90 Nm + 1/4 turn (90 °) further
    • ◆ Renew
    • ◆ Oil threads
    • ◆ The turning further can be done in several stages
    • ◆ The turning further angle can be measured with a commercial protractor e.g. Hazet 6690
  • Belt pulley
    • ◆ When installing note fixing arrangement
  • Crankshaft toothed belt sprocket
  • Oil seal
  • Sealing flange
 
N17-0013
  • Gasket
    • ◆ Renew
  • Sealing bush
    • ◆ Renew if damaged
    • ◆ Insert in sealing flange first
    • ◆ Coat with oil when installing
  • Chain
    • ◆ Tensioning => Fig. 3
    • Engine code ABU 02.93...09.93:
    • ◆ Removing and installing chain guide rail => Fig. 4
  • Oil pump
    • ◆ Checking backlash
      => Fig. 1
    • ◆ Checking axial clearance
      => Fig. 2
  • Oil pump cover with pressure relief valve
    • ◆ Opening pressure: 4.0...5.0 bar
    • ◆ Clean strainer if soiled
 
N17-0013
  • Seal
    • ◆ Renew
  • Oil drain plug
    • ◆ Metal sump: 30 Nm
    • ◆ Aluminium sump: 20 Nm
  • Sump
    • ◆ Engine code ABD, ABU: Steel sump
    • ◆ Engine code AEA, AEE, AEX, APQ: Aluminium sump
    • ◆ Clean sealing surface before installing
    • ◆ Removing and installing engines with liquid gasket
      => Page 17-16
  • 15 Nm
    • ◆ Loosen and tighten the bolts flywheel end only with:
           Socket head bolts:
           3249
           Hexagon head bolts: 3185
 
N17-0013
  • Gasket
    • ◆ Not on engines with liquid gasket
    • ◆ Renew
    • ◆ Before fitting coat sump/cylinder block flanges with "D2"
    • Engine code AEA:
    • ◆ Metal gasket
  • Bracket
  • O-ring
    • ◆ Renew
  • Oil separator
  • To cylinder head cover
  • To air cleaner or air intake elbow
 
V17-0436

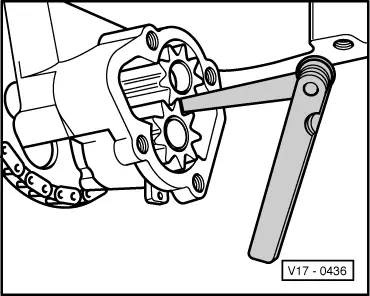
→ Fig. 1     Checking oil pump backlash

     New: 0.05 mm

     Wear limit: 0.20 mm

 
V17-0437

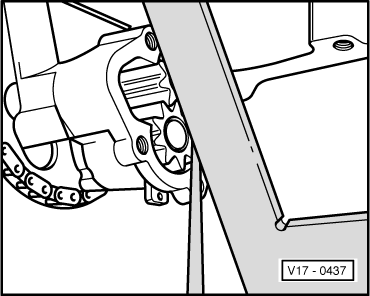
→ Fig. 2     Checking oil pump axial clearance

     Wear limit: 0.15 mm

 
V17-0438

→ Fig. 3     Tensioning drive chain

Note:

On engines with guide rail, this must be removed when checking or adjusting chain tension.

Tension chain by moving oil pump. Check tension with light thumb pressure.

Engine codes ABD ▸ 12.93, ABU ▸ 01.93 (without guide rail):

  • Deflection a = 2.0...3.0 mm

Engine codes ABD 01.94 ▸, ABU 02.93 ▸ (with and without guide rail), AEA, AEE, AEX, APQ:

 
N17-0001
  • Deflection
         Test figure: a = 4.0...5.0 mm
         Setting figure: a = 3.5...4.5 mm

→ Fig. 4     Removing and installing guide rail

  •      1 -     Camshaft chain sprocket
  •      2 -     Oil pump
  •      3 -     20 Nm
  •      4 -     Guide rail
  •      5 -     10 Nm
  •      6 -     Drive chain
 
N17-0091

Vehicles with Duo-centric oil pump

  • Cap
    • ◆ Renew seal if damaged
  • 1.4 bar oil pressure switch (F1), 25 Nm
    • ◆ Black
    • ◆ Checking => Page 17-24
  • 10 Nm
  • Guide tube
  • Guide
    • ◆ Pull off to extract oil
  • Dipstick
    • ◆ The oil level must not be above the max. mark!
    • ◆ Area above shaded zone up to max. mark: Do not top up with engine oil!
    • ◆ Oil level in shaded zone: Engine oil can be topped up
    • ◆ Area min. mark up to shaded zone: Top-up with max. 0.5 ltr. of engine oil!
 
N17-0091
  • Camshaft sprocket
    • ◆ Note position when installing toothed belt
      => Page 13-20
  • Oil filter
    • ◆ Loosen with strap wrench
    • ◆ Tighten by hand
    • ◆ Observe installation instructions on oil filter
  • Gasket
    • ◆ Renew
    • ◆ Must be located on dowel sleeves
  • Tensioner
    • ◆ Tensioning toothed belts
      => Page 13-20
  • 20 Nm
  • Toothed belt
    • ◆ Mark D.O.R. before removing
    • ◆ Check for wear
    • ◆ Do not kink
    • ◆ Removing, installing and tensioning
      => Page 13-20
  • Toothed belt guard - upper part
  • Toothed belt guard - lower part
 
N17-0091
  • 20 Nm
  • 90 Nm + 1/4 turn (90 °) further
    • ◆ Renew
    • ◆ Oil threads
    • ◆ The turning further can be done in several stages
    • ◆ The turning further angle can be measured with a commercial protractor e.g. Hazet 6690
  • Belt pulley
    • ◆ When installing note fixing arrangement
  • Crankshaft toothed belt sprocket
    • ◆ Note position when installing toothed belt
      => Page 13-20
  • 8 Nm
 
N17-0091
  • Oil seal
  • Oil pump
    • ◆ Only renew complete
    • ◆ When installing note follower on crankshaft
      => Page 17-19 , item 24
    • ◆ Must be located on dowel sleeves
    • ◆ Removing and installing
      => Page 17-19
  • Gasket
  • Suction pipe
    • ◆ Clean strainer if soiled
  • Follower
    • ◆ Coat with oil before installing oil pump
  • Seal
    • ◆ Renew
 
N17-0091
  • Oil drain plug
    • ◆ Metal sump: 30 Nm
    • ◆ Aluminium sump: 20 Nm
  • Sump
    • ◆ Removing and installing engines with liquid gasket
      => Page 17-16
    • ◆ Clean sealing surface before installing
    • ◆ Install with silicone sealant
      D 176 404 A2
      => Page 17-16
  • Socket head combi-bolt
    • ◆ Metal sump: 15 Nm
    • ◆ Aluminium sump to aluminium block: 13 Nm
    • ◆ On aluminium block: Renew bolts (coated with sealant)
  • O-ring
    • ◆ Renew
  • Oil separator
  • To cylinder head cover
  • To air cleaner or air intake elbow

Removing and installing oil sump > < Renewing valve stem seals