volkswagen Workshop Repair Guides

Volkswagen Workshop Service and Repair Manuals

Installing > < Removing and installing spring in camshaft adjuster
Removing
Removing
–  Remove engine cover.
–  Remove upper toothed belt guard.
   
–  Fit support bracket -10 - 222 A- as shown and take up weight of engine in installation position.
–  Unbolt cooling system expansion tank and lay to side.
–  Unbolt power-assisted steering reservoir and place to side.
–  Take up weight of engine and remove right engine bracket as shown.
  N13-0189
–  Unscrew securing bolts from assembly mounting/engine bracket, assembly mounting/body and assembly mounting/body bracket -arrows- and remove assembly mounting complete.
  N13-0221
–  Remove upper securing bolt -1- from lower toothed belt guard -2- under engine mounting -3-.
–  Remove coolant hose from engine bracket -3-.
–  Remove engine bracket -3-.
–  Raise vehicle.
–  Remove right wheel housing liner: → General body repairs, exterior; Rep. gr.66
  N15-0696
–  Turn crankshaft in engine direction of rotation until both fixing holes of camshaft adjuster and exhaust camshaft pulley align with fitting holes in camshaft housing -arrows-.
–  Lock camshaft adjuster and exhaust camshaft pulley using locking pin -T10074- as follows:
  N15-0330
–  First fit retaining plate -T10073- on camshaft adjuster.
  N15-0371
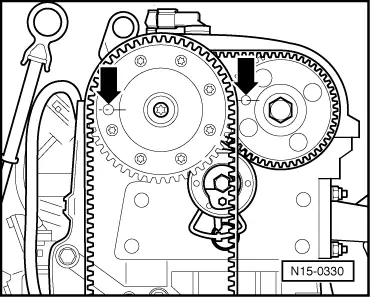
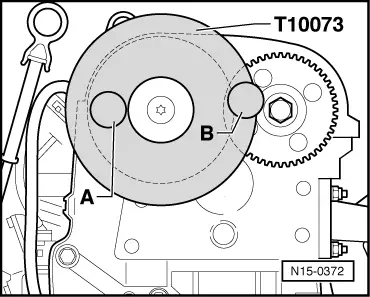
–  Push locking pin -A- into fitting hole in camshaft adjuster and camshaft housing onto stop.
–  Then lock exhaust camshaft pulley by pushing a locking pin -B- through second hole in retaining plate -T10073- in fitting hole of camshaft housing to stop.
  Note
The locking process is made easier by turning exhaust camshaft pulley slightly on securing bolt with a ring spanner until the fitting holes align.
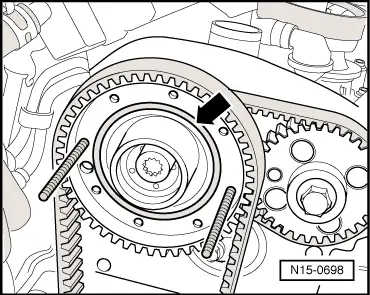
–  Unscrew camshaft adjuster plug.
–  Collect leaking engine oil.
–  Close opening in cover with clean cloths.
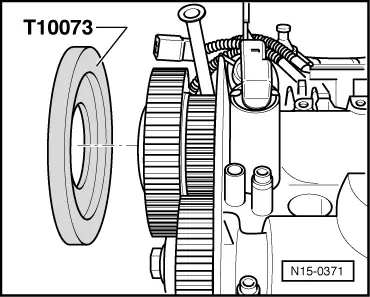
–  Remove locking pins -T10074- and retaining plate -T10073-.
  WARNING
The cover of the camshaft adjuster is under tension from a strong spring. It is essential to secure the cover as follows to prevent accidents.
  N15-0372
–  Remove two opposing securing bolts -3- for the cover.
–  Screw the studs -2- into these holes until they are flush with the rear of the camshaft pulley.
–  Screw a nut onto each stud -2- until it just contacts the cover.
–  Remove the remaining securing bolts -3- for the cover.
–  Then evenly unscrew the nuts on the studs -2-.
  Note
Ensure the studs -2- do not unscrew from the camshaft pulley.
–  Collect leaking engine oil.
  N15-0697
–  Remove cover, spring and O-ring -arrow-.
–  Do not remove the studs.
  N15-0698

Installing > < Removing and installing spring in camshaft adjuster