volkswagen Workshop Repair Guides

Volkswagen Workshop Service and Repair Manuals

Dismantling and assembling oil filter housing > < Renewing valve stem seals
4cyl. Injection Engine, (2.0 ltr. Engine) (Mexico)
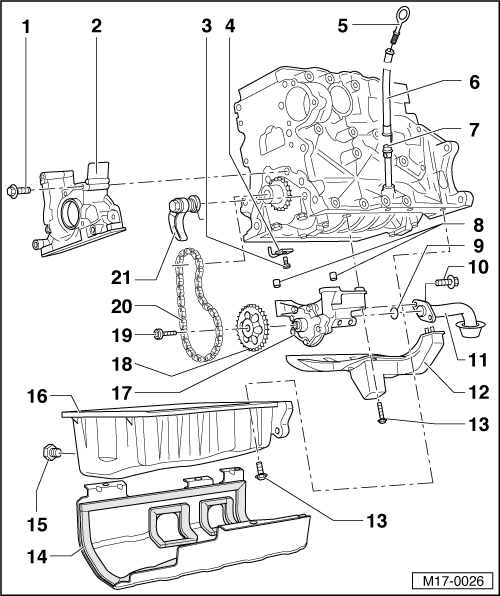
Removing and installing parts of the lubrication system

Notes:

  • ◆ If when repairing an engine, metal shavings or large amounts of small metal particles are found in the engine oil, caused for example by partial seizure of crankshaft or conrod bearings. Perform the following work sequences to prevent consequential damage once repairs are complete:
    • ‒ Thoroughly clean oil passages
    • ‒ Renew oil spray jets
    • ‒ Renew oil cooler
    • ‒ Renew oil filter
  • ◆ The oil level must not be above the max. mark, danger of damage to catalytic converter!
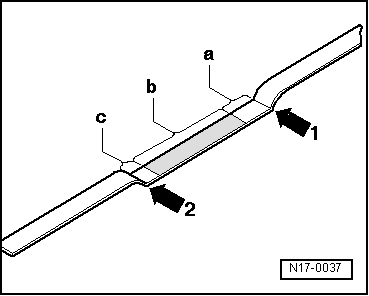
    Markings , fig.1

Checking oil pressure and oil pressure switch .

Oil syste capacity:

     with oil filter 4.0 l

Engine oil specifications:

Use engine oils acc. to VW standard 500 00, 501 01 or 502 00. Only in exceptional cases: Multigrade and single grade oils conforming with API-SF and SG or ACEA A2/A3.

Note:

In the factory the engine is filled with engine oil conforming to VW standard 503 00. This engine oil is designed for long service intervals.

Engine oils conforming to VW standard 500 00, 501 01 or 502 00 may also be used.

 
M17-0026

Dismantling and assembling oil filter housing => Page 17-8

  • 15 Nm
  • Sealing flange
    • ◆ Must be located on dowel sleeves
    • ◆ Insert with silicone sealant
      D 176 404 A2
      => Page 13-24
    • ◆ Removing and installing
      => Page 13-24
    • ◆ Renewing crankshaft oil seal, poly V-belt pulley end => page 13-19
  • Pressure relief valve, 27 Nm
  • Oil spray jet
    • ◆ For piston cooling
 
M17-0026
  • Dipstick
    • ◆ The oil level must not exceed the max. mark!
    • ◆ Markings Fig. 1
  • Dipstick guide
    • ◆ Fastened to intake manifold
    • ◆ Pull off to extract oil
  • Guide tube
  • Dowel sleeves
  • O-ring
    • ◆ Renew
  • 15 Nm
  • Suction line
    • ◆ Clean strainer if soiled
  • Baffle plate
  • 15 Nm
 
M17-0026
  • Oil sump protection
    • ◆ Assembly overview => fig.2
  • Oil drain plug, 30 Nm
    • ◆ If sealing ring is leaking nip open and replace.
  • Oil pan
    • ◆ Clean sealing surface before installing
    • ◆ Insert with silicone sealant
      D 176 404 A2
      => Page 17-11
    • ◆ Removing and installing
      => Page 17-11
  • Oil pump
    • ◆ With pressure relief valve of 12 bar
    • ◆ Before installing, check that both dowel sleeves for centralising oil pump/cylinder block are fitted
    • ◆ Renew if running surfaces and gears are scored
    • ◆ Removing and installing => page 17-16
 
M17-0026
  • Chain sprocket
    • ◆ Observe installing position
  • 20 Nm
    • ◆ Use counter support T10051 to loosen and tighten
  • Chain
  • Chain tensioner with tensioning rail, 15 Nm
    • ◆ When installing, pretension spring and fit
 
N17-0037

→ Fig.1     Dipstick marks

  •      1 -     max. mark
  •      2 -     min. mark
  •      a -     Area above hatched field up to max. mark: Do not replenish with engine oil!
  •      b -     Oil level within hatched field: May be replenished with engine oil
  •      c -     Area from min. mark up to hatched field: Replenish with max. 0.5 ltr. of engine oil!
 
M17-0027

→ Fig.2     Oil sump protection -Assembly overview

  •      1 -     Rubber grommet
    • -located in cylinder block
  •      2 -     Spreader rivet
  •      3 -     Spreader rivet
    • -to remove oil sump protection push upwards
    • -to install press in flush
  •      4 -     Socket
  •      5 -     Bolt, 37 Nm
    • -secure in cylinder block
    • -clean threads before installing
    • -install with locking compound D 000 600 A2
  •      6 -     Oil sump protection

Dismantling and assembling oil filter housing > < Renewing valve stem seals