volkswagen Workshop Repair Guides

Volkswagen Workshop Service and Repair Manuals

Removing and installing cylinder head > < Removing
Installing
Installing
Prerequisite
l  The pistons must not be positioned at TDC.
–  Remove sealant residue from cylinder head and camshaft housing with commercially available sealant remover.
–  Also prevent dirt and residual sealant from entering cylinder head.
–  Clean sealing surfaces carefully. They must be free of oil and grease.
   
–  Turn inlet and exhaust camshafts until camshaft clamp -T10171- can be pushed into holes in camshaft to stop.
–  Secure camshaft clamp -T10171- hand-tight with an M6 bolt (do not tighten).
  Note
Camshaft housings with different sealing variants in area of spark plug recess have been fitted.
Sealing on cylinder head with no sealing ring in area of spark plug recess
  Caution
No sealant is applied in area of the oil strainer -1-.
  N15-0659
–  Apply thin, even coat of sealant on clean camshaft housing sealing surface. See hatched area in illustration.
  Note
Sealant must not be applied too thickly; otherwise excess sealant can enter oil channels and cause damage to engine.
Sealing on cylinder head with sealing ring in area of spark plug recess
–  Place new seals into grooves in cylinder head.
  Caution
No sealant is applied in area of the oil strainer -1-.
  N15-10520
–  Apply thin, even coat of sealant on clean camshaft housing sealing surface. See hatched area in illustration.
–  Do not apply sealant in area of -arrows-.
Sealing on cylinder head with machined chamfer in area of spark plug recess
  Caution
No sealant is applied in area of the oil strainer -1-.
  N15-10521
–  Apply thin, even coat of sealant -D 154 103 A1- on clean camshaft housing sealing surface. See hatched area in illustration.
–  Apply sealant -D 176 600 A1- to the chamfer -arrows- of the cylinder head.
The sealant bead must be 2 mm thick.
  Note
Sealant must not be applied too thickly; otherwise excess sealant can enter oil channels and cause damage to engine.
  N15-10521
–  Ensure that all roller rocker fingers contact valve stem ends -1- correctly and that they are clipped into their respective support elements -2-.
–  Screw two studs (M6x80) into cylinder head before installing camshaft housing.
  N15-0076
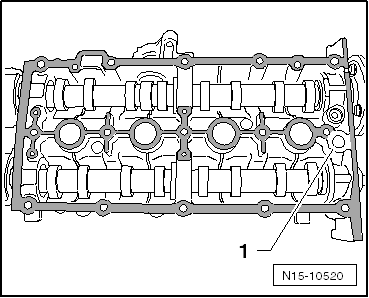
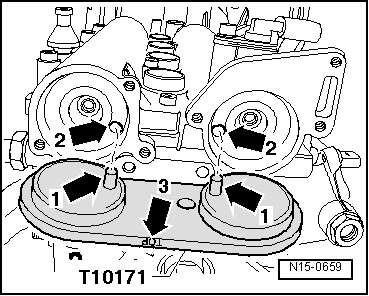
–  Carefully fit camshaft housing vertically onto studs -arrows- and dowel pins from above.
  Note
Ensure that no oil residue can drip onto sealing surfaces.
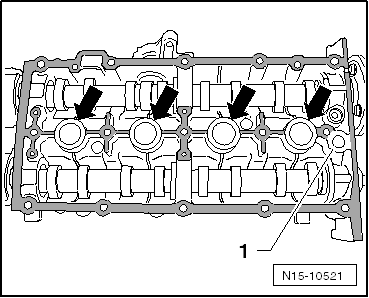
–  Evenly tighten new camshaft housing securing bolts from inside to outside alternately and diagonally.
Ensure that camshaft housing is not canted. Specified torque: 10 Nm + turn 90° further.
  Note
Sealant must dry for approx. 30 minutes after camshaft housing is installed.
–  Adjust valve timing → Chapter.
Further assembly is basically the reverse of the dismantling sequence. In the process, note the following:
t  Install valve timing housing → Chapter.
t  Fit fuel lines (engine codes BAG, BKG) → Chapter
t  Fit fuel lines (engine codes BLF, BLN, BLP) → Chapter
t  Install exhaust gas recirculation valve -N18- → Chapter.
  N15-0656

Removing and installing cylinder head > < Removing