volkswagen Workshop Repair Guides

Volkswagen Workshop Service and Repair Manuals

Removing broken side window > < Assembly overview - side window
Removing undamaged side window
  Note
The removal and installation sequence is only for the left side window. The removal and installation of the right side window is similar.
   
–  Remove rear panel trim → General body repairs, interior; Rep. gr.70.
–  Pull cutting cord -1- through adhesive sealant at point marked on illustration and into inside of vehicle using awl -V.A.G 1474/2- from removal kit for flush bonded windows -V.A.G 1474 A-.
  N64-10387
–  Insert cutting cord -3- behind seal in window flange with aid of tube -1-.
  N64-10388
–  Secure one end of cord -3- to pull handle -V.A.G 1351/1--2- to counterhold.
–  Pull other end of cord -2- into vehicle interior as well.
–  Secure other end of cord to reel device -V.A.G 1654 A--3-.
–  Reposition reel device -V.A.G 1654 A--3- as necessary and cut window free.
–  Use plastic wedge to press cutting cord against window glass while cutting in order to have clearance at window flange.
  N64-10389
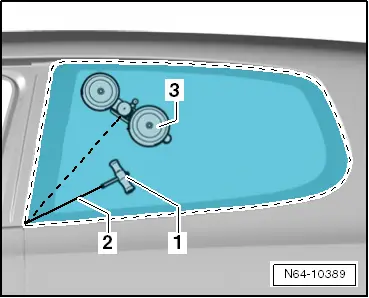
–  Instead of reel device -V.A.G 1654--3-, reel device -V.A.G 1654 A--3- can be used.
–  One suction cup can be removed from the reel device -V.A.G 1654--3- as shown in illustration. This ensures that the reel device -V.A.G 1654 A--3- roller can be guided closer to the window flange.
  N64-10408

Removing broken side window > < Assembly overview - side window