Volkswagen Workshop Service and Repair Manuals
HOME
FEATURES
MENU
INDEX
ABOUT US
Installing >
< Renewing polygon needle bearing and seal on right flange shaft
Golf Mk6
Power transmission
6-speed manual gearbox 02Q
Final drive, differential, differential lock
Renewing polygon needle bearing and seal on right flange shaft
Removing
Removing
Removing
–
Remove right wheel.
–
If insulation tray is installed below engine and gearbox, remove it.
→ General body repairs, exterior; Rep. gr.66
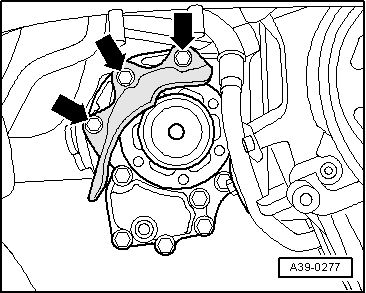
Drive shaft heat shield is secured with 3 nuts, or with 2 nuts for some engines.
→ Running gear, axles, steering; Rep. gr.40
–
Remove drive shaft heat shield, if present
-arrows-
→ Running gear, axles, steering; Rep. gr.40
.
–
Remove right drive shaft
→ Running gear - front and four wheel drive; Rep. gr.40
.
–
On vehicles with particulate filter, check whether particulate filter support has to be removed.
→ Rep. gr.26
–
Place drip tray -V.A.G 1306- under gearbox.
–
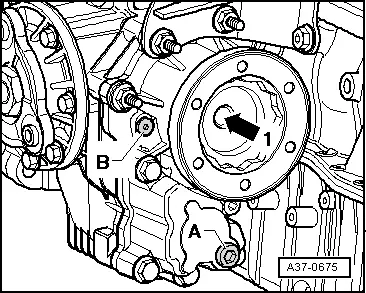
Remove securing bolt for right flange shaft
-arrow 1-
with socket. Screw 2 bolts into flange and counterhold flange with a lever.
–
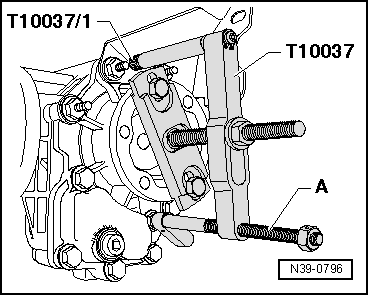
Bolt puller -T10037- to right flange shaft.
–
If necessary, lay a spacer (e.g. press piece -VW 434-) between bevel box carrier and knurled nut -T10371/1-.
–
Use spindle
-A-
to align puller parallel to flange.
–
Pull out right flange shaft.
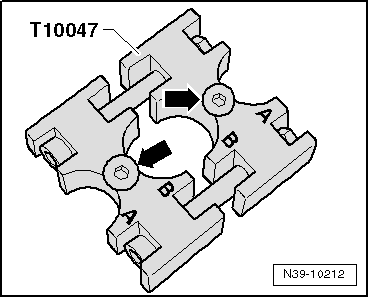
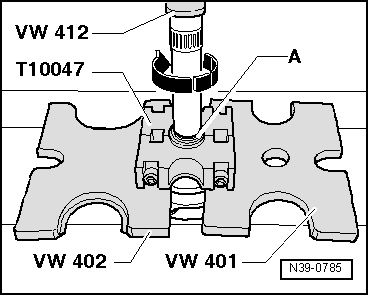
Now set up assembly tool -T10047- as follows:
–
Align both parts of tool so that marks „B“ are opposite one another.
–
The shoulders
-arrows-
must then be below the bearing.
–
Now screw both halves together to stop.
–
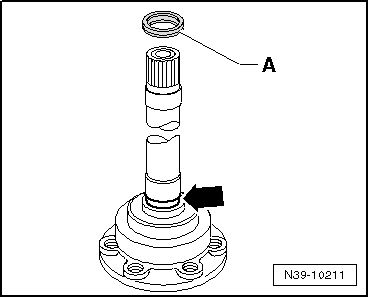
Lever off retaining ring
-A-
for needle bearing.
–
To avoid damage to running surface of bearing on shaft, turn shaft during pressing procedure
-arrow-
.
–
Remove seal
-A-
from groove
-arrow-
.
Power transmission
6-speed manual gearbox 02Q
Final drive, differential, differential lock
Renewing polygon needle bearing and seal on right flange shaft
Removing
Installing >
< Renewing polygon needle bearing and seal on right flange shaft