volkswagen Workshop Repair Guides

Volkswagen Workshop Service and Repair Manuals

Renewing valve stem seals with cylinder head removed > < Removing and installing valve stem seals
Renewing valve stem seals with cylinder head installed
Special tools and workshop equipment required
   
t  Valve stem seal puller -3364-
  W00-0302
t  Valve stem seal fitting tool -3365-
  W00-0194
t  Removal and installation device for valve cotters -VAS 5161- with guide plate -VAS 5161/23- and sleeve -VAS 5161/23-1-
t  2x M6x30 bolts
Procedure
–  Remove all glow plugs → Chapter.
–  Remove camshafts → Chapter.
–  Mark allocation of roller rocker fingers and hydraulic compensation elements for reinstallation.
–  Remove roller rocker fingers together with hydraulic compensation elements and place down on a clean surface.
–  Set piston of respective cylinder to „bottom dead centre“.
  W00-1050
–  Place guide plate -VAS 5161/23- onto cylinder head.
–  Tighten guide plate on intake manifold side by hand using knurled screw -VAS 5161/12- and 2 M6x30 bolts -item 1- until it makes contact.
  N15-10525
–  Screw sealing pins -VAS 5161/10- into guide plate.
–  Screw adapter -VAS 5161/11- hand-tight into relevant glow plug thread.
  N15-10526
–  Insert drift -VAS 5161/3- into guide plate and use a plastic hammer to knock loose the firmly seated valve cotters.
  N15-10527
–  Screw toothed piece -VAS 5161/6- with hooking fork -VAS 5161/5- into guide plate.
–  Push sleeve -VAS 5161/23-1- onto assembly cartridge -VAS 5161/8-.
–  Connect adapter to compressed air supply using a commercially available union and apply pressure continuously.
l  Minimum pressure: 6 bar
–  Attach pressure fork -VAS 5161/2- to toothed piece and press assembly cartridge down.
–  At the same time, turn knurled screw of assembly cartridge clockwise until tips engage in valve cotters.
–  Move knurled screw back and forth to press apart valve cotters and capture them in assembly cartridge.
–  Release pressure fork.
–  Remove assembly cartridge with knurled spacer ring.
–  Remove valve spring and valve spring plate.
  N15-10528
–  Pull off valve stem seal using valve stem seal puller -3364-.
  N15-10538
  Caution
Risk of damage when installing valve stem seals.
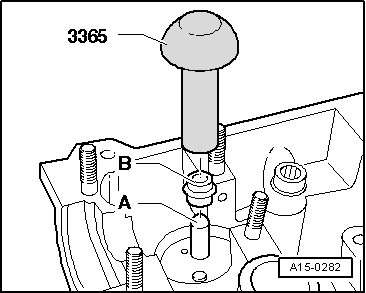
Place plastic sleeve -A-, enclosed with new valve stem seals -B-, onto valve stem.
–  Lightly oil sealing lip of valve stem seal.
–  Push valve stem oil seal onto plastic sleeve.
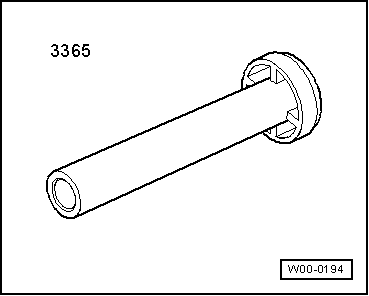
–  Carefully press valve stem oil seal onto valve guide using valve stem seal fitting tool -3365-.
–  Remove plastic sleeve.
  A15-0282
If the valve cotters have been removed from the assembly cartridge, they must first be inserted into the valve insertion device -VAS 5161/18-.
l  Larger diameter of valve cotters faces upwards.
–  Insert valve spring and valve spring plate.
–  Press assembly cartridge onto valve cotter insertion device from above and pick up valve cotters.
  A15-0445
–  Insert assembly cartridge into guide plate -VAS 5161/23- again.
–  Press pressure fork downwards and pull knurled screw upwards, turning it clockwise and anticlockwise. This inserts the valve cotters.
–  Reduce pressure on pressure fork whilst pulling on knurled screw.
–  Repeat procedure on each valve.
Reassembly
Installation is carried out in the reverse order; note the following:
–  Ensure that all roller rocker fingers contact valve stem ends correctly and are clipped into relevant hydraulic compensation elements.
–  Install camshafts → Chapter.
–  Install glow plugs → Chapter.
  N15-10528

Renewing valve stem seals with cylinder head removed > < Removing and installing valve stem seals