Golf Mk6
| Assembly overview - cylinder head |

| 1 - | 20 Nm |
| 2 - | High-pressure pump |
 Caution
|
| q | For fuel supply. |
| q | With fuel pressure regulating valve -N276-. |
| q | Removing and installing → Chapter |
| 3 - | 10 Nm |
| 4 - | Hall sender -G40- |
| q | With O-ring. |
| q | Renew O-ring if damaged. |
| 5 - | 20 Nm |
| 6 - | Lifting eye |
| 7 - | 8 Nm + turn 90° further |
| q | Renew. |
| q | Tightening sequence → Chapter. |
| 8 - | Cylinder head cover |
 Caution
|
| q | Removing and installing → Chapter |
| q | Remove sealant residue. |
| q | Carefully clean sealing surfaces. They must be oil and grease free. |
| q | Apply sealant D 189 500 A1 and D 154 103 A1 before positioning. |
| q | When installing, fit vertically from above onto studs and dowel pins. |
| 9 - | 10 Nm |
| 10 - | Coolant temperature sender -G62- |
| q | Release pressure in cooling system before removing |
| 11 - | O-ring |
| q | Renew. |
| 12 - | Cylinder head gasket |
| q | Renew. |
| q | Metal gasket. |
| q | After renewing, renew entire coolant. |
| 13 - | Cylinder head |
| q | Remove and install → Chapter |
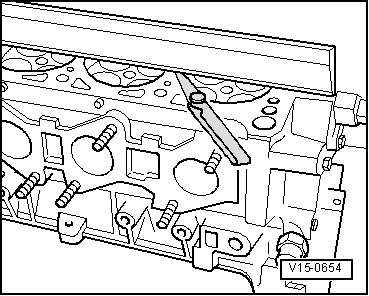
| q | Check for distortion → Fig.. |
| q | Sealing surfaces must be free of oil and grease. |
| q | After renewing, renew entire coolant. |
| 14 - | Support element |
| q | Do not interchange. |
| q | With hydraulic valve clearance compensation. |
| q | Oil contact surface. |
| 15 - | Oil pressure switch -F1-, 20 Nm |
| q | Check → Chapter. |
| q | If seal is leaking, nip open and renew. |
| 16 - | Roller rocker finger |
| q | Check roller bearing for ease of movement. |
| q | Oil contact surface. |
| q | When installing, secure to supporting element using securing clip. |
| 17 - | Cylinder head bolt |
| q | Renew. |
| q | Follow installation instructions and sequence when loosening and tightening → Chapter. |
| 18 - | Roller tappet |
| q | Lightly coat contact surface with engine oil. |
| 19 - | O-ring |
| q | Renew. |
| q | Moisten with oil before inserting. |
|

|
