volkswagen Workshop Repair Guides

Volkswagen Workshop Service and Repair Manuals

Checking valve guides > < Checking axial clearance of camshafts
Renewing valve stem seals
(With cylinder head installed)
   
Special tools and workshop equipment required
t  Spark plug socket and extension -3122 B-
t  Valve stem seal puller -3364-
t  Valve stem seal fitting tool -3365-
t  Adapter -T40012-
t  Torque wrench -V.A.G 1331-
t  Removal and installation device -VAS 5161-
t  Guide plate for 2.0 l and 3.0 l FSI engine -VAS 5161/19B-

Removing valve stem oil seals:
–  Remove camshafts → Chapter.
–  Remove roller rocker fingers and place onto a clean surface. When doing this, ensure that the roller rocker fingers are not interchanged.
–  Remove spark plugs using spark plug socket and extension -3122 B-.
   
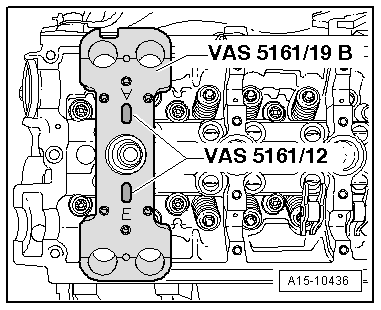
–  Bolt guide plate -VAS 5161/19B- to cylinder head using knurled bolts -VAS 5161/12- as shown.
–  Set piston of respective cylinder to „bottom dead centre“.
  A15-10436
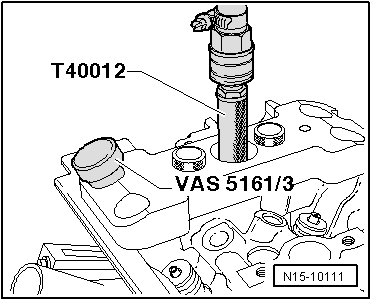
–  Screw adapter -T40012- into spark plug thread and connect compressed air of at least 6 bar.
–  Strike tight valve cotters with drift -VAS 5161/3- and a plastic hammer.
  N15-10111
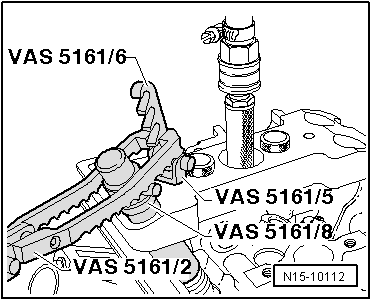
For inlet side
–  Screw toothed piece -VAS 5161/6- with hooking fork -VAS 5161/5- into centre tread of guide plate -VAS 5161/19B-.
–  Insert assembly cartridge -VAS 5161/8- into guide plate -VAS 5161/19B-.
–  Attach pressure fork -VAS 5161/2- to snap-in device -VAS 5161/6-.
  N15-10112
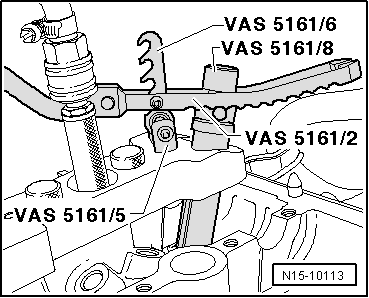
For exhaust side
–  Screw toothed piece -VAS 5161/6- with hooking fork -VAS 5161/5- into outer tread of guide plate -VAS 5161/19B-.
–  Press down assembly cartridge -VAS 5161/8-. Simultaneously turn knurled screw of assembly cartridge -VAS 5161/8- to right until tips lock into valve cotters.
–  Move knurled screw back and forth lightly to press apart valve cotters and capture them in the assembly piece.
–  Release pressure fork -VAS 5161/2-.
–  Remove assembly cartridge -VAS 5161/8-.
  N15-10113
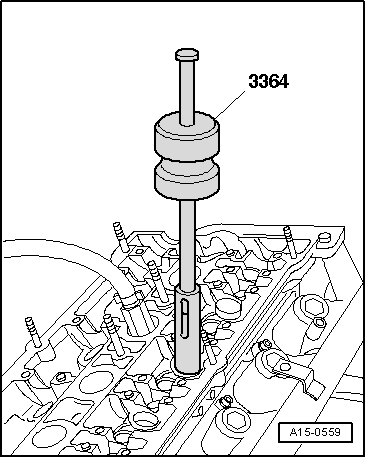
–  Pull off valve stem seals using valve stem seal puller -3364-.
  A15-0559
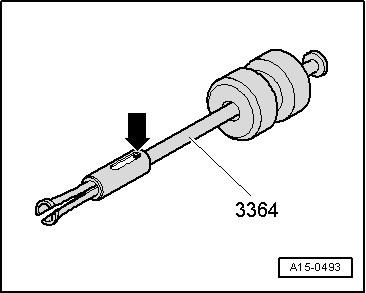
–  If valve stem seal puller -3364- cannot be used on account of restricted space, knock out pin -arrow- with a punch and remove the impact extractor attachment.
  A15-0493
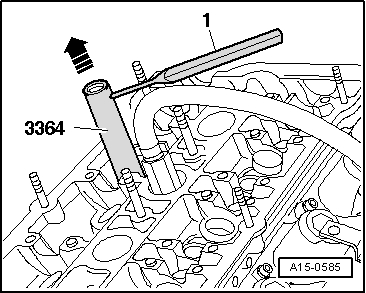
–  Position lower part of valve stem seal puller -3364- on valve stem oil seal.
–  Insert a drift -1- in hole in lower part of puller device.
–  Apply assembly lever to puller and pull out valve stem oil seal -arrow-.
  A15-0585
Installing valve stem oil seals:
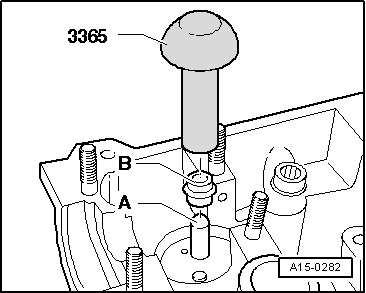
–  To prevent damage to new valve stem seals -B-, attach plastic sleeve -A- to valve stem.
–  Lubricate sealing lip of valve stem seal -B-, place it in the valve stem oil seal fitting tool -3365- and push carefully onto valve guide.
–  Remove plastic sleeve -A-.
–  Insert valve spring and valve spring plate.
  A15-0282
Inlet side
–  Set up disassembly and assembly tool -VAS 5161- as shown.
  N15-10112
Exhaust side
–  Set up disassembly and assembly tool -VAS 5161- as shown.
  Note
  N15-10113
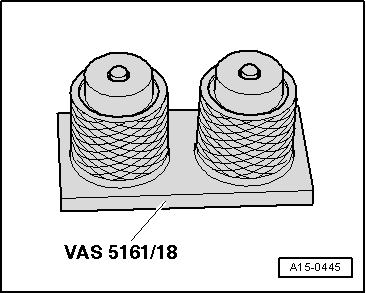
t  If the valve cotters have been removed from the installation cartridge, they must first be inserted into the insertion device -VAS 5161/18-.
t  Press assembly cartridge -VAS 5161/8- onto insertion device from above and pick up valve cotters.
–  Press assembly cartridge -VAS 5161/8- down using pressure fork -VAS 5161/2- and turn knurled screw of assembly cartridge back and forth while pulling upwards.
–  Release pressure fork -VAS 5161/2- whilst still pulling the knurled screw upwards.
–  Remove disassembly and assembly tool -VAS 5161-.
Further assembly is basically the reverse of the dismantling sequence.
  A15-0445

Checking valve guides > < Checking axial clearance of camshafts