
Golf III L4-1984cc 2.0L SOHC (1993)
Radiator: Service and Repair
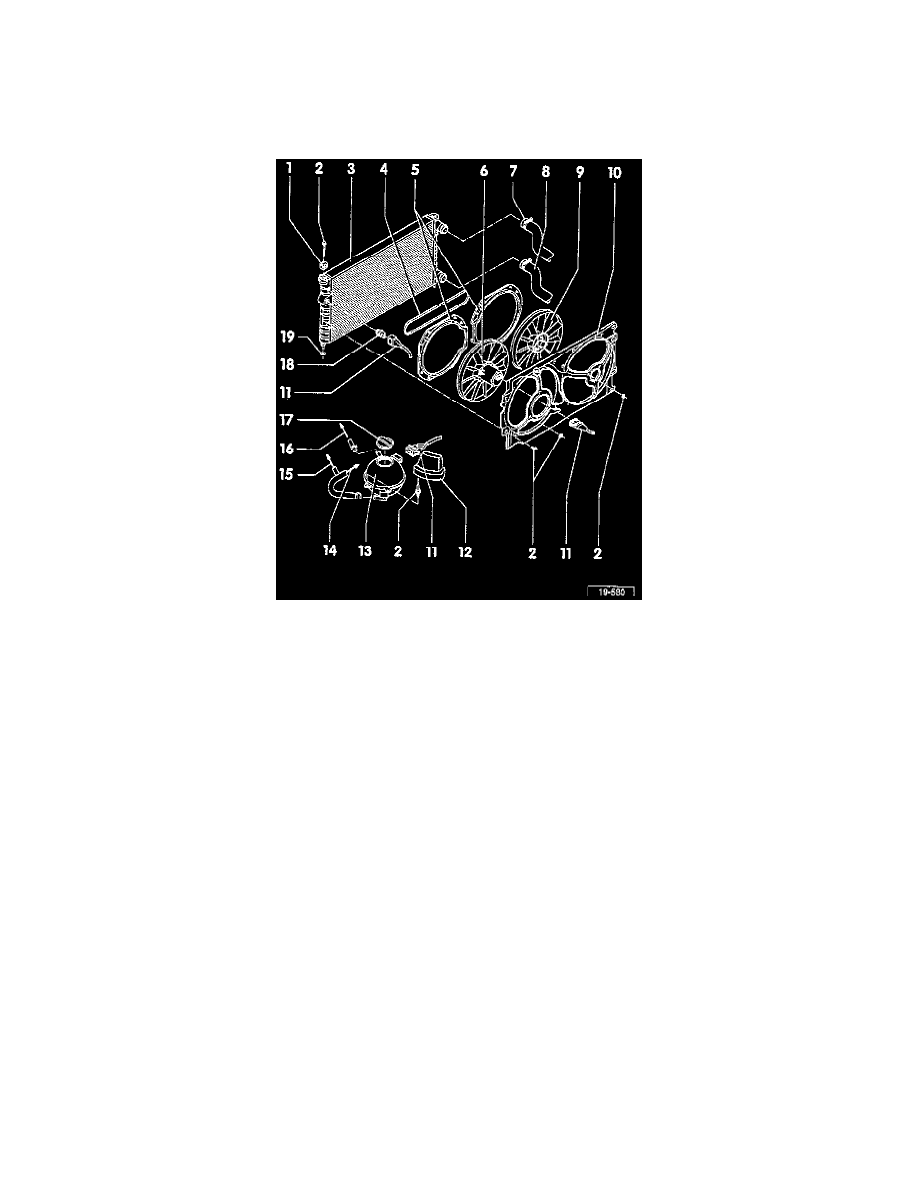
Radiator and Coolant Fan, Removing and Installing
Note:
During removal and installation procedures, refer to the component location illustration, component notes and procedures.
Component View
1
Mount
2
Bolt. Tighten to: 10 Nm (7 ft. lbs.).
3
Radiator
4
V-belt - only on models with optional equipment.
5
Guide Ring - note installed position.
6
Coolant Fan
7
Coolant Hose, Upper To Connector Pipe
8
Coolant Hose, Lower To Coolant Pump
9
Auxiliary Fan - only on models with optional equipment.
10
Fan Shroud - note installed position.
11
Connector
12
Cover
13
Expansion Tank
14
To Coolant Pipe Or Connector Flange.
On models with M/T, connects to item No. 13 of coolant pipe diagram, refer to Radiator Hose.
On models with automatic transmission, connects to item No. 9 of coolant pipe diagram, refer to Radiator Hose.
15
To ATF Cooler - On models with M/T.
16
To Cylinder Head
17
Cap. Pressure: 1.3-1.5 bar (19-22 psi).
18
Coolant Fan Control Thermal Switch. Tighten to: 35 Nm (26 ft. lbs.).
19
Rubber Bushing
Removing
-
Drain coolant. Refer to Cooling System, Service and Repair. See: Service and Repair
-
Remove front bumper. Refer to Body and Frame, Bumper, Service and Repair See: Body and Frame/Bumper/Front Bumper/Service and Repair
-
Disconnect coolant hoses from radiator.
-
Disconnect harness connectors from Coolant Fan Control (FC) thermal switch -F18- and coolant fan -V7-.
-
Remove headlights. Refer to Lighting and Horns, Headlamp, See: Lighting and Horns/Headlamp/Service and Repair
-
Remove both radiator mounting bolts and remove radiator toward the front.