volkswagen Workshop Repair Guides

Volkswagen Workshop Service and Repair Manuals

Dismantling and assembling heater unit > < Removing and installing heater unit
Removing and installing heat exchanger
Special tools and workshop equipment required
   
t  Drip tray -VAS 6208-
t   
  W00-10228
t  Hose clamps up to Ø 40 mm -VAS 3093-
t  Compressed air gun, commercially available
Removing
  Note
After renewal, completely renew coolant.
  W00-0671
–  Remove heater unit -1-. → Chapter
–  Press locking lugs on sides outwards and carefully pull heat exchanger out of heater unit -3-.

Installing
   
Installation is carried out in the reverse order. When installing, note the following:
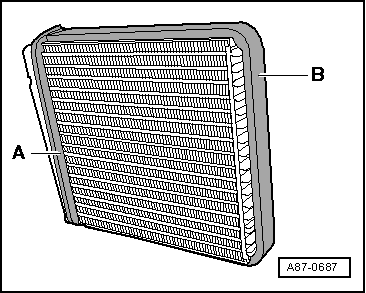
–  Check seals attached to heat exchanger -A- and -B-. Install heat exchanger only with undamaged seals.
  Note
t  An improperly bonded seal can roll up when heat exchanger is pushed into heater unit.
t  If seal is damaged or improperly attached, cold air can flow past heat exchanger.
–  Check heater unit for cleanliness through shaft for heat exchanger while heat exchanger is removed.
–  If necessary, remove dirt or residue of leaked coolant from heater unit, e.g. after removing a leaking heat exchanger.
  A87-0687
Installation position of seal for heat exchanger and bulkhead
  Note
The seal between the heat exchanger and the bulkhead has an adjustment mark.
–  Fit seal -1- so that adjustment mark on seal and mark on base plate -2- align -3-.
–  Push heat exchanger into heater unit.
  Note
If locking lugs do not hold heat exchanger securely, screw it on additionally → Item.
  N80-0167

Dismantling and assembling heater unit > < Removing and installing heater unit