-
‒ When lowering the assembly, ensure that clearance exists between assembly and drive shafts.
-
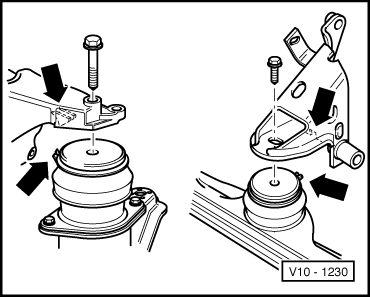
‒ →
When installing the rear right and front assembly mountings ensure that the recess on the rear console and the recess on the front console locates on the lugs of the bonded rubber mounting -arrows-.
-
‒ Insert all assembly mounting bolts by hand approx. 5...6 turns.
-
‒ Align assembly mountings stress-free by rocking.
-
‒ First tighten front and rear right assembly mountings, then tighten rear left assembly mounting.
Tightening torques
,
Assembly mountings.
Vehicles with manual gearbox
-
‒ Install hydraulic clutch slave cylinder:
=> 5-Speed manual gearbox 02A; Repair group 30; Servicing clutch control
-
‒ Install selector cables with support bracket on gearbox, adjust if necessary:
=> 5-Speed manual gearbox 02A; Repair group 34; Servicing selector mechanism; Removing and installing selector cables
Vehicles with automatic gearbox
-
‒ Install selector cable on gearbox, adjust if necessary:
=> Automatic gearbox 096; Repair group 37; Servicing selector mechanism; Dismantling and assembling selector mechanism
Vehicles with air conditioner
-
‒ Installing air conditioner compressor:
=> Heating, Air conditioning; Repair group 87; removing and installing compressor bracket
Continuation for all vehicles
-
‒ Installing P.A.S. vane pump:
=> Running gear; Repair group 48; Assembly overview: vane pump, hydraulic pipes, reservoir; Removing and installing P.A.S. vane pump
-
‒ Installing lock carrier with attachments:
=> General body repairs; Repair group 50; lock carrier
-
‒ Electrical connections and routing:
=> Electrical system; Repair group 97
=> Repair group 24; Motronic injection and ignition system; Servicing injection part
-
‒ Install ribbed belt => Page 13-21
.
-
‒ Filling with coolant => Page 19-14
-
‒ Adjusting throttle cable => Page 20-16
.
-
‒ Check idling speed and ignition timing:
=> Repair group 24; Motronic injection and ignition system; Servicing injection part
-
‒ Check headlight adjustment and adjust if necessary:
=> Maintenance
|