|
Removing and installing engine
Notes on removing
Note:
Check whether a coded radio is installed as during the forthcoming work sequences the battery earth strap must be disconnected. Obtain radio code first if necessary.
-
‒ The engine is removed forwards together with the gearbox.
-
‒ With ignition switched off disconnect battery earth strap.
-
‒ All cable ties which are opened or cut open when removing engine, must be replaced in the same position when installing engine.
-
‒ Remove engine cover.
-
‒ Remove battery
-
‒ Remove battery tray.
-
‒ Disconnect fuel supply and return pipes at fuel filter.
-
‒ Remove connecting pipe between charged air cooler and intake connecting flange.
-
‒ Remove air mass meter/turbocharger connecting pipe.
-
‒ Pull connectors off thermo-switch and radiator fan.
-
‒ Remove noise insulation tray:
=> General body repairs exterior; Repair group 50; Body front; Assembly overview
-
‒ Drain coolant .
-
‒ Pull radiator coolant hoses off engine using spring-type clip pliers V.A.G 1921 or VAS 5024.
Vehicles with air conditioner:
-
‒ Observe additional information and removal instructions => Page 10-14.
-
‒ Removing lock carrier with attachments:
=> General body repairs, exterior; Repair group 50; Body, front; Removing and installing lock carrier with attachments.
-
‒ Remove hydraulic clutch slave cylinder:
=> 5-Speed manual gearbox 02J; Repair group 30; Servicing clutch control
Note:
Clutch pedal must not be depressed.
-
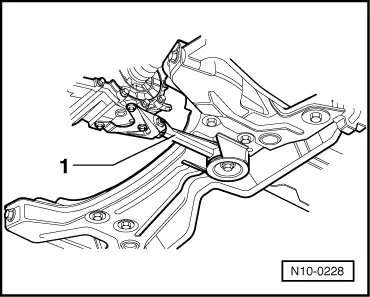
‒ Disconnect selector mechanism from gearbox.
=> 5-Speed manual gearbox 02J; Repair group 34; Servicing selector mechanism
-
‒ Pull vacuum and breather hoses off engine.
-
‒ Disconnect all electric wires from gearbox, alternator and starter and move clear.
-
‒ Pull off/disconnect all other electrical connections as necessary from engine and lay to one side.
|