volkswagen Workshop Repair Guides

Volkswagen Workshop Service and Repair Manuals

Removing and installing oil sump > < Renewing valve stem seals
4-cyl. injection engine (4-valve, roller rocker finger), Mechanics
Removing and installing parts of the lubrication system

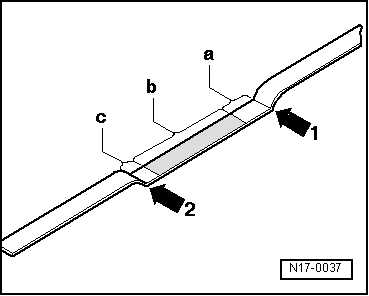
Note:

The oil level must not be above the max. mark - danger of damaging catalyst!

Marks , Fig. 1 .

Checking oil pressure => Page 17-17

Oil system capacity1):

     with oil filter 3.2 ltr.

     1)     Up-to-date figures:

=> Exhaust emissions test binder

Engine oil specifications:

Note:

Engines are filled at the factory with oil meeting VW standard 503 00. This engine oil is matched to long service intervals. However, you can also use the engine oils listed below.

Use engine oil to VW standard 500 00, 501 01 or 502 00. Only in exceptional cases: Multi-grade oils corresponding to API-SF or SG.

 
N17-0125
  • 0.30 bar oil pressure switch (F1),
    25 Nm
    • ◆ Checking => Page 17-17
    • ◆ If sealing ring is leaking nip open and replace.
  • Heater element (N79)
    • ◆ For crankcase breather
    • ◆ Check heater element voltage supply between contacts 1 and 2 with engine running:
           Specification:
           At least 11.5 V
  • To air cleaner
  • 20 Nm
  • Cap
    • ◆ Renew seal if damaged
  • Dipstick
    • ◆ The oil level must not be above the max. mark!
    • ◆ Markings => Fig. 1
 
N17-0125
  • Guide
    • ◆ Pull off to extract oil
  • Guide tube
  • Main drive toothed belt
    • ◆ Mark D.O.R. before removing
    • ◆ Check for wear
    • ◆ Do not kink
    • ◆ Toothed belt routing => Fig. 1
    • ◆ Removing, installing and tensioning
      => Page 15-19
  • Oil cooler
    • ◆ Ensure clearance to adjacent components
    • ◆ Coat contact area outside the seal with AMV 188 100 02
    • ◆ See note
      => Page 17-1
    • ◆ Coolant hose connection diagram
 
N17-0125
  • 25 Nm
  • Oil filter
    • ◆ Loosen at hexagon bolt head
    • ◆ Tighten by hand
    • ◆ Observe installation instructions on oil filter
  • O-ring
    • ◆ Insert in oil cooler before installing oil cooler
    • ◆ Renew
    • ◆ Oil before installing
  • 10 Nm
  • Crankshaft toothed belt sprocket
  • Oil seal
 
N17-0125
  • Oil pump
    • ◆ When installing note follower on crankshaft
      => Page 17-7 , item 30
    • ◆ Must be located on dowel sleeves
    • ◆ Removing and installing
      => Page 17-12
  • Gasket
    • ◆ Renew
    • ◆ Must be located on dowel sleeves
  • Gasket
    • ◆ Renew
  • Suction pipe
  • 20 Nm
    • ◆ Loosen and tighten with Torx bit from V.A.G 1766
  • Main drive tensioning roller
    • ◆ Checking => Page 15-12
    • ◆ Tensioning toothed belts
      => Page 15-19
 
N17-0125
  • Sump
    • ◆ Removing and installing
      => Page 17-8
    • ◆ Clean sealing surface before installing
    • ◆ Install with silicone sealant
      D 176 404 A2
      => Page 17-8
  • Oil drain plug, 30 Nm
    • ◆ With attached seal
    • ◆ Renew
  • 13 Nm
    • ◆ Renew
    • ◆ Loosen and tighten only bolts on flywheel end with socket insert T10058
  • 45 Nm
  • Cable guide
 
N17-0125
  • 25 Nm
  • Oil spray jet
    • ◆ For piston cooling
  • Driver
    • ◆ Coat with oil before installing oil pump
  • O-ring
    • ◆ Renew
  • Oil separator
  • Engine oil temperature sender, 10 Nm
 
N17-0037

→ Fig. 1     Markings on oil dipstick

  •      1 -     max. mark
  •      2 -     min. mark
  •      a -     Area above hatched field up to max. mark: Do not replenish with engine oil!
  •      b -     Oil level within hatched field: can be replenished with engine oil
  •      c -     Area from min. mark up to hatched field: replenish with max. 0.5 ltr. of engine oil!

Removing and installing oil sump > < Renewing valve stem seals