volkswagen Workshop Repair Guides

Volkswagen Workshop Service and Repair Manuals

Checking valve guides > < Checking hydraulic bucket tappets
4-Cyl. injection engine (4 valve), Mechanics
Servicing valve gear
Removing and installing camshaft

Special tools, testers and auxiliary items

  • ◆ Engine support bracket 10-222A with legs 10-222A/1
  • ◆ Counter-hold tool 3415
  • ◆ Counter-hold tool 3036
  • ◆ Torque wrench V.A.G 1331 (5...50 Nm)
  • ◆ Torque wrench V.A.G 1332 (40...200 Nm)
  • ◆ Sealing compound AMV 174 004 01

Removing

  • ‒ First remove toothed belts
    .
 
N13-0178
  • ‒ Turn the crankshaft back slightly.
  • ‒ Loosen the camshaft sprockets. To do this hold camshaft sprockets with counter-hold tool 3036.
  • ‒ → Set camshaft sprockets so that the markings align as shown.
  • ‒ Remove camshaft sprockets.
  • ‒ Remove cylinder head cover.
  • ‒ Remove distributor.
 
N15-0091

Inlet camshaft

  • ‒ → First remove bearing caps 0, 1 and 3 as well as the distributor securing cap.
  • ‒ Then slacken off bearing caps 2 and 4 alternately and diagonally.

Exhaust camshaft

  • ‒ First remove bearing caps 5, 6 and 8.
  • ‒ Then slacken off bearing caps 7 and 9 alternately and diagonally.

Installing

Conditions

  • ● The pistons must not be positioned at TDC.

Note:

Note the fitting position of the bearing cap: The point -arrow- must point to the exhaust side.

  • ‒ Oil the camshaft contact surfaces.
  • ‒ Fit the camshaft so that the toothed belt sprocket recesses are opposite one another (top dead centre No. 1 cylinder).

Inlet camshaft

 
N15-0091
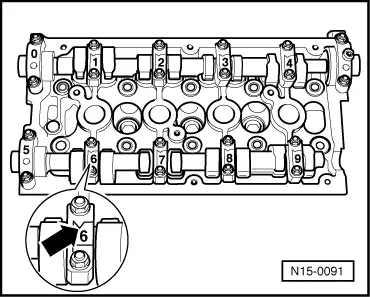
  • ‒ → Tighten bearing caps 2 and 4 alternately and diagonally and then tighten to
         6 Nm.
  • ‒ Lightly coat contact surface of bearing cap 0 and distributor securing cap with sealant AMV 174 004 01.
  • ‒ Install bearing caps 0, 1 and 3 and also the distributor securing cap and also tighten to
         6 Nm.
    When doing this insert distributor for centralizing securing cap.
  • ‒ Turn all nuts by 1/4 turn (90 °) further.

Exhaust camshaft

  • ‒ Tighten bearing caps 7 and 9 alternately and
    diagonally and then tighten to
         6 Nm.
  • ‒ Coat bearing cap 5 seating areas lightly with sealant AMV 174 004 01.
  • ‒ Install bearing caps 5, 6 and 8 and also tighten to
         6 Nm.
  • ‒ Turn all nuts by 1/4 turn (90 °) further.
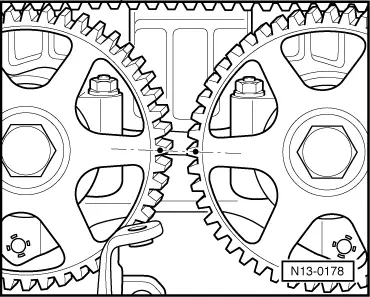
  • ‒ Install camshaft sprockets.
  • ‒ Hold the respective camshaft sprocket with counter-hold tool 3036 and tighten to
         20 Nm
    and then turn bolt
         1/4 turn (90 °) further.

The rest of the assembly is basically a reverse of the dismantling sequence.

Installing toothed belt and adjusting timing => Page 13-12 .

Note:

When new tappets have been installed the engine must not be started for about 30 minutes. Hydraulic compensation elements must settle (otherwise valves will strike pistons).

Checking valve guides > < Checking hydraulic bucket tappets