volkswagen Workshop Repair Guides

Volkswagen Workshop Service and Repair Manuals

Checking semi-automatic toothed belt tensioning roller > < Removing
Installing
Installing
Prerequisites
l  The pistons must not be positioned at TDC.
l  The crankshaft toothed belt pulley is secured to the crankshaft with the securing bolt and two washers.
l  Camshaft pulleys locked into camshaft housing fitting holes with camshaft lock -T10016- and secured against turning.
  Note
If a piston is at TDC, the valves could strike the piston when the camshafts turn.
Procedure
   
–  Set crankshaft to TDC No. 1 cylinder. The tooth with end ground down must align with the mark on the oil pump -arrow-.
–  Fit toothed belt for coupling the camshafts in a clockwise direction starting at top on inlet camshaft pulley and then onto exhaust camshaft pulley. The slack section of the toothed belt must be underneath. Note direction of rotation with used belts.
Install coupling drive tensioning roller as follows
  N13-0147
–  Turn coupling drive tensioning roller clockwise towards marking window -arrow- using a hexagon key -1- (tensioning roller in relaxed position).
–  Press lower section of toothed belt for coupling the camshafts upwards with tensioning roller and fit tensioning roller securing bolt.
–  Tighten securing bolt hand tight. The lug in the base plate must engage in the hole in the cylinder head -2-.
  N13-0364
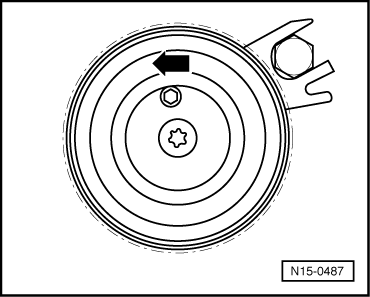
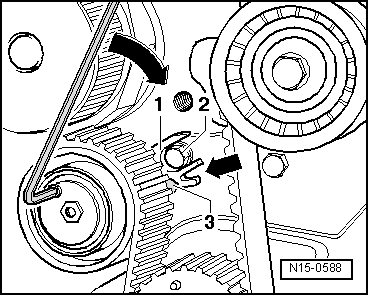
–  Finally tension toothed belt by turning tensioning roller anti-clockwise using a hexagon key -1-, until the indicator -2- aligns over the lug in the base plate in the marking window -arrow-.
–  Tighten clamping nut on tensioning roller. Torque setting: 20 Nm.
  Note
The camshaft must be secured by the tool against turning until the main drive toothed belt is fitted.
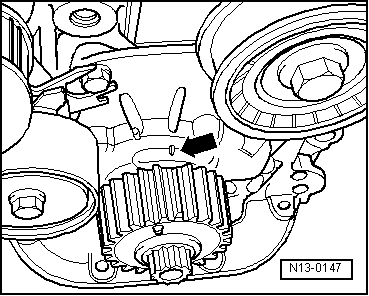
–  Fit main drive toothed belt on in an anti-clockwise direction starting at water pump then over tensioning roller, crankshaft, idler roller and inlet camshaft pulley. Note direction of rotation with used belts.
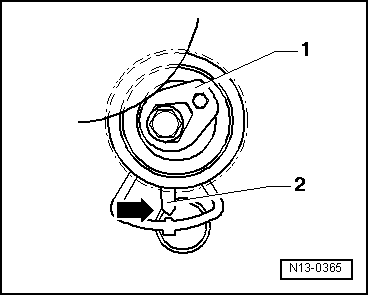
If tensioning roller was removed beforehand, install tensioning roller as follows
  N13-0365
–  Turn main drive tensioning roller anti-clockwise to indicated position -arrow- using a hexagon key.
  N15-0487
–  Tighten securing bolt hand tight. The cut-out in the base plate -1- must engage over securing bolt -2-.
–  Then tension toothed belt by turning tensioning roller in direction of arrow until indicator -3- aligns with notch in base plate -arrow-.
–  Tighten clamping nut on tensioning roller. Torque setting: 20 Nm.
–  Remove tool from camshaft pulleys.
–  Now turn crankshaft two turns in engine direction of rotation until it is again at top dead centre No. 1 cylinder.
–  Now the position of the toothed belts and tensioning rollers must be checked again.
–  Tension both toothed belts again if necessary.
–  Refit lower toothed belt guard.
–  Refit crankshaft pulley. When doing this, note the following
t  The pulley securing bolt and the toothed belt pulley must be renewed.
t  When installing pulley, observe fixing arrangement to toothed belt pulley.
t  Tightening procedure for the new oiled bolt: 90 Nm + 1/4 turn (90°) further.
–  Fit engine bracket to cylinder head. Torque setting: 50 Nm.
–  Install poly V-belt tensioning element again on vehicles with an air conditioning system.
–  Install engine mounting. Prescribed torque → Chapter.
–  Install top toothed belt guard.
–  Installing poly V-belt → Chapter.
  Note
When installing poly V-belt, ensure that belt seats correctly in pulley.
–  Install front right wheel housing liner → General body repairs, exterior; Rep. Gr.66
–  Install engine splash guard.
–  Install coolant expansion tank.
–  Install air cleaner housing → Chapter.
  N15-0588

Checking semi-automatic toothed belt tensioning roller > < Removing