
Polo Mk4
 Note
Note
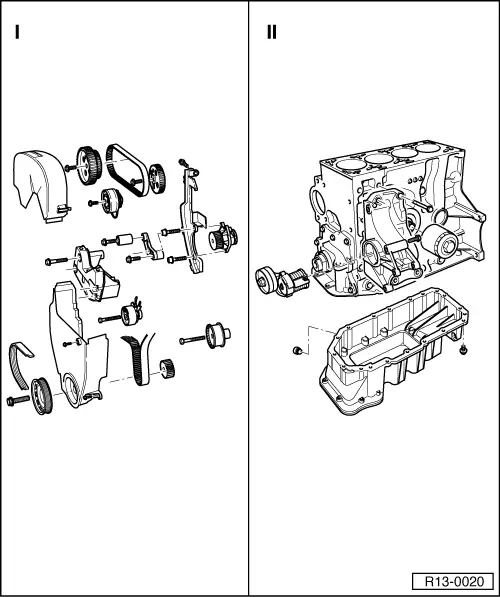
|
Note
|
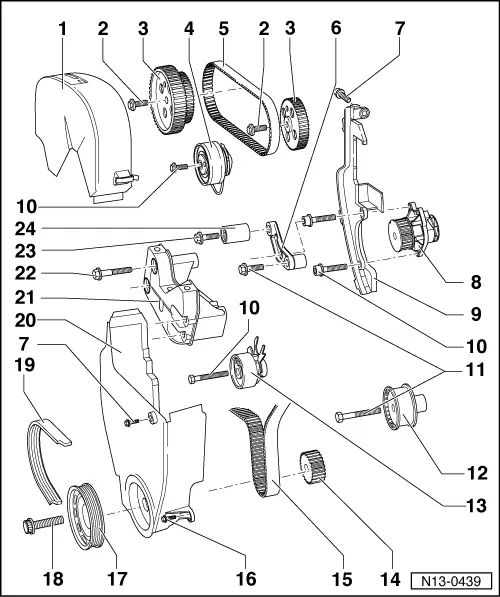
| 1 - | Upper part of mechanical distribution cover |
| 2 - | Tighten at 20 Nm + 90° |
| q | Replace |
| q | To loosen and tighten, hold valve command gear with Camshaft clamp -T10016- |
| 3 - | Valve command gears |
| q | Observe fastening when installing |
| q | Observe installation position when installing indented belt → Chapter. |
| 4 - | Tension pulley of valves command shaft |
| q | Check → Chapter. |
| q | Adjust indented belt → Chapter. |
| 5 - | Tension pulley of valves command shaft |
| q | Before removing mark operation direction |
| q | Check wear |
| q | Do not fold |
| q | Remove and install, adjust → Chapter. |
| 6 - | Support |
| 7 - | 10 Nm |
| 8 - | Water pump |
| q | With integrated sealing ring |
| q | Sealing ring may not be removed from pump |
| q | In case of damages or leakage, fully replace water pump |
| q | Remove and install → Chapter. |
| 9 - | Mechanical distribution back cover |
| 10 - | 20 Nm |
| 11 - | 50 Nm |
| 12 - | Pulley of main indented belt |
| 13 - | Tension pulley of main indented belt |
| q | Adjust indented belt → Chapter. |
| 14 - | Crank shaft gear |
| q | Observe installation position when installing indented belt → Chapter. |
| 15 - | Main indented belt |
| q | Before removing mark operation direction |
| q | Check wear |
| q | Do not fold |
| q | Remove and install, adjust → Chapter. |
| 16 - | 12 Nm |
| q | Replace |
| 17 - | Crank shaft pulley |
| q | Observe fastening when installing |
| q | Removal and installation → Chapter, Indented belt - remove, install and adjust |
| q | Remove and install Poly-V belt → Chapter. |
| 18 - | Tighten at 90 Nm + 90° |
| q | Replace |
| q | To loosen and tighten, use wrench 3415 |
| q | Tightening continuation may be done in many phases |
| q | Tightening continuation angle may be measured with a regular angle measuring disc, such as Hazet 6690 |
| 19 - | Poly-V belt |
| q | Mark rotation direction before removal |
| q | Remove and install Poly-V belt → Chapter. |
| q | Poly-V belt trajectory → Chapter. |
| 20 - | Lower cover of mechanic distribution |
| 21 - | Engine right support |
| 22 - | 50 Nm |
| q | Replace |
| 23 - | 25 Nm |
| 24 - | Pulley of indented belt |
Note
|
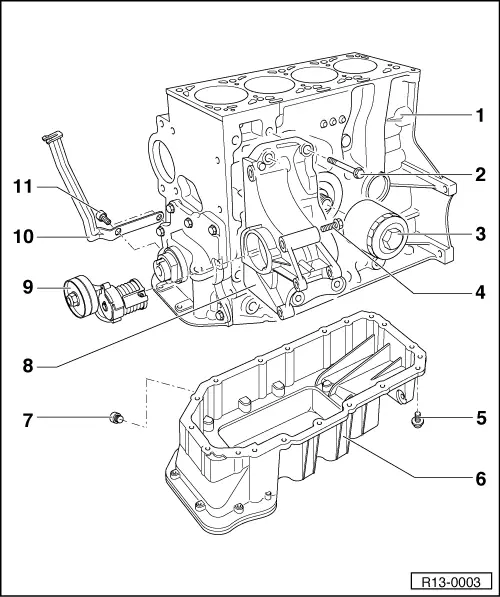
| 1 - | Engine block |
| q | Crank shaft - remove and install → Chapter. |
| q | Pistons and rods - remove and install → Chapter. |
| 2 - | 50 Nm |
| q | Tightening sequence: first tighten upper right bolt, then lower right bolt, and last, the left bolt (seen from the front, in vehicle movement direction) |
| 3 - | Oil filter |
| q | Loosen through hexagonal |
| q | Tighten manually |
| q | Observe oil filter installation instructions |
| 4 - | M8 Tighten at 20 Nm + 90° M10: 45 Nm |
| 5 - | Tighten at 10 Nm + 90° |
| q | Replace |
| q | Loosen oil carter fastening bolts from engine block on pulley side (4 units) inside oil carter |
| 6 - | Oil carter |
| q | Two pieces |
| q | Clean sealing surface before installation |
| q | Install with silicone seal “D 176 404 A2” |
| q | To remove and install, remove oil carter cover |
| q | Remove and install → Chapter. |
| 7 - | Oil draining plug, 30 Nm |
| q | With integrated sealing ring |
| q | Replace |
| 8 - | Compact support |
| q | For alternator, air conditioning compressor and Poly-V belt fastening element |
| q | Remove and install compact support in vehicles with air conditioning: → Ventilation system; Rep. Gr.87 |
| 9 - | Tension pulley |
| q | For Poly-V belts |
| q | Only vehicles with air conditioning |
| q | To loosen Poly-V belt, turn with 16 mm screwdriver |
| q | Remove and install Poly-V belt → Chapter. |
| 10 - | Support |
| q | For connectors |
| 11 - | 40 Nm |