
Polo Mk4
 Note
Note
|
 WARNING
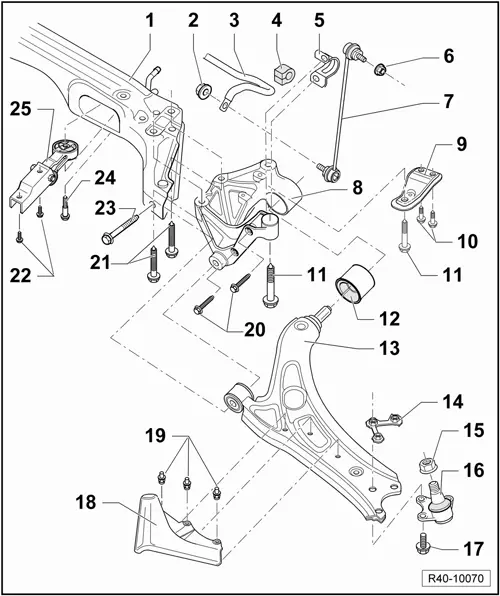
| 1 - | Auxiliary frame (sub-frame) |
| q | different versions |
| q | See: → Electronic Parts Catalogue„ETKA“ |
| q | Remove and install → Chapter |
| 2 - | Hexagonal nut |
| q | Self-locking |
| q | 40 Nm |
| q | Replace after each removal |
| 3 - | Anti-roll bar |
| The auxiliary frame (subframe) must be lower for the removal/installation of the anti-roll bar |
| q | Remove and install → Chapter |
| 4 - | Rubber support |
| q | Always replace both sides |
| q | See: → Electronic Parts Catalogue„ETKA“ |
| q | For its removal, loosen the fastening screws of the clamp with the rubber support |
| 5 - | Clamp |
| 6 - | Hexagonal nut |
| q | Self-locking |
| q | 40 Nm |
| q | Replace after each removal |
| 7 - | Coupling rod |
| q | Tighten the locknut upon aligning the vehicle |
| q | Only for vehicles with anti-roll bar |
| q | Between anti-roll bar and suspension column |
| 8 - | Console of the auxiliary frame (sub-frame) |
| q | Remove and install → Chapter |
| If the console thread is damaged, it can be repaired with a Heli-Coil thread insert |
| Repair the thread in the longitudinal member → Chapter |
| 9 - | Support |
| 10 - | Hex screws |
| q | 20 Nm + 90° |
| q | Replace after each removal |
| If the soldered nut thread is damaged, it can be repaired with a Heli-Coil thread insert |
| Repair the thread in the longitudinal member → Chapter |
| 11 - | Hexagonal head screw |
| q | 70 Nm + 90° |
| q | Replace after each removal |
| If the soldered nut thread is damaged, it can be repaired with a Heli-Coil thread insert |
| Repair the thread in the longitudinal member → Chapter |
| 12 - | Rubber support bearing for the console |
| q | different versions |
| q | See: → Electronic Parts Catalogue„ETKA“ |
| q | Remove and install → Chapter |
| 13 - | Wishbone (transversal) |
| q | Remove and install → Chapter |
| 14 - | Plate with nuts |
| 15 - | Hexagonal nut |
| q | Self-locking |
| q | 20 Nm + 90° |
| q | Replace after each removal |
| 16 - | Swivel guide |
| q | Check → Chapter |
| q | Remove and install → Chapter |
| q | Installation position → Chapter |
| 17 - | Hexagonal head screw |
| q | 20 Nm + 90° |
| q | Replace after each removal |
| 18 - | Air deflector plate |
| q | Only on vehicles with 13 chassis |
| 19 - | Spreader rivet |
| q | Only on vehicles with 13 chassis |
| 20 - | Hex screws |
| q | 20 Nm + 90° |
| q | Replace after each removal |
| 21 - | Hexagonal head screw |
| q | 50 Nm + 90° |
| q | Replace after each removal |
| follow the sequence for installing and tightening the screws: |
| t | First, tighten the hexagonal screw -position 23-, but do not tighten it definitely |
| t | Next, tighten the hexagonal screw -position 21-, but do not tighten it definitely |
| t | Finally, tighten the hexagonal screws alternately. |
| 22 - | Hexagonal head screw |
| q | 30 Nm + 90° |
| q | Replace after each removal |
| 23 - | Hexagonal head screw |
| q | 70 Nm + 90° |
| q | Replace after each removal |
| follow the sequence for installing and tightening the screws: |
| t | First, tighten the hexagonal screw -position 23-, but do not tighten it definitely |
| t | Next, tighten the hexagonal screw -position 21-, but do not tighten it definitely |
| t | Finally, tighten the hexagonal screws alternately. |
| 24 - | Hexagonal head screw |
| q | 40 Nm + 90° |
| q | Replace after each removal |
| 25 - | Pendular support |