volkswagen Workshop Repair Guides

Volkswagen Workshop Service and Repair Manuals

Front suspension spring - repair > < Suspension column - remove and install|Removal
Installation
Installation
Installation is performed in reverse sequence to the removal, considering the following:
  WARNING
Replace self-locking nuts and screws subject to angular torque
–  Install and tighten the upper fastening screws on the shock absorber. Tightening torque, see → Anchor.
–  Install and tighten the fastening screws for the suspension pillar on the wheel roller bearing case. Tightening torque, see → Anchor.
–  To install the drive semi-shaft on the wheel roller bearing case, consult:
t  for vehicles (without ABS) → Anchor
t  For vehicles (with ABS) → Anchor
–  Insert the swivel guide in the wishbone.
   
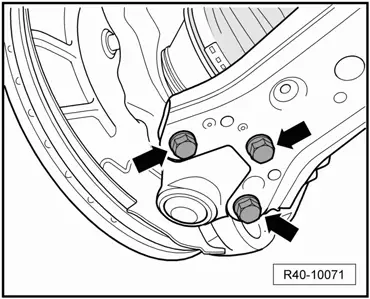
–  Install the fastening screws -arrows- (screws on the old markings) for the wishbone swivel guide. Tightening torque, see → Anchor.
–  Install the front wheel and tighten the screws. Tightening torque, see → Chapter.
–  Install and tighten the grooved nut (dodecagonal). Tightening torque, see → Chapter.
  Note
After the installation, check with a drive test check whether the car has no directional trend and if the steering wheel is not in the straight position (wheels forward). In case there is any irregularity, the geometry of the vehicle must be checked.
–  Check the alignment → Chapter.
Tightening torques
  R40-10071
ComponentsTightening torques
Steering terminal to the wheel roller bearing case.
t  Use new fastening nuts
20 Nm + 90°
Wishbone swivel guide
t  Use new fastening screws
20 Nm + 90°
Swivel guide to the wheel roller bearing case.
t  Use new fastening nuts
20 Nm + 90°
Body suspension pillar
t  Use new fastening screws
15 Nm + 90°
Wheel roller bearing case suspension pillar
t  Use new fastening nuts
60 Nm + 90°


Front suspension spring - repair > < Suspension column - remove and install|Removal