Volkswagen Workshop Service and Repair Manuals
HOME
FEATURES
MENU
INDEX
ABOUT US
Installing windscreen >
< Assembly overview - windscreen
Polo Mk5
Body
General body repairs, exterior
Glazing/window mechanism / Flush bonded windows
Removing windscreen
Removing windscreen
Removing windscreen
–
Remove A-pillar trim
→ General body repairs, interior; Rep. gr.70
.
–
Remove all sun visors
→ General body repairs, interior; Rep. gr.68
.
–
Remove interior mirror
→ General body repairs, interior; Rep. gr.68
.
–
Moulded headliner can now be lowered sufficiently to allow windscreen to be cut out without damage occurring to moulded headliner.
–
Vehicles with rain sensor
→ Vehicle electrics; Electrical system; Rep. gr.92
.
–
Removing plenum chamber cover
→ Chapter
.
–
Remove water deflector of Polo Blue Motion
→ Chapter
.
–
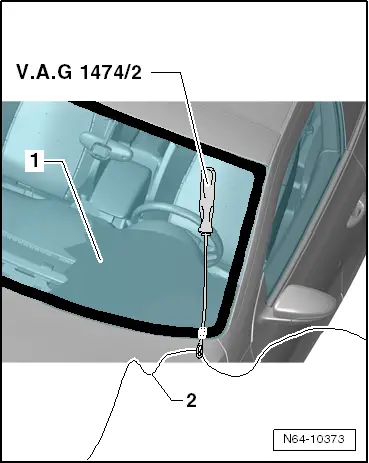
Slide protective backing -V.A.G 1474/8-
-1-
between front windscreen and dash panel.
–
Pull cutting cord
-2-
through adhesive sealing material into inside of vehicle using awl -V.A.G 1474/2-.
–
Secure inside end of cutting cord against falling out using pull toggle -V.A.G 1351/1-
-3-
.
–
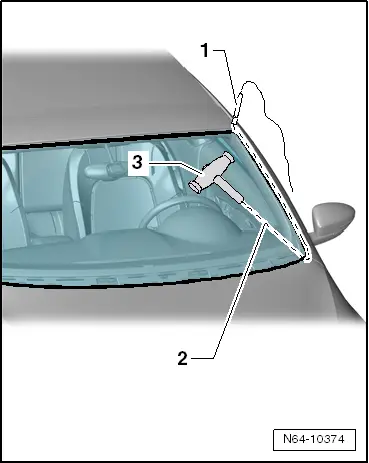
Insert cutting cord
-2-
into window flange using tube
-1-
.
–
Place cutting cord all around the window glass.
–
Ensure that cutting cord lies under window in corners.
–
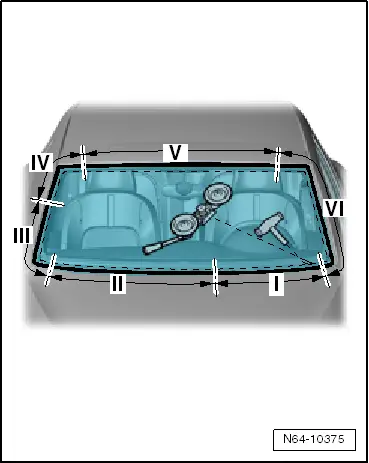
Pull the 2nd cutting cord through the adhesive sealant.
–
Secure other end of 2nd cord to reel device -V.A.G 1654 A-
–
Position the winding device -V.A.G 1654 A- at „position I“.
–
Turn reel device -V.A.G 1654 A- accordingly and cut windscreen glass free.
–
Use plastic wedge to press cutting cord against windscreen glass while cutting in order to have a certain amount of clearance between window flange and dash panel.
Body
General body repairs, exterior
Glazing/window mechanism / Flush bonded windows
Removing windscreen
Installing windscreen >
< Assembly overview - windscreen