volkswagen Workshop Repair Guides

Volkswagen Workshop Service and Repair Manuals

Removing and installing heater and air conditioning unit, right-hand drive vehicles > < Removing
Installing
   
Installing
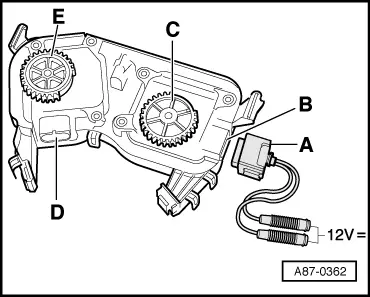
–  Position control motor gear wheels -C- and -E- as illustrated.
  A87-0362
–  To do so, use adapter cable -A- → Chapter.
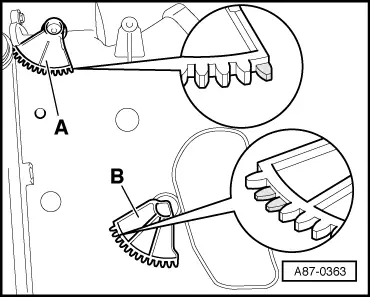
–  Position lever -A- (defroster flap) and -B- (temperature flap) on air distribution housing as illustrated.
  Note
Take note of narrower teeth on each lever segment and the resulting larger gap between the teeth at this position.
  A87-0363
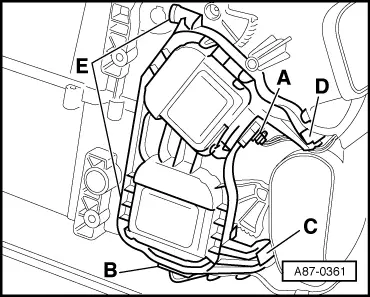
–  Fit bracket for control motors in mounting -E-.
  A87-0361
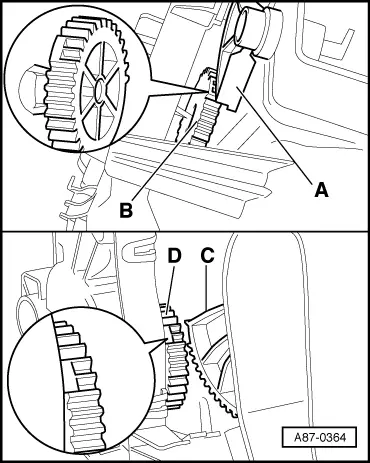
–  Now bring defroster flap control motor -V107--B- together with lever -A- and temperature flap control motor -V68--D- with lever -C-. Ensure gear wheels and levers are positioned correctly.
  Note
If gear wheels and levers are not aligned as prescribed, the control motor will lock up as soon as a wide tooth attempts to mesh with a narrow tooth.
  A87-0364
–  Lock retainer on air distribution housing -C- and -D-.
  A87-0361
–  Check function of control motors. Connect 12 V source to contacts -4- and -6- using adapter cable -A- → Chapter for control motors and check function of control motors. Check each control motor individually!
  Note
If the gear wheels and levers are not aligned, the control motors will lock up, or the heater and air conditioning unit will be noisy as the flaps will not close correctly.
  A87-0362

Removing and installing heater and air conditioning unit, right-hand drive vehicles > < Removing