volkswagen Workshop Repair Guides

Volkswagen Workshop Service and Repair Manuals

Emptying the gas line > < Parts of Autogas (LPG) fuel supply system
Emptying the fuel tank (Autogas)
Empty fuel tank (Autogas) if gas tank valve -N495- is defective (valve does not open). → Anchor
  Note
t  If the customer is given a service appointment and it is known that a tank valve will have to be replaced, the customer should drive the vehicle until the gas tank is empty before bringing the vehicle in for service.
t  Even if the fuel tank indicator shows empty, there is still some residual liquid gas in the fuel tank depending on the set gas pressure limit. The residual liquid gas must be removed entirely!
   
Safety area
A - Wind direction
B - At least 10 m
C - At least 20 m
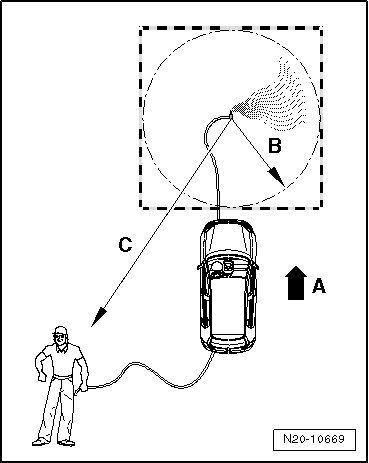
The safety area is to be closed off with barrier tape and the access points are to be marked clearly with a warning that there is a danger of the gas exploding.
  WARNING
Autogas is heavier than air!
There must be no cavities in the ground (depressions, pits, channels, cellars or other hollow areas into which the gas can flow).
There must be no ignition sources present, e.g. exposed flame, sparks, electrostatic discharge or hot surfaces, that could cause the Autogas to ignite.
  Note
t  It must be ensured that no gas enters buildings further away, e.g. through open windows and doors. In addition, the area must be easily accessible and well ventilated (not a back yard).
t  The wind direction is to be taken into account.
Types of fuel tank (Autogas) to be emptied
t  Normal tank emptying equipment or liquid-gas burner developed for LPG
For use, see → corresponding instructions
or
t  Allow to escape into the atmosphere
–  Empty the gas line → Chapter
When gas pressure has been reduced, switch off ignition.
  WARNING
There is a danger of injury due to escaping gas.
The system is pressurised.
Wear suitable protection such as eye protection and protective gloves.
Before opening the system place a cloth around the connection. Then release pressure by carefully loosening the connection.
  N20-10669
–  Loosen gas line union -arrow- with banjo bolt -1- on gas inlet of filter housing.
–  If the pipe insert at the vaporiser has become loose, the sealing ring must be replaced.
Specified torque: 20 Nm.
–  Detach connector from gas tank valve -N495- and assemble valve.
–  Make up drainage pipe.
Drainage pipe consists of:
t  Certified copper gas pipe or hose pipe with copper ends and a pipe union
t  Outer diameter Ø max. 6 mm
t  Length approx. 12 m
–  Set up safety area → Anchor.
–  Route drainage pipe such as to ensure there are no kinks and connect to vehicle gas line.
  Note
Take wind direction into account.
–  Connect gas tank valve -N495- to a power supply cable.
–  Make sure that the ignition and the vehicle's electrical consumers have been switched off and that the doors are closed.
–  Connect power supply cable to an additional battery.
  WARNING
In accordance with the safety requirements and regulations applicable to the use of Autogas systems, never leave the vehicle unsupervised!
Tank emptying begins.
Emptying fuel tank (Autogas) if gas tank valve -N495- is defective (valve does not open)
  N01-10936
–  Detach connectors from gas tank valve -N495--1- and gas gauge sender -G707--4- on Autogas tank.
  WARNING
There is a danger of injury due to escaping gas.
The system is pressurised.
Wear suitable protection such as eye protection and protective gloves.
Before opening the system place a cloth around the connection. Then release pressure by carefully loosening the connection.
–  Release gas line to vaporiser and gas line from filler connection -5-.
–  Unscrew bolts -2- and remove fuel tank from car.

   
–  Set up safety area. → Anchor
–  Carefully unscrew bolts cross-wise from gas gauge sender -G707-.
  Note
The escape of gas can no longer be controlled until the fuel tank is empty.
  N20-10782

Emptying the gas line > < Parts of Autogas (LPG) fuel supply system