
850 T-5R L5-2.3L Turbo VIN 58 B5234T5 (1995)
Trailing Arm: Service and Repair
Transverse Arm Mount
1.
Fold rear seat backrests forward, then undo luggage area carpet at front edge.
2.
Remove cover plate under front edge of carpet, then undo righthand side panel at front edge and fold to one side. Remove backrest catch and panel
attachment clip.
3.
Raise rear of vehicle until wheels are off ground, remove upper shock absorber mounting bolts on righthand side, then disconnect electrical
connector retainer and position wiring and connector away from shock mount.
4.
Raise and support vehicle.
Fig. 10 Delta-Link Rear Suspension
5.
Remove right wheel and protecting plate at bracket for rear axle link, then disconnect anti-roll bar mount at right side, Fig. 10.
6.
Disconnect brake pipe bracket on right trailing arm, then the ABS pipe and brake pipe from clip on right trailing arm.
7.
Remove load from shock absorber by pressing trailing arm upward. Use a jack placed against recess for spring mounting bolt.
8.
Disconnect shock absorber from lower mount, then remove spring mounting nut and spring.
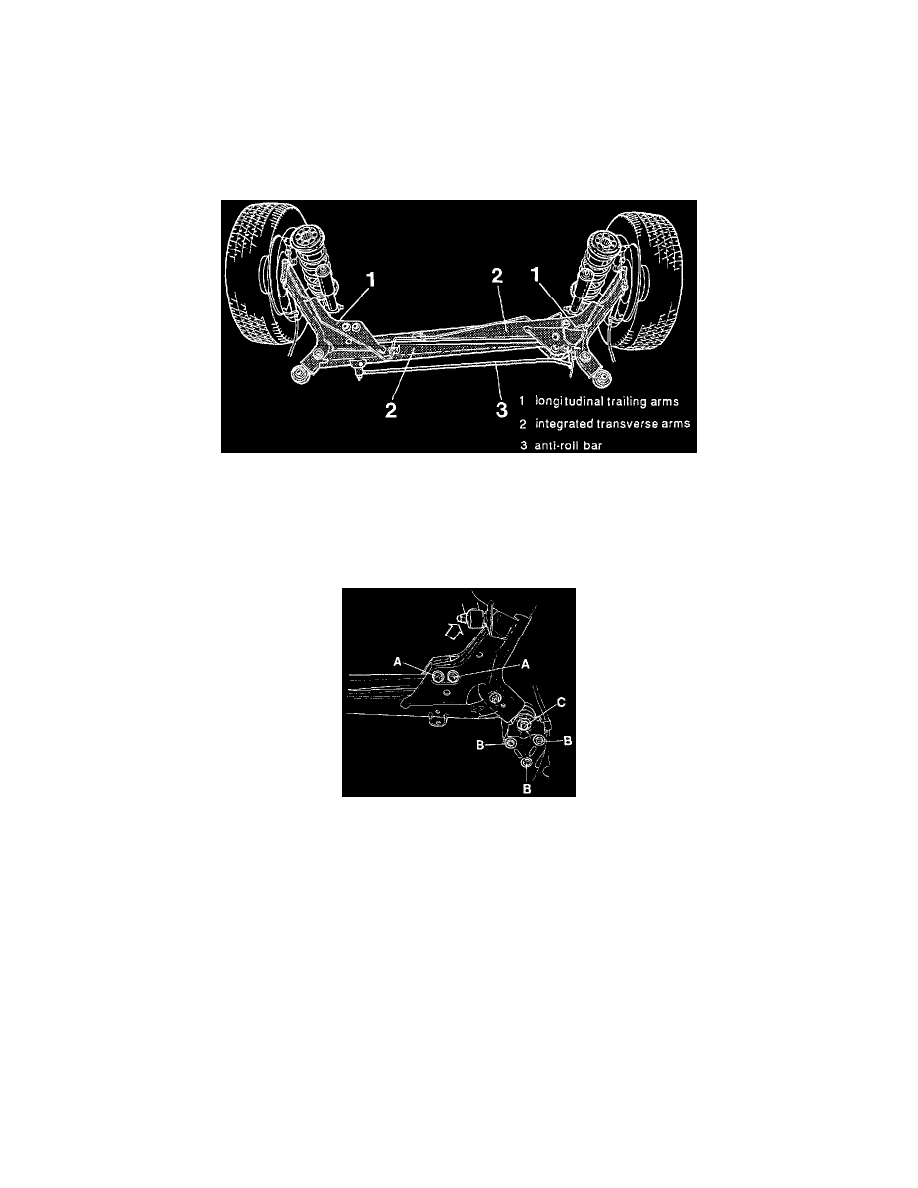
Fig. 11 Transverse Arm Anchor Bolt
9.
Reinstall shock absorber and tighten nut a few turns, then remove bolts A for transverse arm mounts on both sides, then bolts B and C on right
side, Fig. 11.
10.
Position a jack under left spring seat and raise seat a few centimeters, then disconnect trailing arm mount from body guide pin on right side.
11.
Press out righthand trailing arm, lefthand trailing arm remains in position.
12.
Install a new transverse arm mount for righthand trailing arm and tighten to specifications.
13.
Align attachment with mount in lefthand trailing arm, ensuring that trailing arm maintains same position relative to body, then tighten to
specifications.
14.
Adjust lefthand trailing arm position with jack, then install righthand transverse arm with attachment in its mount without inserting bolts.
15.
Replace attachment for lefthand transverse arm and tighten to specifications.
16.
Install transverse arm with attachment in its mount without inserting bolts, then connect righthand trailing arm to body guide pins using new bolts
and tighten to specifications. Bolt C which goes through rear axle link and bracket should be tightened first then the brackets three bolts B, Fig.
11.
17.
Install new bolts A for transverse arm attachments, then disconnect right shock absorber.
18.
Install spring, then connect right shock absorber and tighten to nuts specifications.
19.
Connect brake pipe and ABS cable to trailing arm attachment, brake pipe bracket to trailing arm attachment lug, then the anti-roll bar to trailing
arm. Tighten to specifications.
20.
Install protecting plate and wheel, the tighten lug nuts crosswise to specifications.