audi Workshop Repair Guides

Audi Workshop Service and Repair Manuals

Passenger compartment trim panels > < Removing and installing central tube support
Removing and installing dash panel central tube
Removing
–  Remove the dash panel → Chapter.
–  Detach the fuse holder C -SC- on the left and the fuse holder D -SD- on the right from the dash panel central tube → Electrical system; Rep. gr.97.
–  Remove the defroster vent intermediate piece at the top centre → Rep. gr.87.
–  Remove the dash panel vent air duct in the centre → Rep. gr.87.
–  Remove the driver side footwell vent → Rep. gr.87.
–  Equipment version with gas-discharge headlights: Remove the headlight range control unit -J431- → Electrical system; Rep. gr.94.
–  Equipment version with entry and start authorisation system: Remove the entry and start authorisation control unit -J518- → Electrical system; Rep. gr.96.
–  Equipment version with parking aid: Remove the parking aid control unit -J446- → Electrical system; Rep. gr.94.
–  Equipment version with mobile phone: Remove the aerial amplifier for mobile telephone -R86- → Communication; Rep. gr.91.
–  Unscrew the central tube support from the transmission tunnel → Chapter.
–  Unscrew the steering column from the dash panel central tube and set it down on the floor of the vehicle → Rep. gr.48.
   
–  Remove the wiper motor → Electrical system; Rep. gr.92.
–  Screw out the bolt -1- for the brace and central tube at the plenum chamber bulkhead.
  A70-11443
–  Screw out the bolts -2- for the brace -1-.
  A70-11257
–  Screw out the bolts -1, 2- for the relay/fuse holder on the driver side.
–  Pull the fuse and relay carrier -3- upwards -arrow- and disengage at the dash panel central tube.
  A70-11258
–  Screw out the bolts -2- for the heater and air conditioning unit at the top of the dash panel central tube -1-.
  A70-11444
–  Screw out the bolts -1, 2, 3- for the heater and air conditioning unit at the dash panel central tube on the driver side.
  A70-11445
  Caution
Mark the vertical and side positions at the dash panel central tube for re-installation.
–  Screw out the bolts -1, 2- for the dash panel central tube on the left and right.
  Note
  A70-11446
A second mechanic is required to detach the dash panel central tube.
–  Unplug the connectors, unclip the wires at the dash panel central tube and lay bare.
–  Disengage the dash panel central tube -3- at the heater and air conditioning unit -4-.
–  On the left and right, disengage the hooks -1- at the dash panel central tube at the A-pillar at the mounts -2-. To do so, lift the dash panel central tube slightly -arrow A-.
–  Carefully swivel the top of the dash panel central tube to the rear -arrow B- and at the same time pull it upwards.
–  Take the dash panel central tube out of the passenger compartment.
  A70-11259
Installing
–  Check the freedom of movement of the adjusting nut -1- of the compensating element -2--arrows-.
–  Completely screw down but do not tighten the adjusting nut.
  A70-11447
–  Carefully insert the dash panel central tube -3- with the hooks -1- in the mounts -2-.
–  Engage the heater and air conditioning unit -4- at the dash panel central tube.
–  Align the dash panel central tube with the marks made on removal for the central tube at the A-pillars and tighten the bolts.
Perform further installation in reverse order, paying attention to the following:
–  Install the steering column → Rep. gr.48.
Checking installation position of dash panel central tube
–  Provisionally insert the dash panel.
–  Screw on the dash panel at the dash panel central tube on the left and right.
–  Close the doors.
–  Check whether the gap between the dash panel and door is the same on the left and right.
–  Check whether the height of the dash panel coincides with the recesses in the door trim panels.
–  If the setting is not correct, note down the lateral and/or vertical deviation.
–  Unfasten the bolted joints of the dash panel central tube.
–  Adjust the dash panel central tube on the basis of the deviations noted down.
  A70-11259
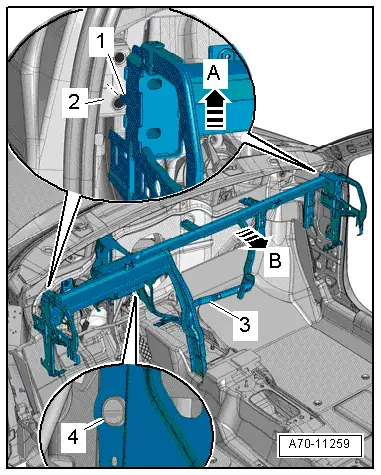
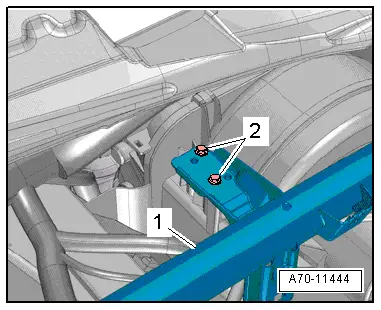
–  Tighten the bolts -1, 2- for the dash panel central tube on the left and right.
  WARNING
The battery must be connected with the ignition switched on. If pyrotechnic components (airbag, belt tensioner for example) are inexpertly repaired, this may result in unwanted triggering after connecting the battery. There must not be anyone in the vehicle when connecting the battery.
–  With the ignition switched on, connect the battery earth wire → Electrical system; Rep. gr.27.
  Note
If the airbag warning lamp -K75- indicates a fault following installation, the event recorder must be interrogated, erased and interrogated again → Vehicle diagnostic tester.
Notes on installation: For example tightening torques, component replacement → Chapter.
  A70-11446

Passenger compartment trim panels > < Removing and installing central tube support