| –
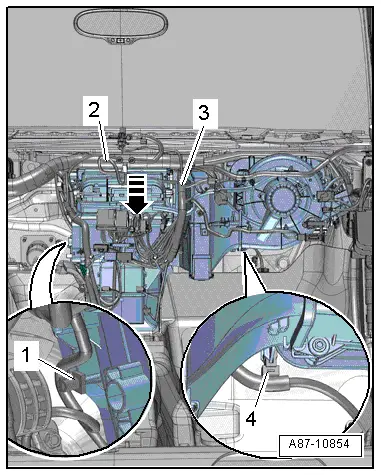
| Unplug the central connector on the right of the fresh air blower. |
| –
| Disengage the wiring harness -2- at the top of the heater by sliding it -arrow- to the rear out of the guides. |
| –
| Sever the cable ties -1, 4- and lay bare the wiring harness. |

Caution | Risk of irreparable damage to the heater and fresh air blower. |
| t
| If the cable tie holders are detached from the mounting pins at the heater or fresh air blower, the pins may break off. |
| t
| If the mounting pins are broken off, the heater or fresh air blower must be replaced. |
|
| –
| Swivel the heater -3- into the passenger compartment in the area of the fresh air blower and take out to the right. |
| Install in reverse order, paying attention to the following: |

Note | t
| Check all seals at heater for damage prior to installation and renew damaged seals. |
| t
| Check that the sealing plate at the connections for the coolant hoses is properly positioned and that the corresponding seal is intact. |
| –
| Insert the heater and engage the central tube at the mount on the left and right → Rep. gr.70. |
| –
| Screw the heater to the central tube. |
| –
| Check heater operation as well as the vent direction and distribution of the air flow from the defroster vent to the windscreen. |
| –
| Check that the air flow direction corresponds to the switch position. |
| l
| Due to the gear mechanism at the heater and at the air distributor, one turn of the switch produces two turns of the flexible shaft. |
|
|
|
