audi Workshop Repair Guides

Audi Workshop Service and Repair Manuals

Transporting gearbox > < Removing gearbox
Installing gearbox
Installing gearbox
Installation is carried out in reverse sequence; note the following:
  Note
t  Renew bolts which are tightened by turning through a specified angle.
t  Renew self-locking nuts and bolts, and seals, O-rings and gaskets.
t  Secure all hose connections with the correct hose clips (as original equipment); refer to → Electronic parts catalogue.
t  Re-attach all cable ties at the same locations when re-installing.
t  Clean input shaft splines and (in the case of used clutch plates) the hub splines. Remove corrosion and apply only a very thin coating of grease for clutch plate splines -G 000 100- to the splines. Then move clutch plate backwards and forwards on input shaft until hub moves freely on shaft. It is important to remove excess grease.
   
–  Check that dowel sleeves -A- for centralising engine/gearbox are in the cylinder block; install any missing dowel sleeves.
  Note
If the dowel sleeves are not fitted, this will lead to gear-change problems, clutch malfunction and in some cases gearbox noise (gears will make rattling noises).
  A34-0665
–  Make sure that the intermediate plate is engaged on the sealing flange and fitted on the dowel sleeves -arrows-.
–  Check clutch release bearing for wear and renew if necessary.
–  Lubricate surface which contacts ball-head pin with MoS2 grease.
–  Raise gearbox carefully and move to installation position using gearbox support -3282-.
–  Bring gearbox into position.
–  Install bottom engine/gearbox securing bolts.
–  Detach gearbox support -3282- with adjustment plate -3282/31- from gearbox after bolting gearbox and engine together.
  A10-10090
–  Fit gearbox bracket -A- with new bolts -arrows- → Chapter.
–  Install top engine/gearbox securing bolts.
  Note
Lubricate rubber mounting of assembly mounting (left-side) and upper part of gearbox bracket with assembly oil → Electronic parts catalogue.
–  Raise engine/gearbox assembly via spindle of support bracket -10 - 222 A-.
  N34-1528
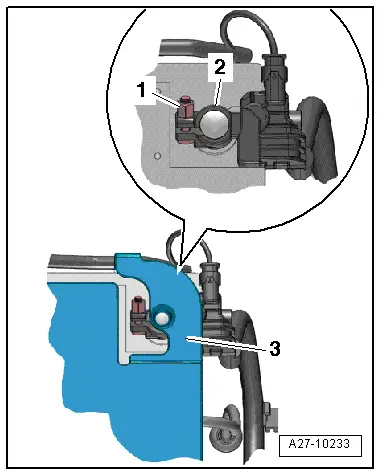
–  Align the engine/gearbox assembly in installation position. To do so, raise engine/gearbox until gearbox bracket makes full contact with gearbox mounting.
  Caution
The threads in the gearbox bracket can be damaged if the bolts are not inserted straight.
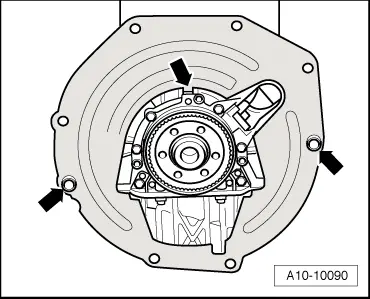
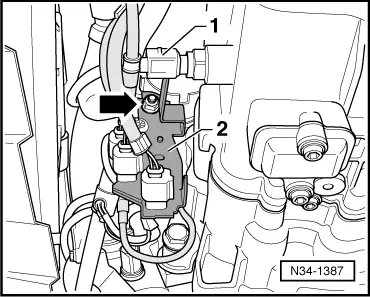
Before fitting the bolts -arrows-, the gearbox bracket and the gearbox mounting must be aligned so they are parallel. If necessary, press gearbox up with engine and gearbox jack.
–  Check adjustment of assembly mountings; adjust if necessary → Engine, mechanics; Rep. gr.10.
–  Bolt gearbox bracket to gearbox mounting → Chapter.
  WARNING
Do not remove support bracket -10 - 222 A- until all bolts securing the left-hand engine/gearbox mounting have been tightened to the specified torque.
–  Install pendulum support → Chapter.
–  Secure drive shafts to gearbox flange shafts → Running gear; Rep. gr.40.
–  Install exhaust system so it is free of stress → Engine, mechanics; Rep. gr.26.
–  Install starter → Electrical system; Rep. gr.27.
  A10-11341
–  Gearbox for vehicles with start/stop system: plug connector -arrow- into gearbox neutral position sender -G701-.
  N34-11273
–  Install retainer -2- on starter -arrow-.
–  Plug connector -1- onto reversing light switch -F4-.
–  Install clutch slave cylinder → Chapter.
–  Fit selector cables to gearbox → Chapter.
–  Adjust selector mechanism → Chapter.
–  Install radiator cowl → Engine, mechanics; Rep. gr.19.
–  Check oil level in gearbox and top up with gear oil if necessary → Chapter.
–  Install wheel housing liner (front left) and noise insulation → General body repairs, exterior; Rep. gr.66.
–  Fit front left wheel → Running gear; Rep. gr.44.
–  Install air cleaner housing → Injection and ignition system; Rep. gr.24.
  N34-1387
–  Connect earth wire -2- to battery terminal → Electrical system; Rep. gr.27.
  A27-10233
Tightening torques
Gearbox to engine
  A34-0665
ItemBoltNm
1, 2M12 x 5080
3 1)M12 x 12580
4 1)M12 x 13580
5M12 x 6080
6, 7M10 × 5040
8 2)M12 x 6080
ADowel sleeves for centralising
l  1) Also secures starter.
l  2) Installed from engine side.


Transporting gearbox > < Removing gearbox