audi Workshop Repair Guides

Audi Workshop Service and Repair Manuals

Renewing crankshaft oil seal > < Removing and installing poly V-belt tensioner (top)
Removing and installing poly V-belt pulley for crankshaft
   
Removing and installing poly V-belt pulley for crankshaft
Special tools and workshop equipment required
t  Spark plug socket and extension -3122 B-
t  Counterhold tool -3415- with pins -3415/1-
t  Dial gauge -VAS 6079-
t  Puller -T10094 A-
t  Adapter for dial gauge -T10170-
t  Locking pin -T10340-

Removing
  Note
t  Use locking pin -3415- in addition to counterhold tool -T10340- to prevent slipping and to make sure the tightening torque for the crankshaft pulley bolt is maintained.
t  The locking pin -T10340- locks the crankshaft only in the direction of engine rotation.
  Caution
Risk of damage to engine.
Locking pin -T10340- must be screwed in with crankshaft at „TDC“ position.
–  Remove poly V-belt → Chapter.
   
–  Pull off engine cover panel (front) -arrows- and remove towards front.
  A10-11413
–  Remove bolts -1 and 3-.
–  Release hose clip -2-, detach air pipe (top right) and remove air hose.
  A21-10567
–  Unplug electrical connector -2-.
–  Detach vacuum hoses -1-.
  A21-10570
–  Unplug electrical connector -4-.
–  Remove bolts -1 and 3-.
–  Press release tabs and disconnect crankcase breather hoses -arrows-.
–  Release hose clip -2- and disconnect hose at activated charcoal filter.
–  Detach hoses.
  A10-11415
–  Apply puller -T10094 A- to ignition coil for cylinder 1, pull out ignition coil and at the same time unplug electrical connector at ignition coil for cylinder 1.
–  Remove spark plug for cylinder 1 with spark plug socket and extension -3122 B-.
  A15-10530
–  Screw adapter for dial gauge -T10170- into spark plug hole as far as the stop.
–  Insert dial gauge -VAS 6079- with extension -T10170/1- as far as the stop and secure using locking nut -arrow-.
–  Rotate crankshaft in normal direction of rotation to „TDC“.
l  „TDC“ = maximum measured value on dial gauge.
  N15-0653
–  Unscrew plug -arrow- for „TDC“ hole on cylinder block.
  A13-10875
–  Screw locking pin -T10340- into cylinder block as far as stop and tighten to 30 Nm.
  Note
The locking pin -T10340- locks the crankshaft only in the direction of engine rotation.
–  Remove front wheel housing liner (right-side) → Rep. gr.66.
  A13-10896
  Caution
Risk of damage to engine.
To prevent the crankshaft chain sprocket from slipping off the drive lug, do not rotate the crankshaft after the poly V-belt pulley has been detached.
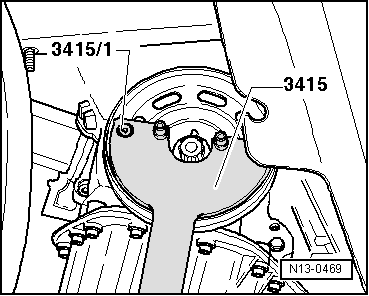
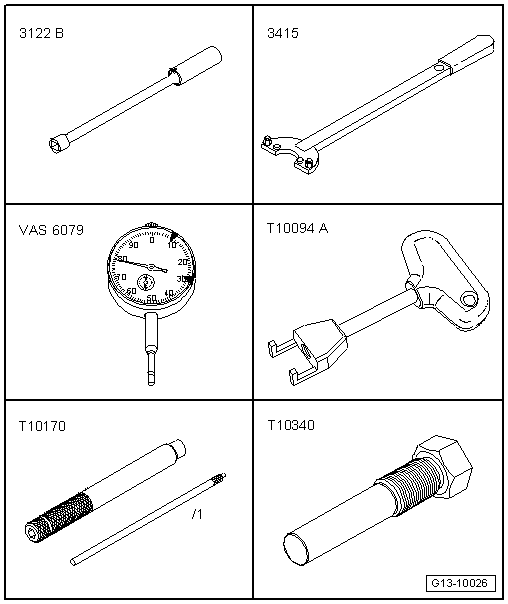
–  Loosen bolt for poly V-belt pulley using counterhold tool -3415- with pin -3415/1-.
–  Remove bolt and take off poly V-belt pulley.
Installing
l  Tightening torques → Chapter „Poly V-belt drive - exploded view“
  Note
t  Renew the bolts tightened with specified tightening angle.
t  All contact surfaces between bolt, poly V-belt pulley, bearing bush and chain sprocket must be free of oil and grease.
–  Fit poly V-belt pulley, lubricate threads of bolt for poly V-belt pulley with oil and screw in by hand until bolt makes contact.
  Caution
Risk of damage to engine.
t  
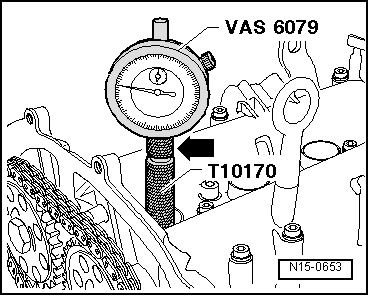
Use dial gauge to check „TDC“ position of crankshaft. Crankshaft must only be brought into contact with locking pin -T10340- from „TDC“ position.
t  Also use counterhold tool -3415- and pin -3415/1- to counterhold poly V-belt pulley when tightening bolt.
  N13-0469
–  Turn crankshaft in direction of engine rotation until it makes contact with locking pin -T10340-.
–  Tighten bolt for poly V-belt pulley (counterhold with counterhold tool -3415- and pin -3415/1-).
  N13-0469
–  Remove locking pin -T10340-.
Remaining installation steps are carried out in reverse sequence; note the following:
  Note
Secure all hose connections with the correct type of hose clips (same as original equipment) → Electronic parts catalogue.
–  Install spark plug → Booklet819.
–  Tighten plug for „TDC“ drilling → Fig..
–  Install air pipe (top right) → Chapter.
–  Install air hoses with screw-type clips → Fig..
–  Install poly V-belt → Chapter.
  A13-10896

Renewing crankshaft oil seal > < Removing and installing poly V-belt tensioner (top)